Replacing the Transmission and Clutch
October 2012: What time is it when your washing machine sounds like this?
Time to replace the transmission! It's not a hard repair and I'll show you how to do it.
If you came to this page directly, you might want to first check out my basic washing machine repair page. It has many of the much more common washer repairs. However, if you were already there and you're sure that you need to replace your transmission and clutch, then keep reading here. You might want to print these instructions out if you decide to do the repair.
The washer shown in these videos and photos is a top
loading Sears Kenmore 90-series direct drive washing machine model number
110.26912691
that I purchased new from Sears in 1998. I am the original
owner. These instructions can be used to repair similar direct drive washing
machines made by Whirlpool, KitchenAid, Roper, Estate by Whirlpool, Kirkland
Signature (Costco), Inglis (Canadian), Kenmore (Sears) and others.
For the past couple of months my washer was making a grinding noise during the spin cycle. Interestingly, the agitate cycle worked perfectly. The spin was working fine, it just sounded bad, but I knew it was just a matter of time until it died. The inevitable finally happened this past week with a series of loud bangs and then it would not spin at all. Based on its symptoms, I had already determined that the transmission, also known as the gearcase or gear box, was the most likely culprit. The part number for the complete gearcase is 3360630.
Unfortunately the gearbox (transmission) is an expensive part, about $180 new. Consider that you also have to replace the clutch (part number 3946794 -- $40) at the same time, and since you have the whole thing taken apart, it would be silly to not replace the motor coupling too ($5). These prices are the lowest online prices at this time (10/2012). If you had to call a repair person, it is likely you would pay more than that for those parts, plus at least $100 for labor, making the entire job a $350-$400 expense. Ouch! Who can afford that? For a 14 year old washer like mine, it wouldn't make sense to spend that kind of money to repair it; it would be more cost effective (although even more expensive) to just get a new washer. But I do not want to spend at least $800 on a new washer, I prefer to fix my old reliable washer. I estimate it has done over 10,000 loads of laundry since we bought it. I figure it can do another 10,000 if I take good care of it.
I also decided that it didn't make sense to put a new transmission into an old washer, so I looked for a rebuilt transmission. I found one online from a parts place with a 90-day warranty for $120 including a new clutch and motor coupling. Perfect. I ordered the part and installed it. I did the job myself and it took me about two hours. I probably could have done it in half the time if I didn't have a camera in one hand and a pen and paper in the other, ha ha, but then I wouldn't have these great instructions and photos to share with you.
I will warn you that there were some "gotchas" i.e. differences from other instructions I found online, especially those from several online repair clinic and parts direct type places which I won't name. There are subtle differences in the 90-series and I was glad that I had the proper tools is my toolbox or I would have had to make a mad dash out to Sears or my local hardware store. I'll point the differences out at appropriate points in my instructions.
Tools I needed: flat blade and Phillips head screwdrivers,
socket set with 1/2" drive and long extension, 9/16" DEEP socket, 1/2" socket,
1/4" socket.
Click on
any of the images below for a larger view.
| I got a shipping confirmation from FedEx so I was expecting the transmission to be waiting for me when I got home from work. I was not expecting it to be so poorly packed. To say I was horrified was an understatement. The box had a hole in the side where part of the transmission casing had broken through, and an 18" steel shaft was sticking out the top! How could FedEx have accepted it packed like this? If I wasn't so upset I would have laughed. |
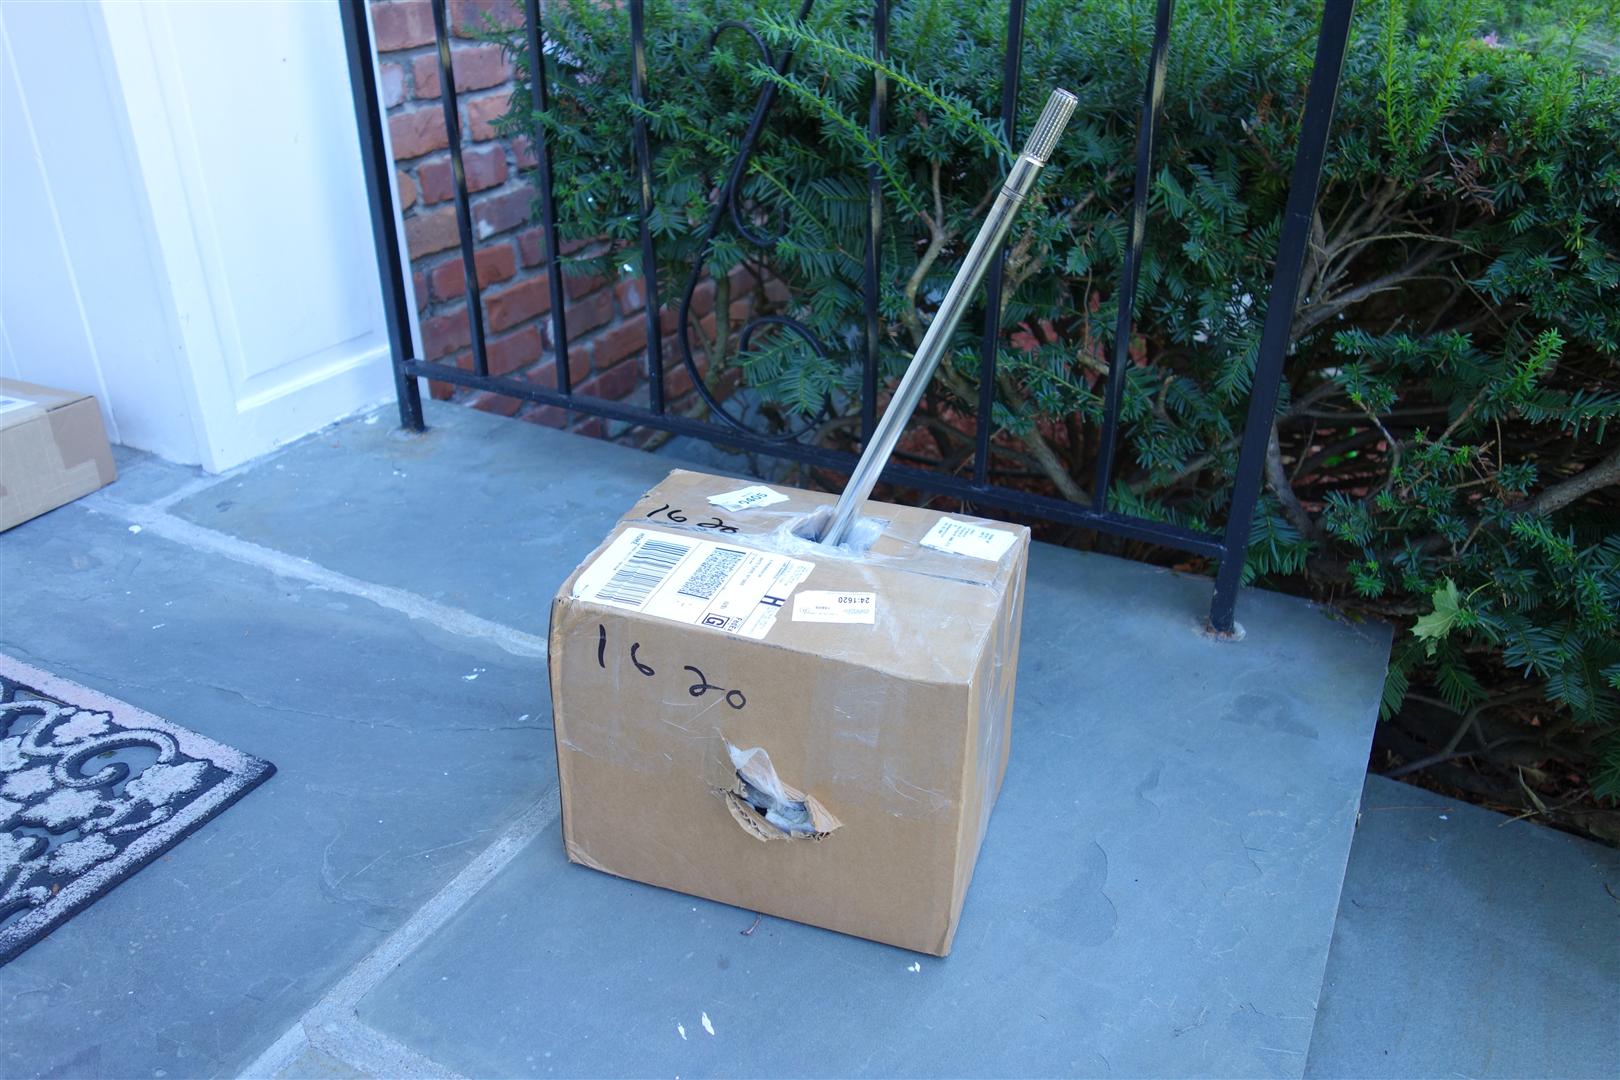 |
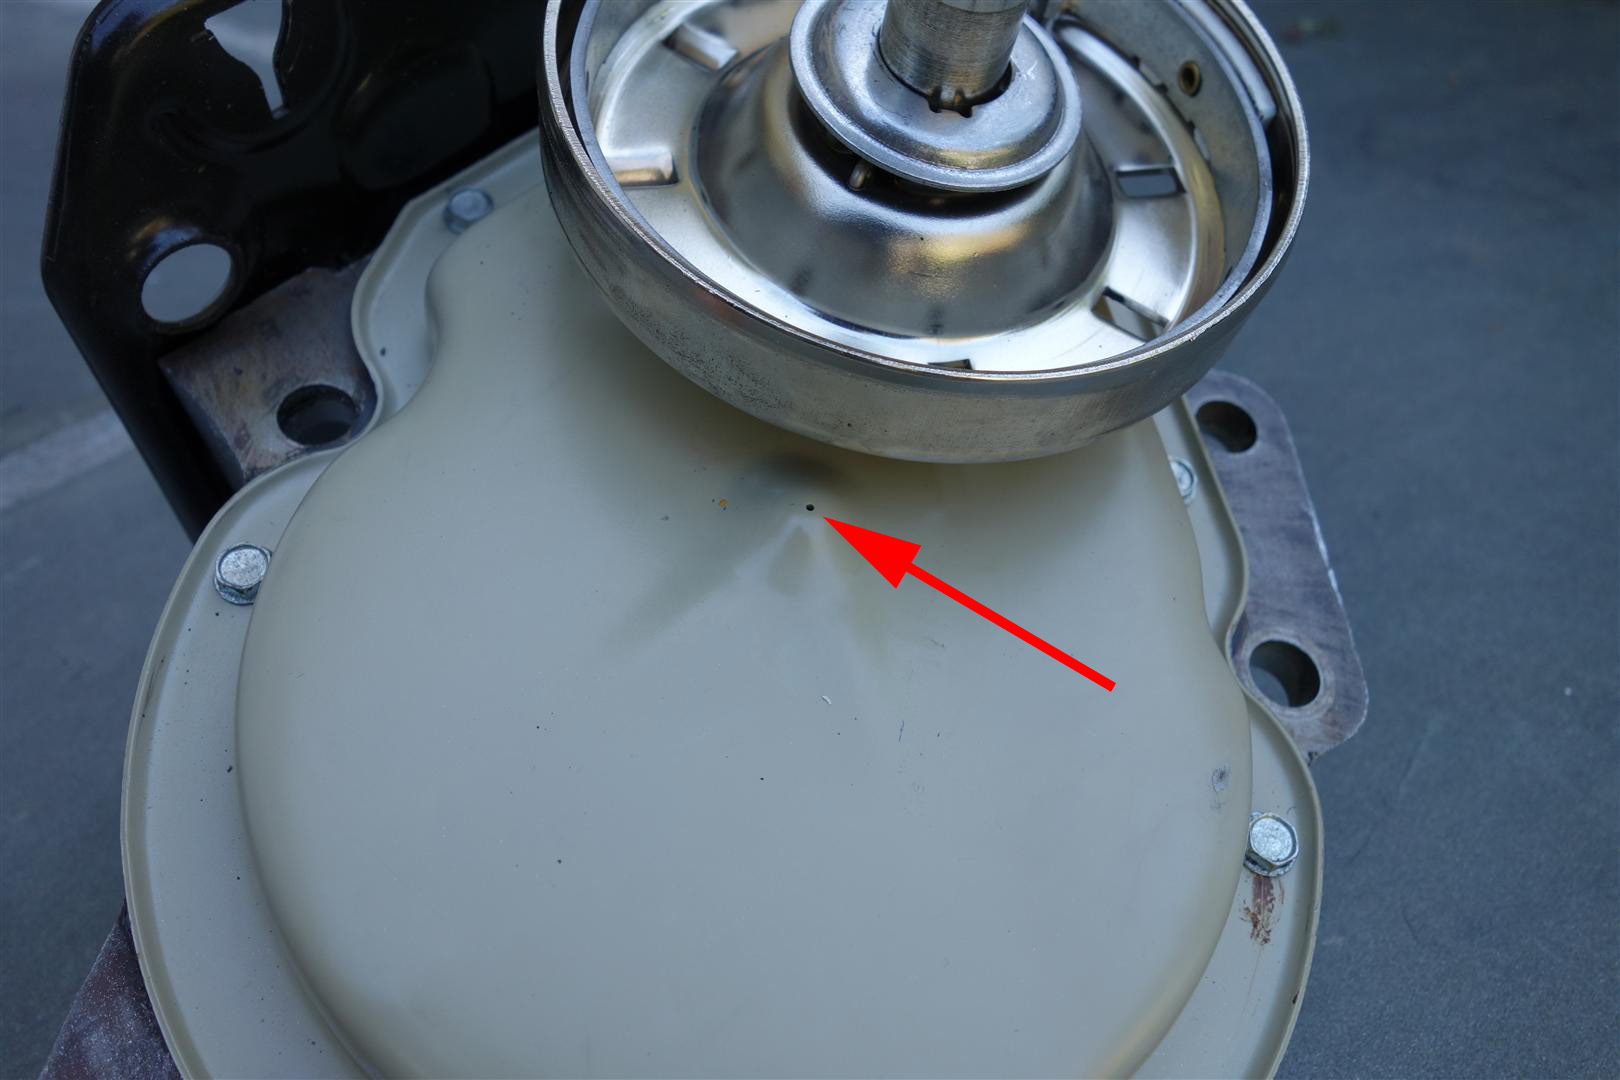
| I took it out of the box.
The "packing" inside was nothing but a few random pieces of broken Styrofoam
that looked like they were scavenged from a dumpster. No wonder the casing
broke through the side of the box. This thing is heavy! It needs to be
securely packed, not just thrown haphazardly in a box.
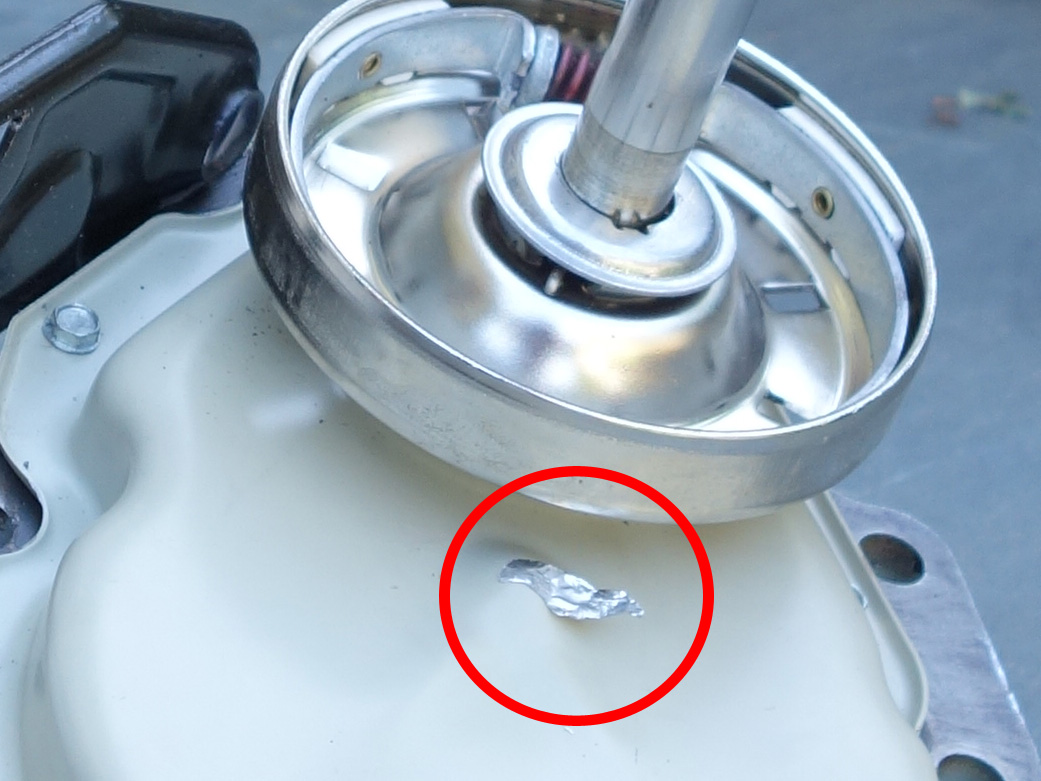
I inspected the transmission and it seemed to be OK despite the poor packing. I order a lot of stuff online, and this is maybe the worst job of packing I've ever seen. I called the seller and he gave me a song and dance about how hard it is to find good people to work in his shipping department. He did offer to extend the 90-day warranty to six months. It was the least he could do. Important: click the photo to see a piece of foil tape circled. It is covering a tiny hole and is what is keeping the transmission oil from leaking out. At least they got that right. Do not remove that tape until I tell you to! |
 |
|
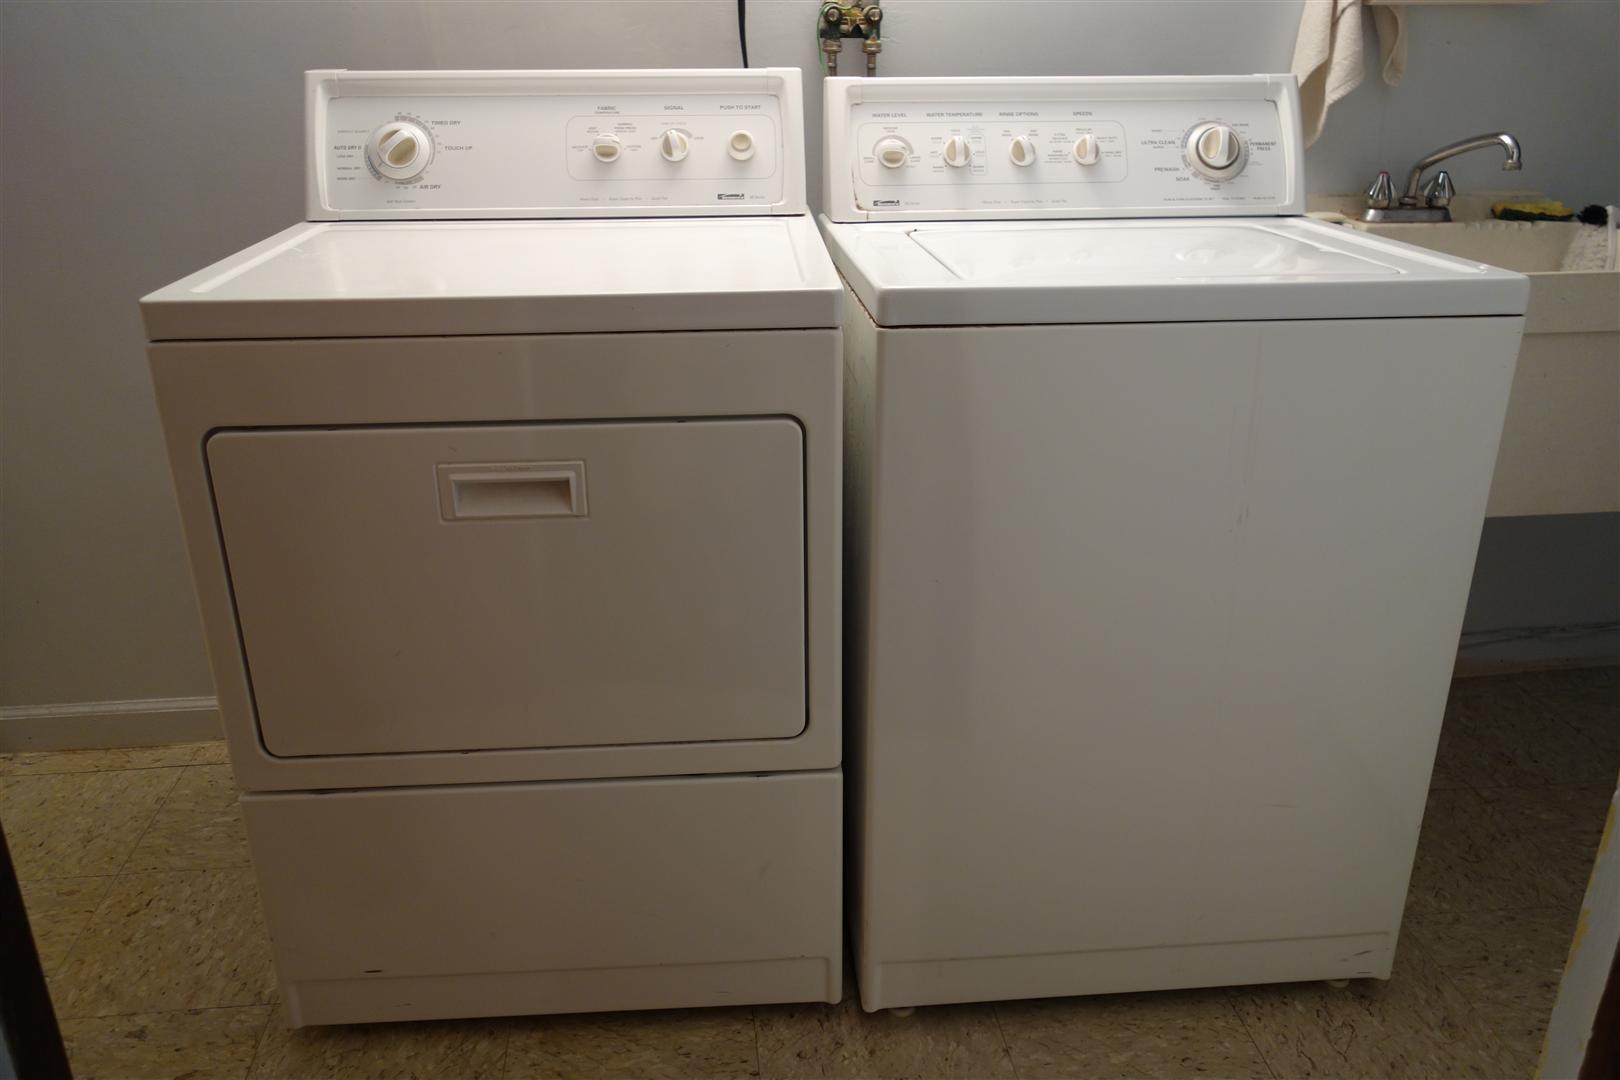
Obligatory shot of my laundry room. It is just off the main part of a finished basement, and the laundry room is finished too. My Kenmore 90-series dryer is on the left and the Kenmore 90-series washer that I am about to repair is on the right. There is a slop sink hard against the right side of the washer. There is very little room to work in here. I have to slide the dryer as far to the left as I can (which isn't very far because it's connected to a gas line), and then pull the washer out past the sink and rotate it clockwise 90 degrees so that I have enough room to lie it down on its back to do the repair. |
 |
|
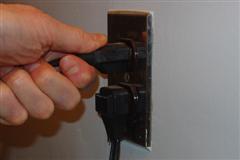
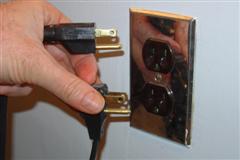
WARNING: Electricity can kill you! Before you do anything else, unplug the machine! |
|
 |
 |
|
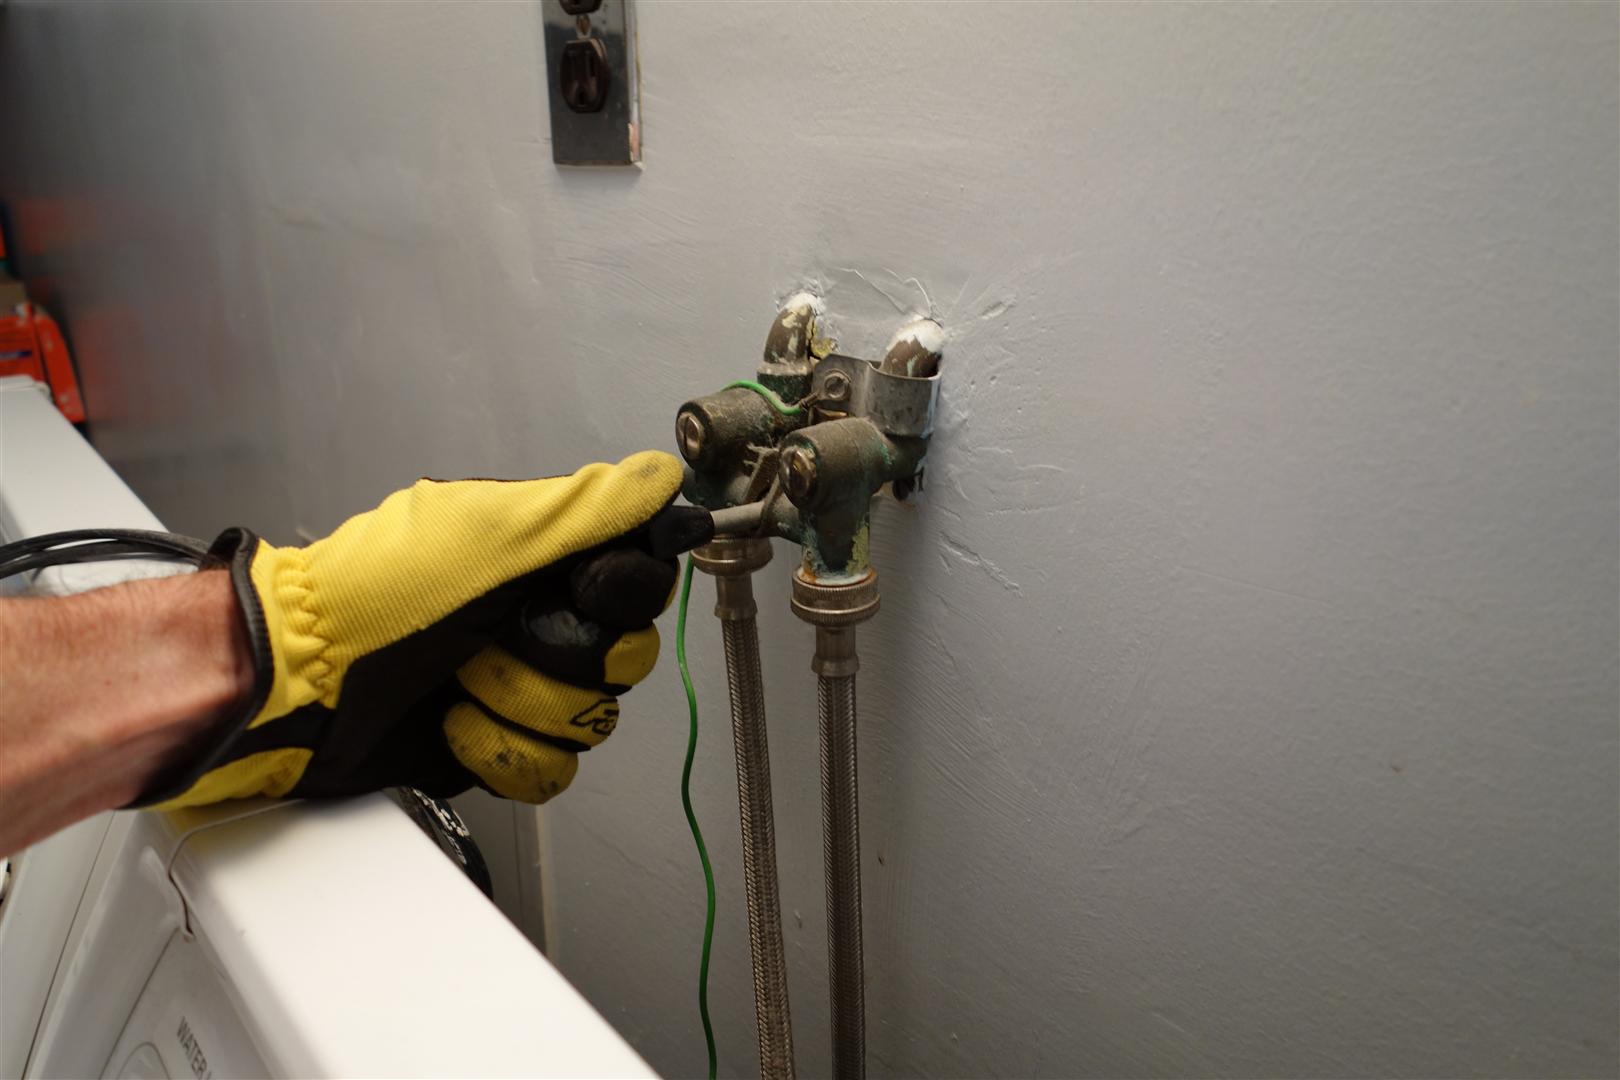
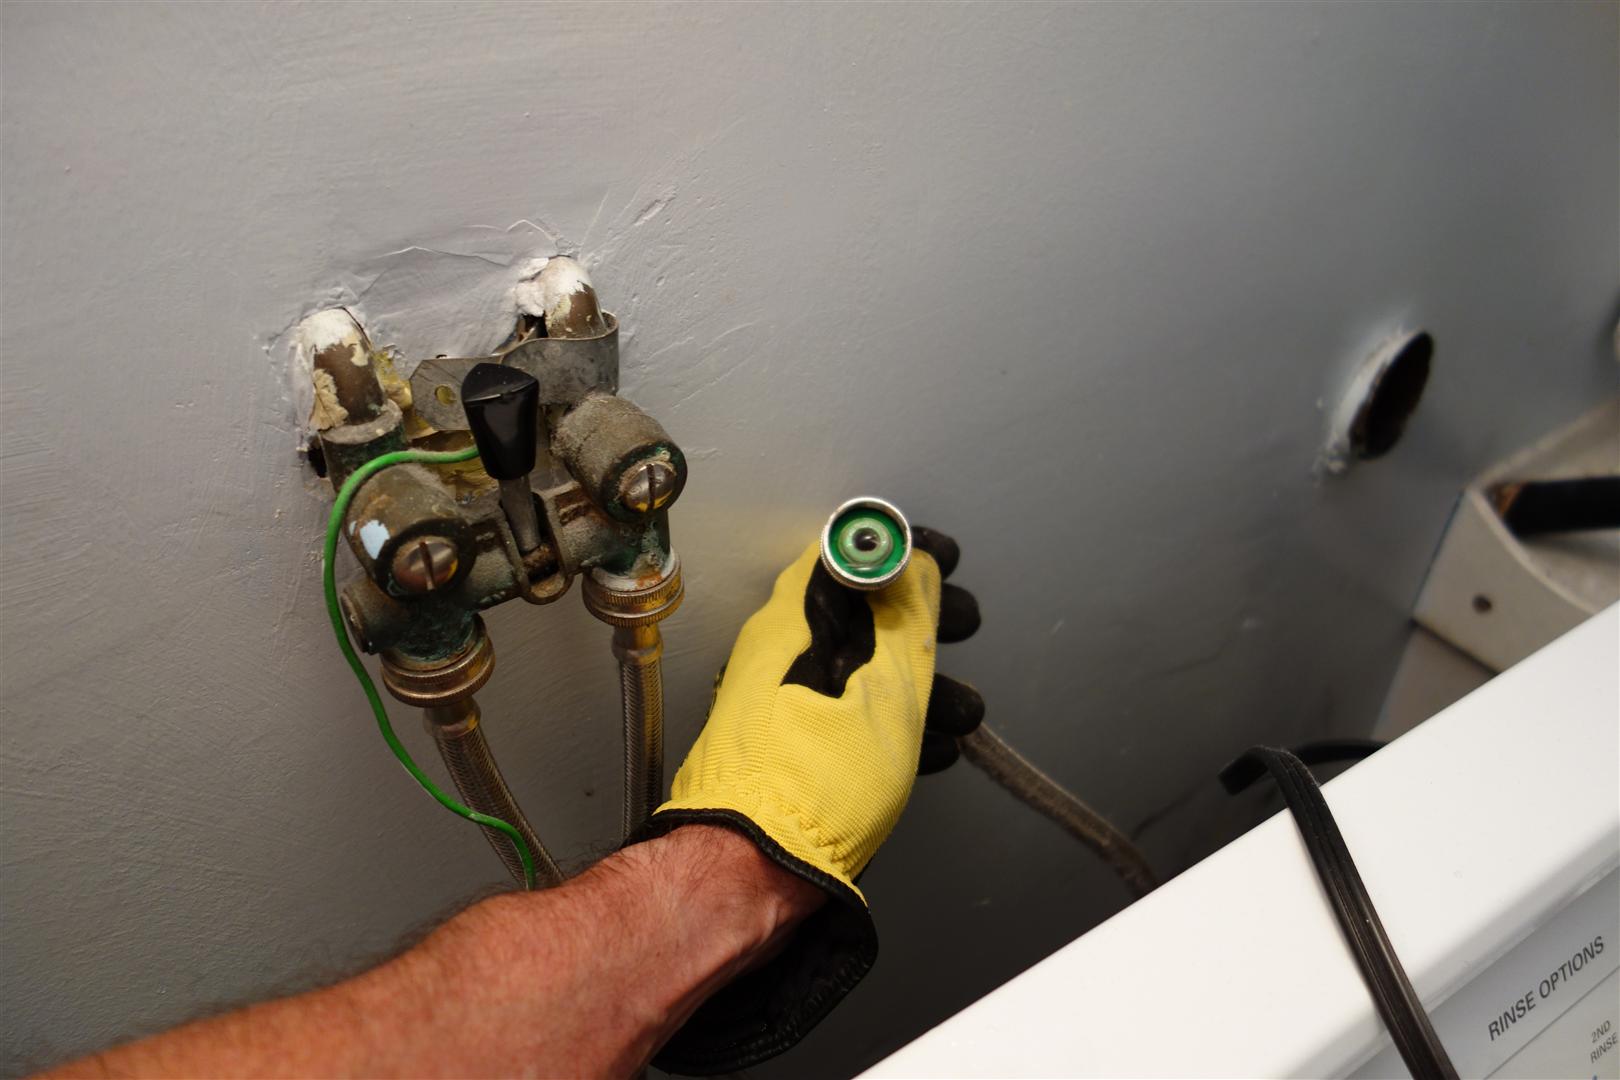
Turn off the water. Your water supply valves will probably not look exactly like mine, but I'll leave that to you to figure out, because the next step is to disconnect the water lines from the washer, and if the water is still on it's going to look like Old Faithful in your laundry room. Tip: Before you disconnect the hoses, keep track of which one goes where. In my case, the right side hose goes to the top inlet valve on the washer. It just takes the guesswork out when you reattach them. |
 |
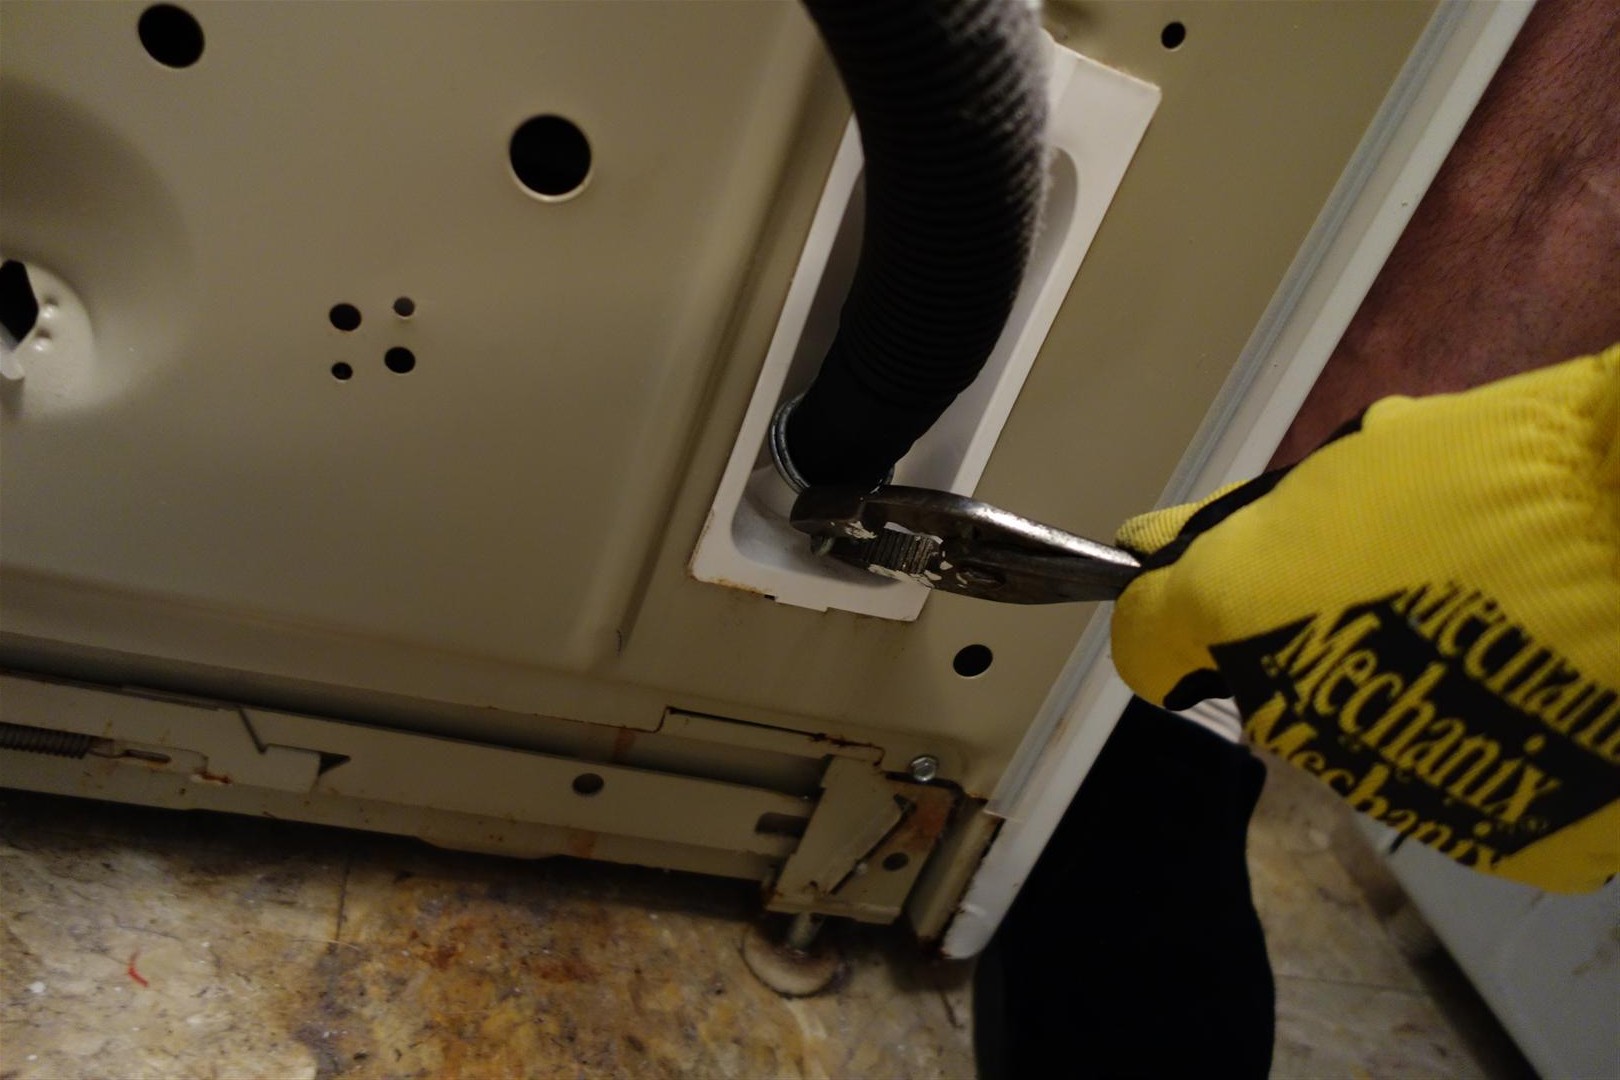
| Disconnect the two water lines
from the water inlet valve on the back of the washer. Please excuse the
bizarre perspective. This is looking down the back of the washer and I've
got a pair of pliers one hand and a camera in the other. I'm doing this all
by myself, taking pictures while doing the repair!
Important: For later, when you reattach the water lines. The water inlet valve male end (the light blue threaded part in this photo) is plastic. BE CAREFUL THAT YOU DO NOT CROSS THREAD OR OTHERWISE DAMAGE THE PLASTIC THREADS, AND DO NOT OVER TIGHTEN THE HOSES. Make them just tight enough so they do not leak. |
 |
| This wasn't on other
instructions or videos I saw online, but it's pretty obvious what needs to
be done. The green wire is a ground wire which is connected to the back of
the washer and attached to the water
pipe. Disconnect the ground wire from the washer. You don't need to disconnect the other
end, which you can see along with one of my disconnected water hoses if you
click the picture.
You may not have a ground wire. If you don't have one, you can add one or not, but don't worry about it now. |
 |
|
The drain hose from my washer magically disappears into a hole in my wall. OK, it's not magic. I've peeked behind the curtain and there is a big pipe which goes right down into my main drain line which the washer drains into. Since the next step is to pull the washer away from the wall, we need to remove the drain hose from whatever it is attached to, the hole in the wall in my case. Important: the drain hose is filled with water, which will spill all over your floor if you're not careful. Plan accordingly. Have a bucket, mop, and some old towels handy. Drain the hose into the bucket. |
 |
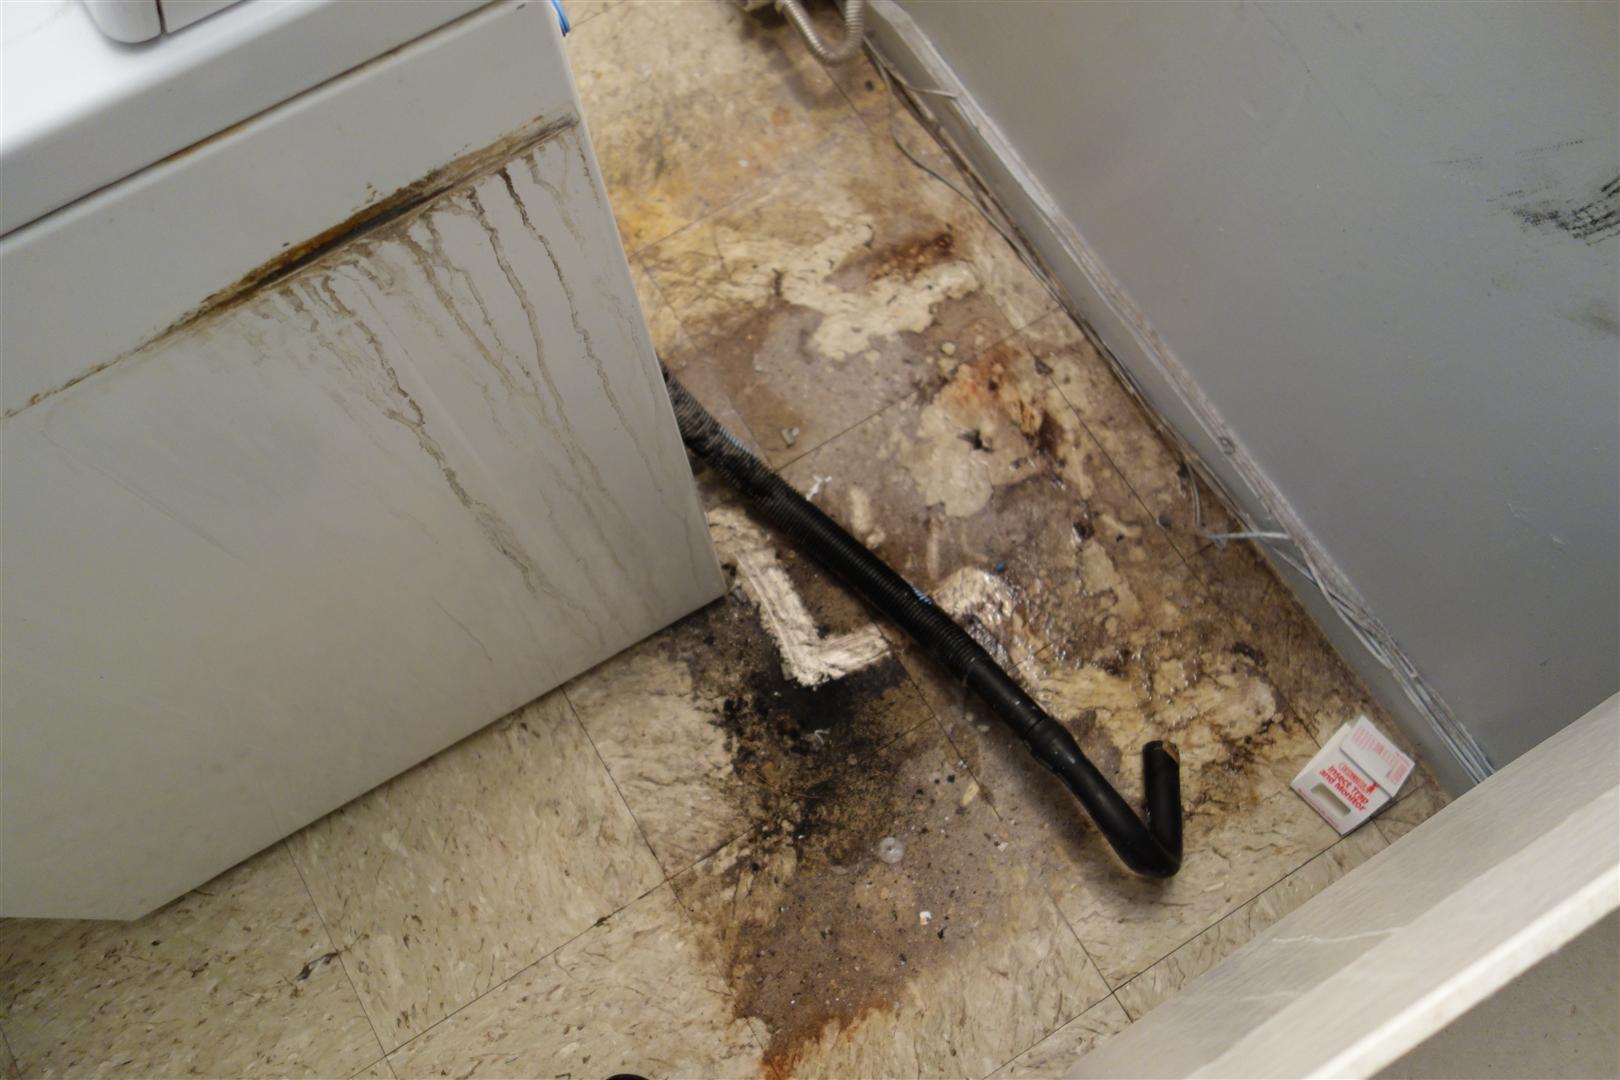
| Yikes! I pulled my washer away from the
wall and was horrified for the second time today.
Well now you know that this is a real laundry room and not a photo studio. Excuse me for a moment while I clean up that mess! OK it's all cleaned up. Well, at least as clean as it is going to get! Back to the repair... |
 |
Next step is to disconnect the drain hose from the washer. There is a hose clamp that you need to squeeze with a pair of pliers to remove. Squeezing the ends of the hose clamp together actually loosens the clamp, then slide off the clamp so that you can remove the hose. If you've never seen one of these before, it's more difficult to explain but obvious what to do when you see it. Important: the drain hose undoubtedly still has some water left in it. Have a bucket handy and (unlike me) put a towel down to catch what the bucket doesn't. Or you can just let water spill all over your floor and mop it up later (like me). I don't recommend this. |
 |
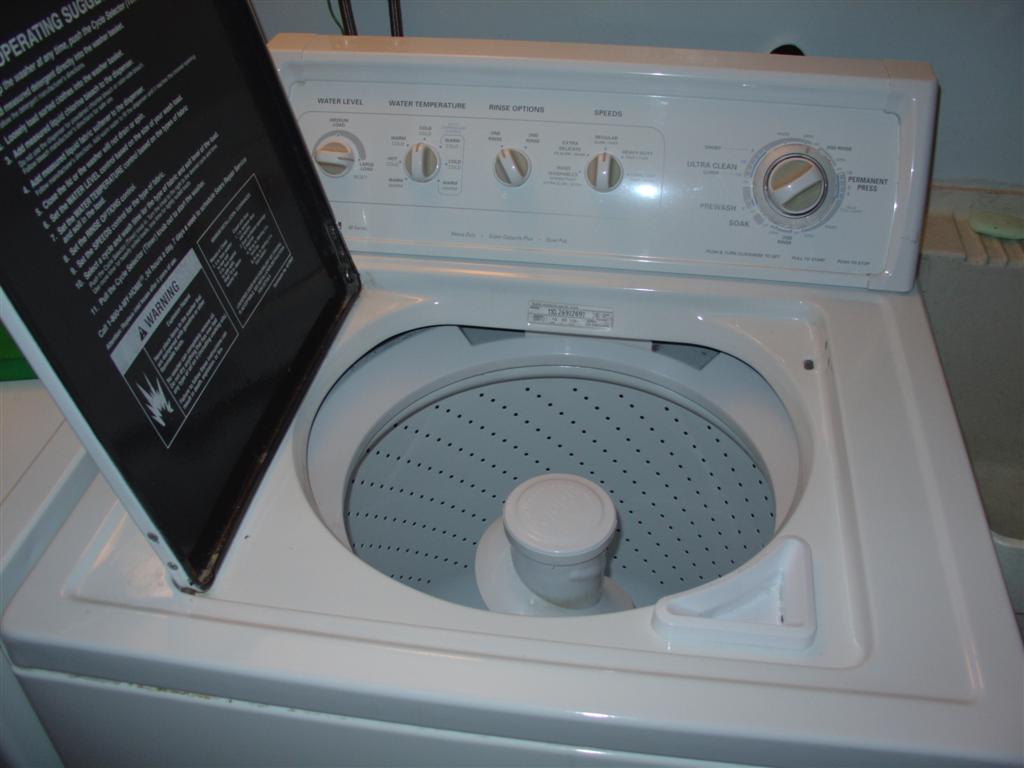
| Finally, we are ready to get to the
interesting part of the repair. We need to remove the agitator so that
eventually we can remove the transmission. If there is a dispenser for fabric softener, remove it. We don't have one. Pry off the agitator cap with a flat blade screwdriver. If you look closely, there should be a little slot that the blade fits into so that you don't have to mangle the cap. We are about to hit our first GOTCHA! |
 |
|
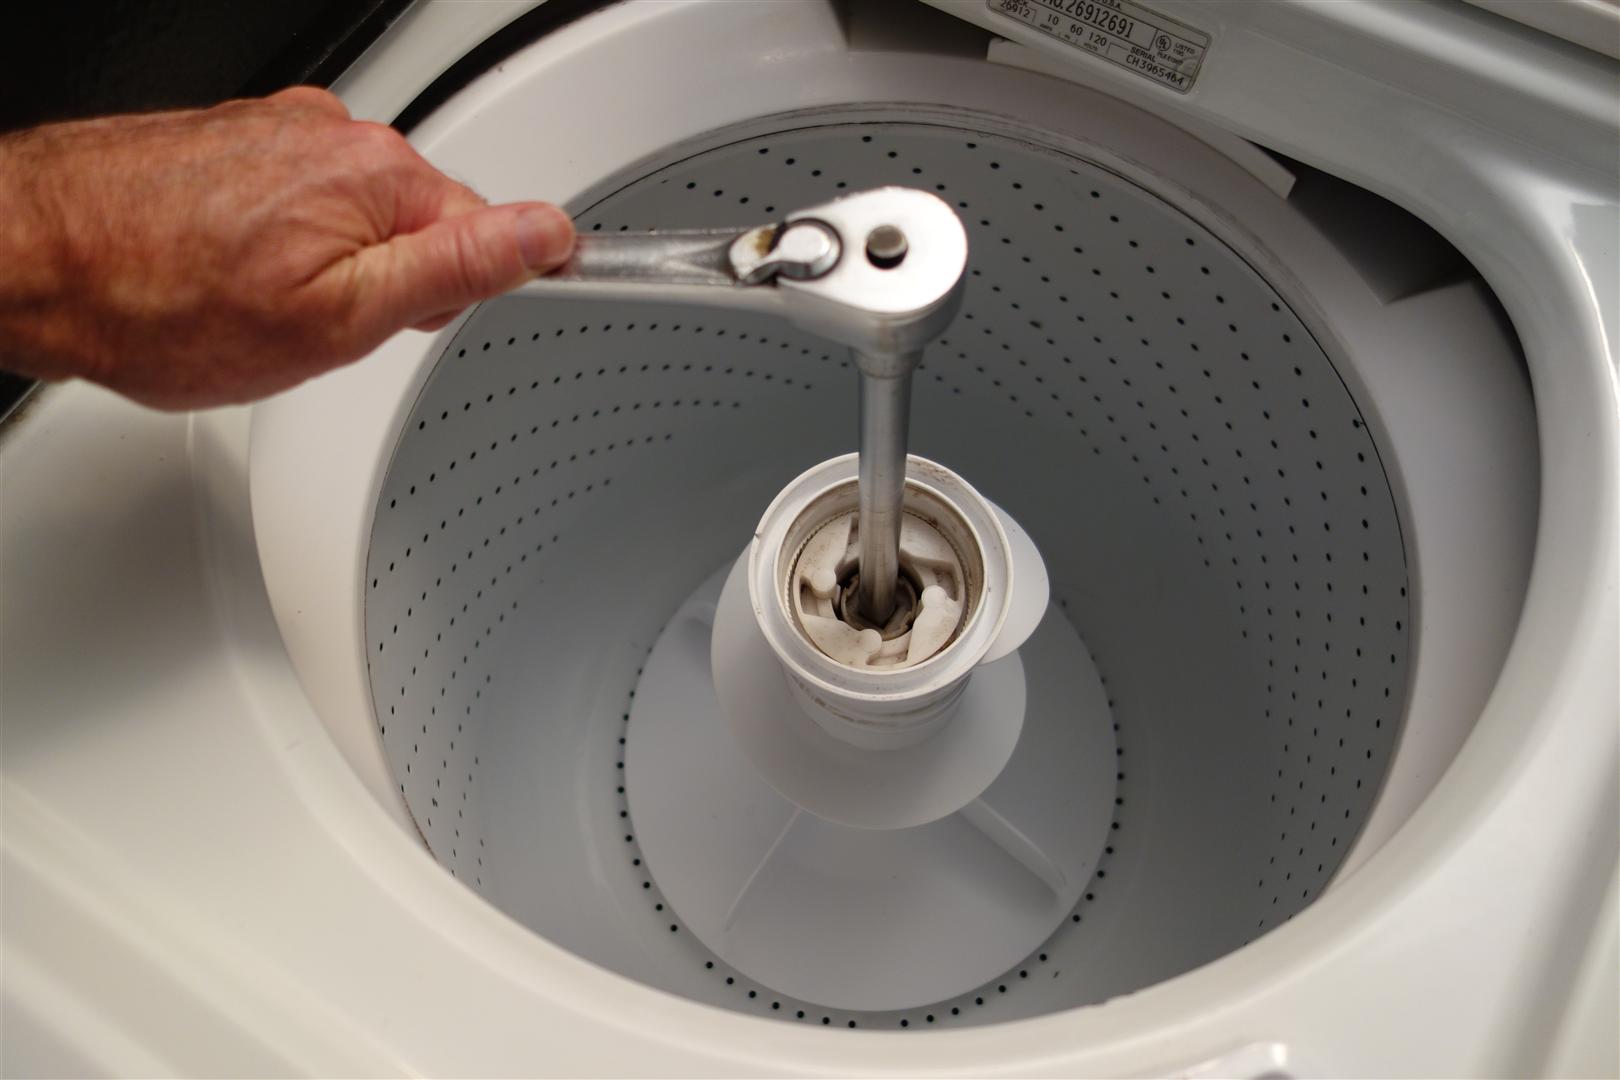
GOTCHA: Every video I saw said to use a 7/16" socket to remove a nut or bolt, but there is no nut or bolt to remove! The plastic agitator cam which holds the agitator clutch dogs is held in by a plastic retainer and spring. When you look down, all you see is a square hole. Click here to see the detail. You need a 1/2" socket extension to remove this part. It fits perfectly. This may be specific to the 90-series. Aren't you glad you found my instructions? |
 |
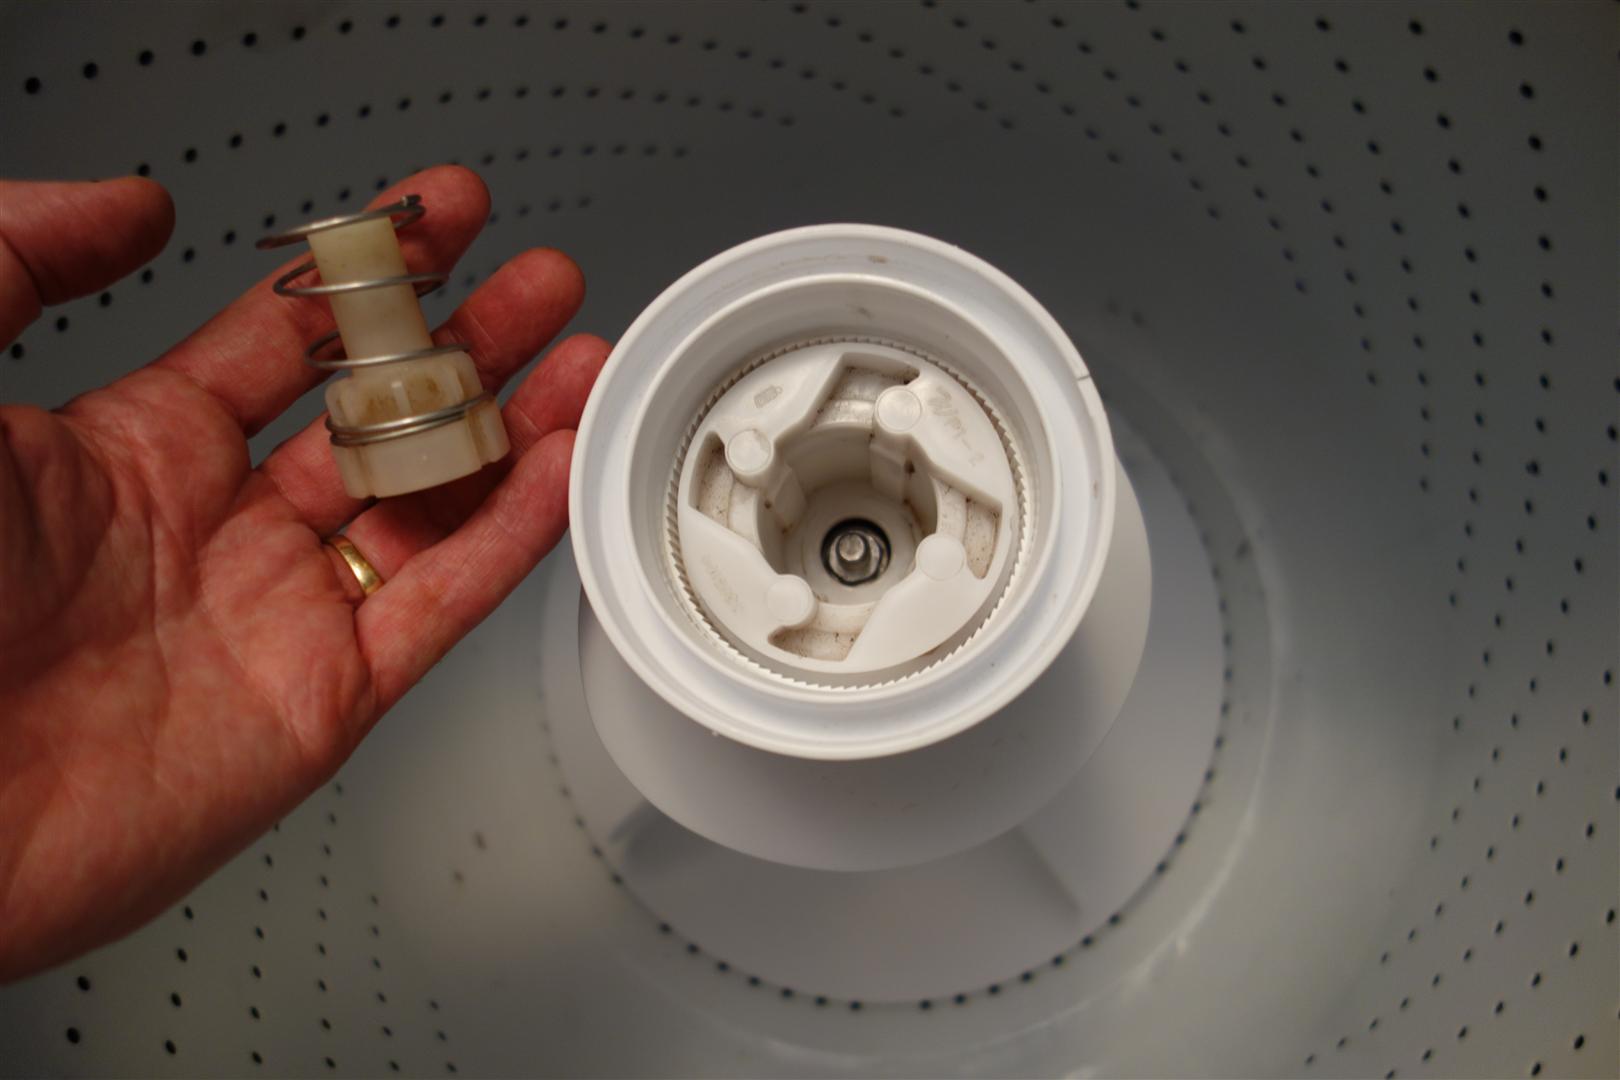
| Remove the retainer. If it sticks, or if you don't have skinny fingers, use a pair of thin pliers to grab it and pull it straight out. Be careful not to lose the spring. |
 |
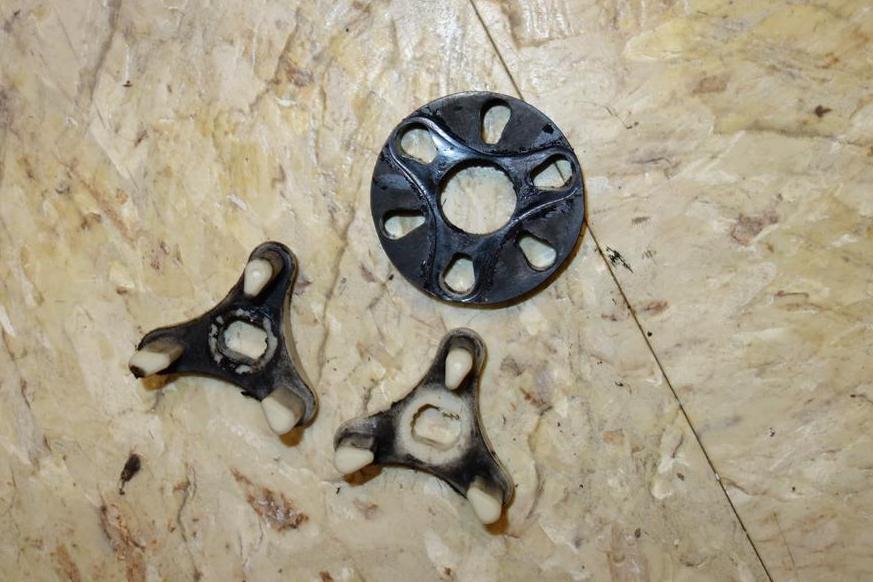
| Here is the entire cam assembly. You can
see three of the four "agitator dogs" around the outside of the ring near my
fingers. This part was filthy with some unknown crud when I pulled it out. We cleaned it up nicely, which you can see if you click the picture. The agitator dogs are in good shape and I saw no need to replace them, but now I know it would be a very easy job if I ever need to. |
 |
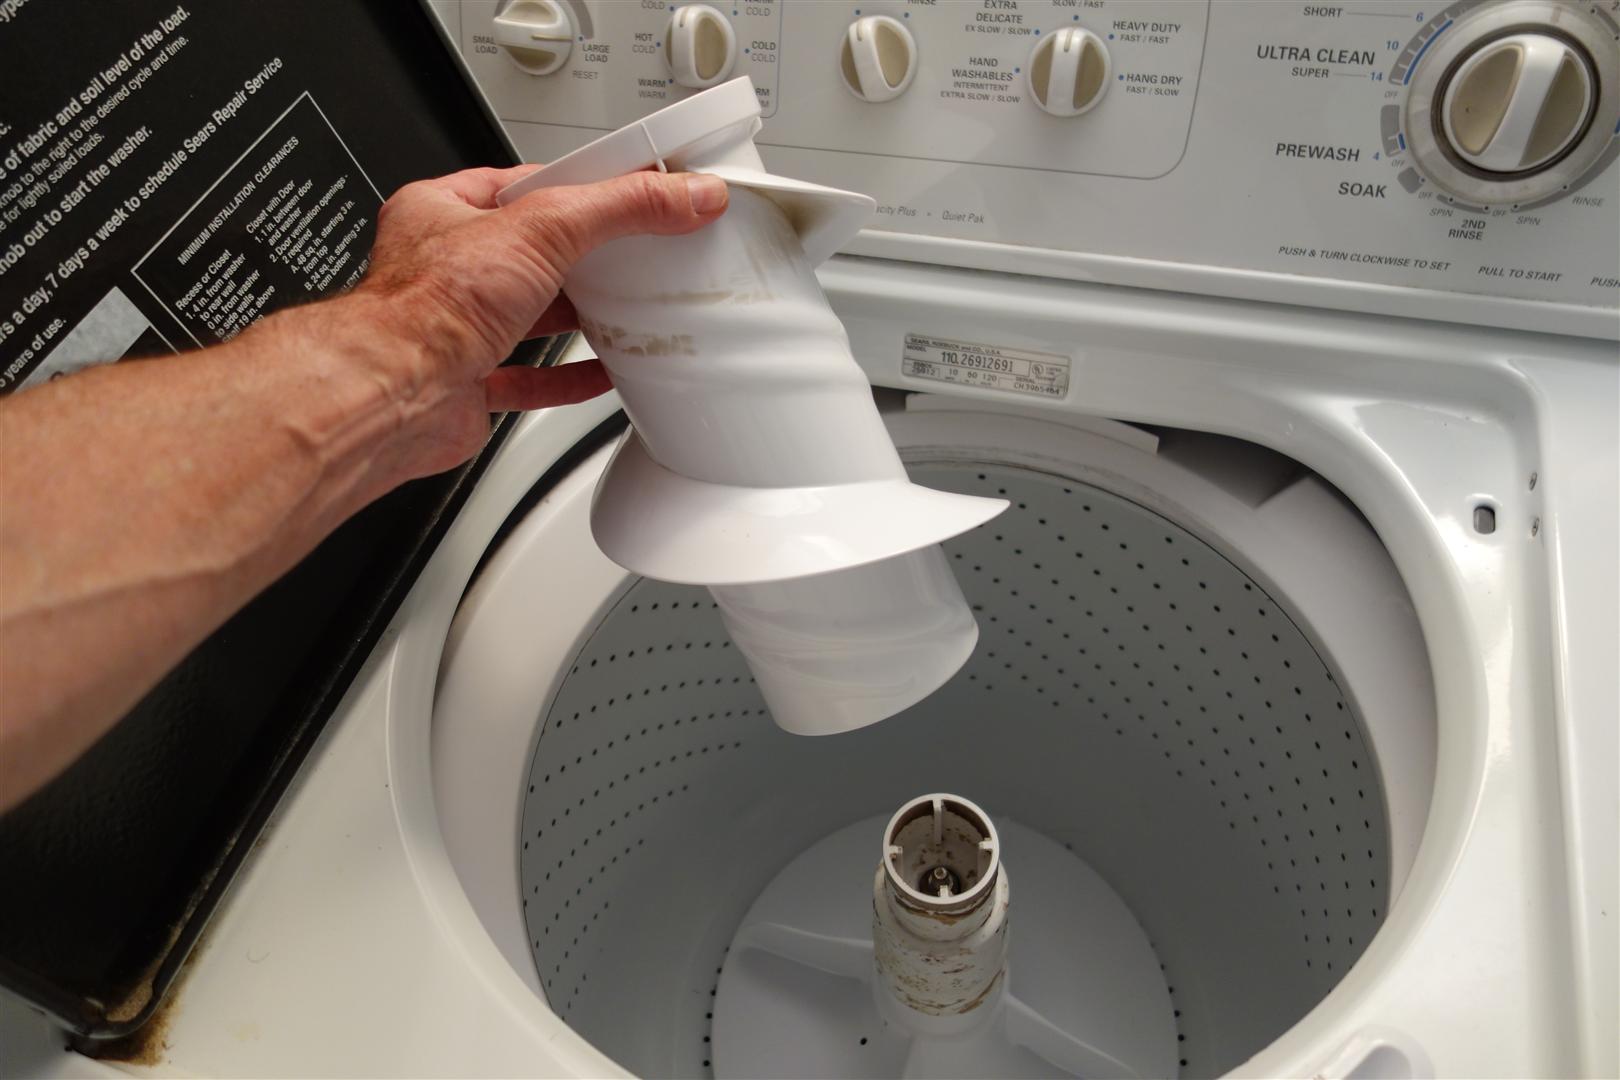
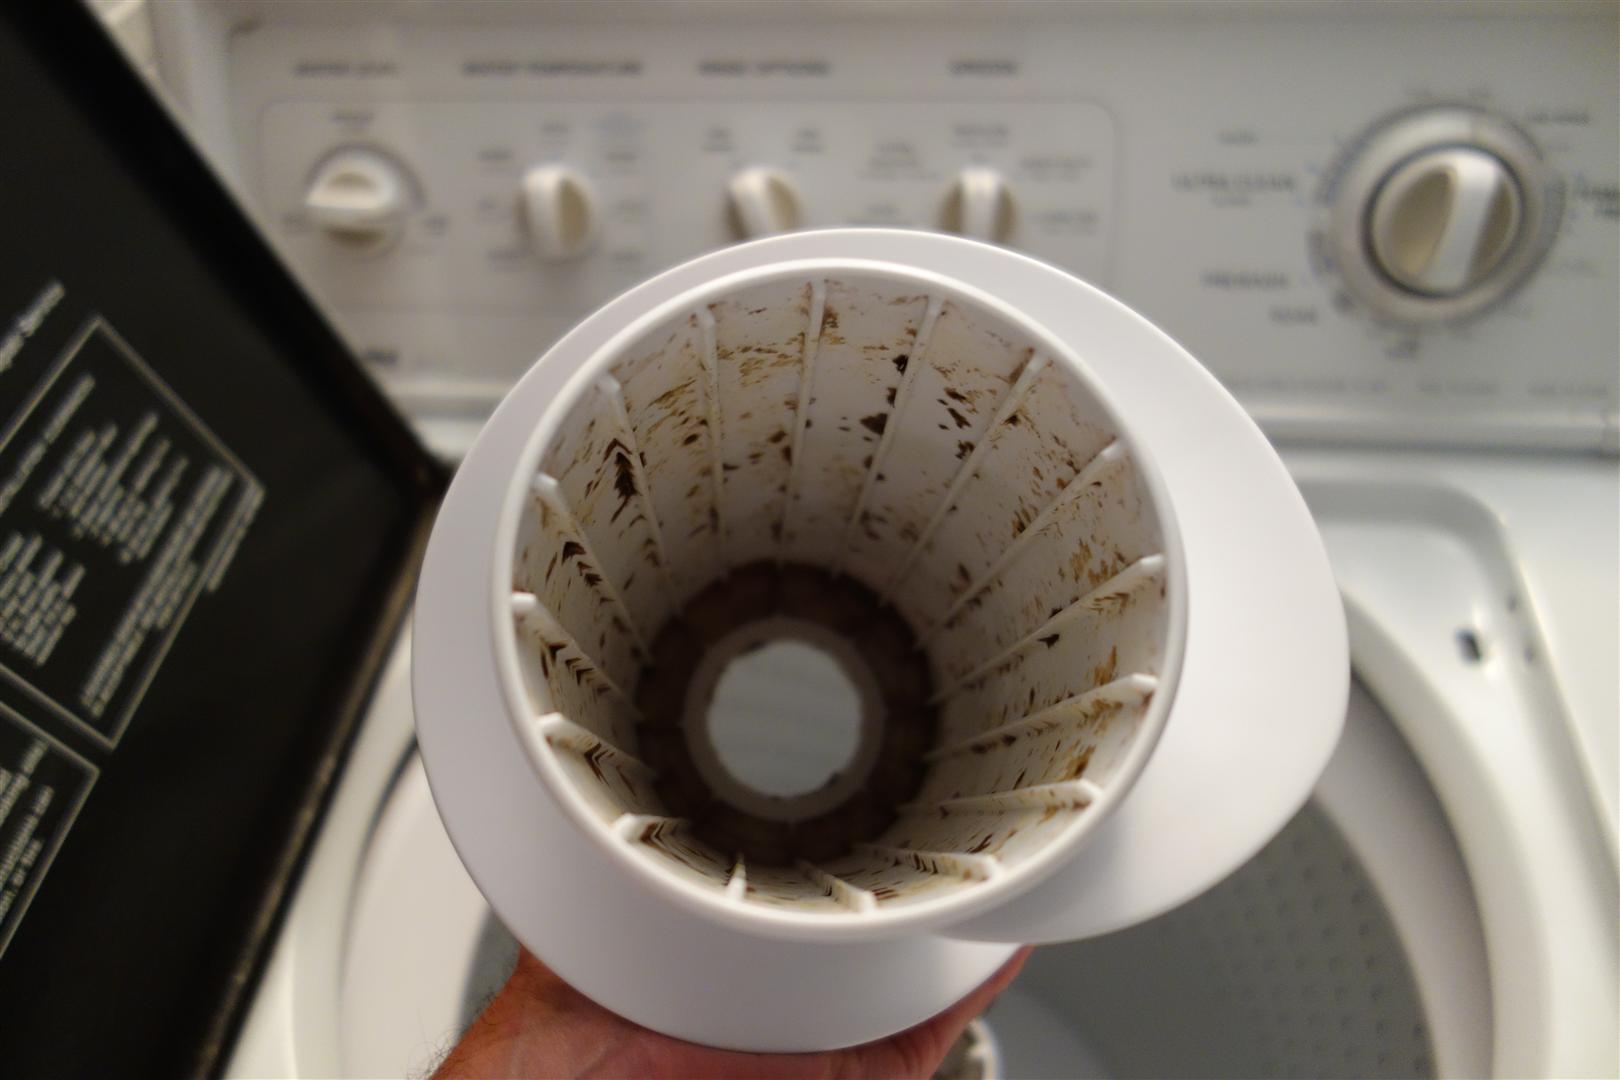
| Remove the auger. Pull it right off the
agitator. The auger was filthy inside. Click here
to see it if you dare. It also cleaned up nicely with warm soapy water and a
soft brush. Now we can see a nut or bolt inside the agitator, but we are about to hit our second GOTCHA! |
 |
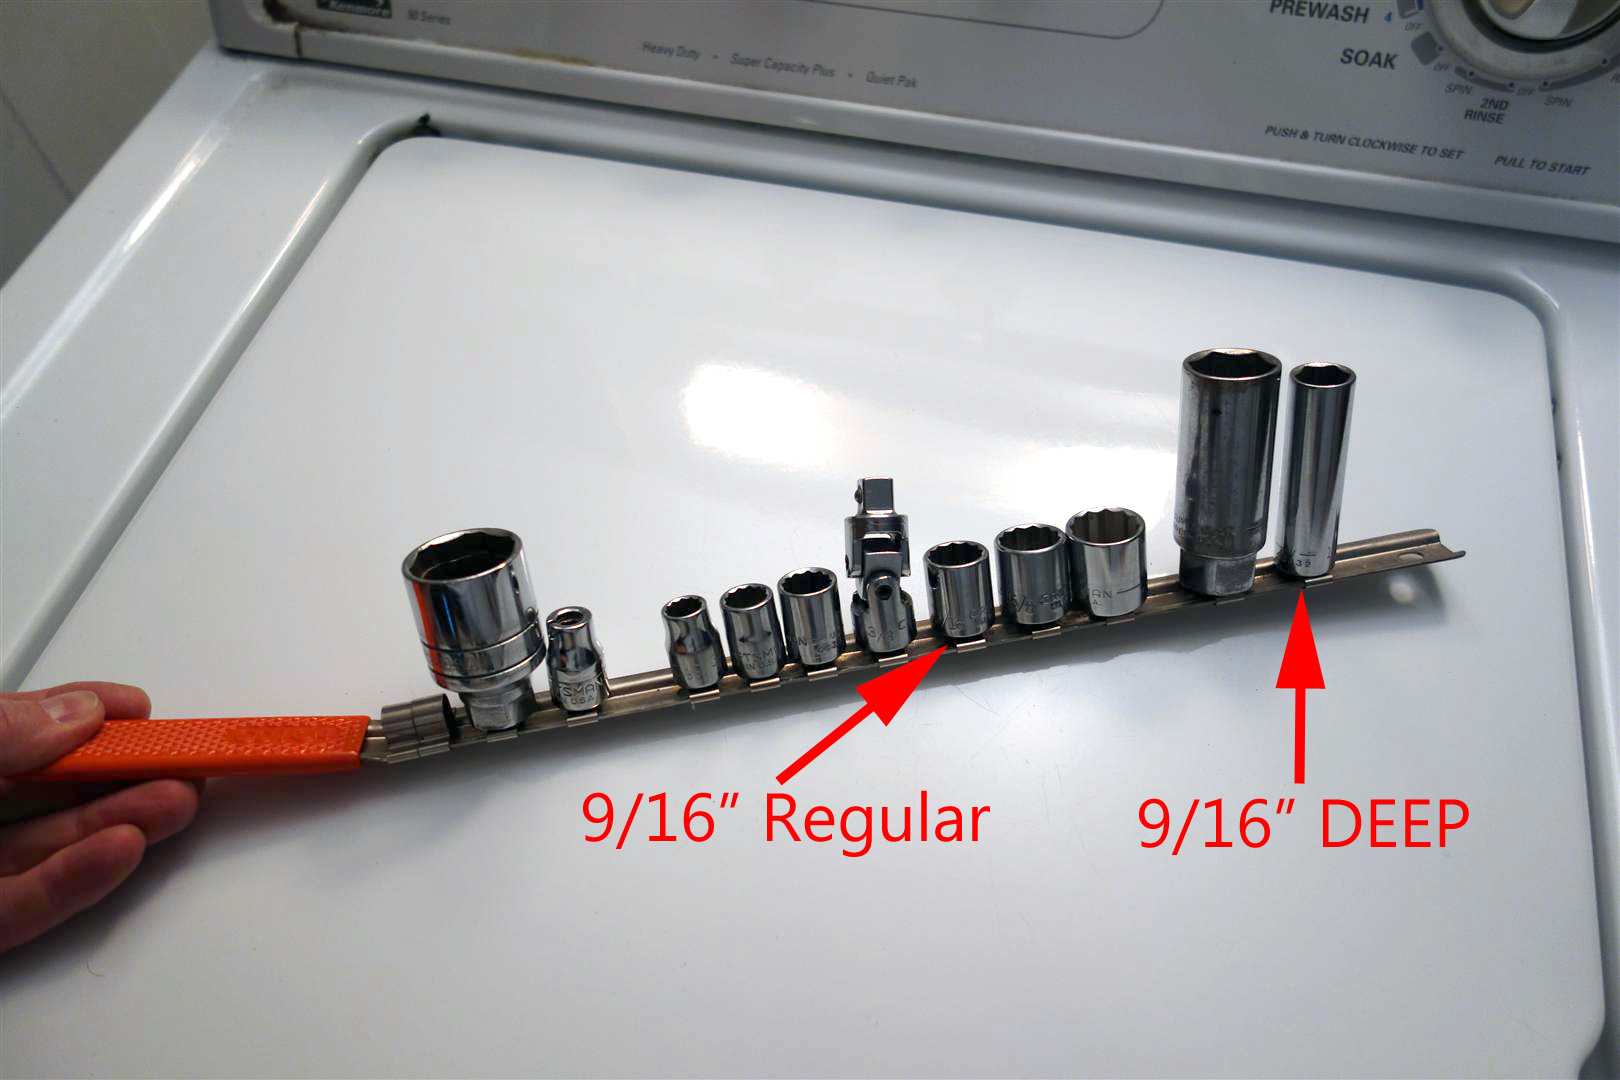
| GOTCHA: The bolt is not 7/16", it
is 9/16" and you can't get it out with a regular
socket! You need a 9/16" DEEP socket. Click the picture to the right to see
the distinction. I don't know if this is a peculiarity to the Kenmore
90-series or if other washers share this trait. You can see it better when I
finally get the bolt out. Here is my set of 1/2" drive sockets on a very handy socket holder. Keeps them together in my tool box. Lucky for me, you can see that I have two deep sockets, and one of them, the one on the far right, happens to be 9/16". |
 |
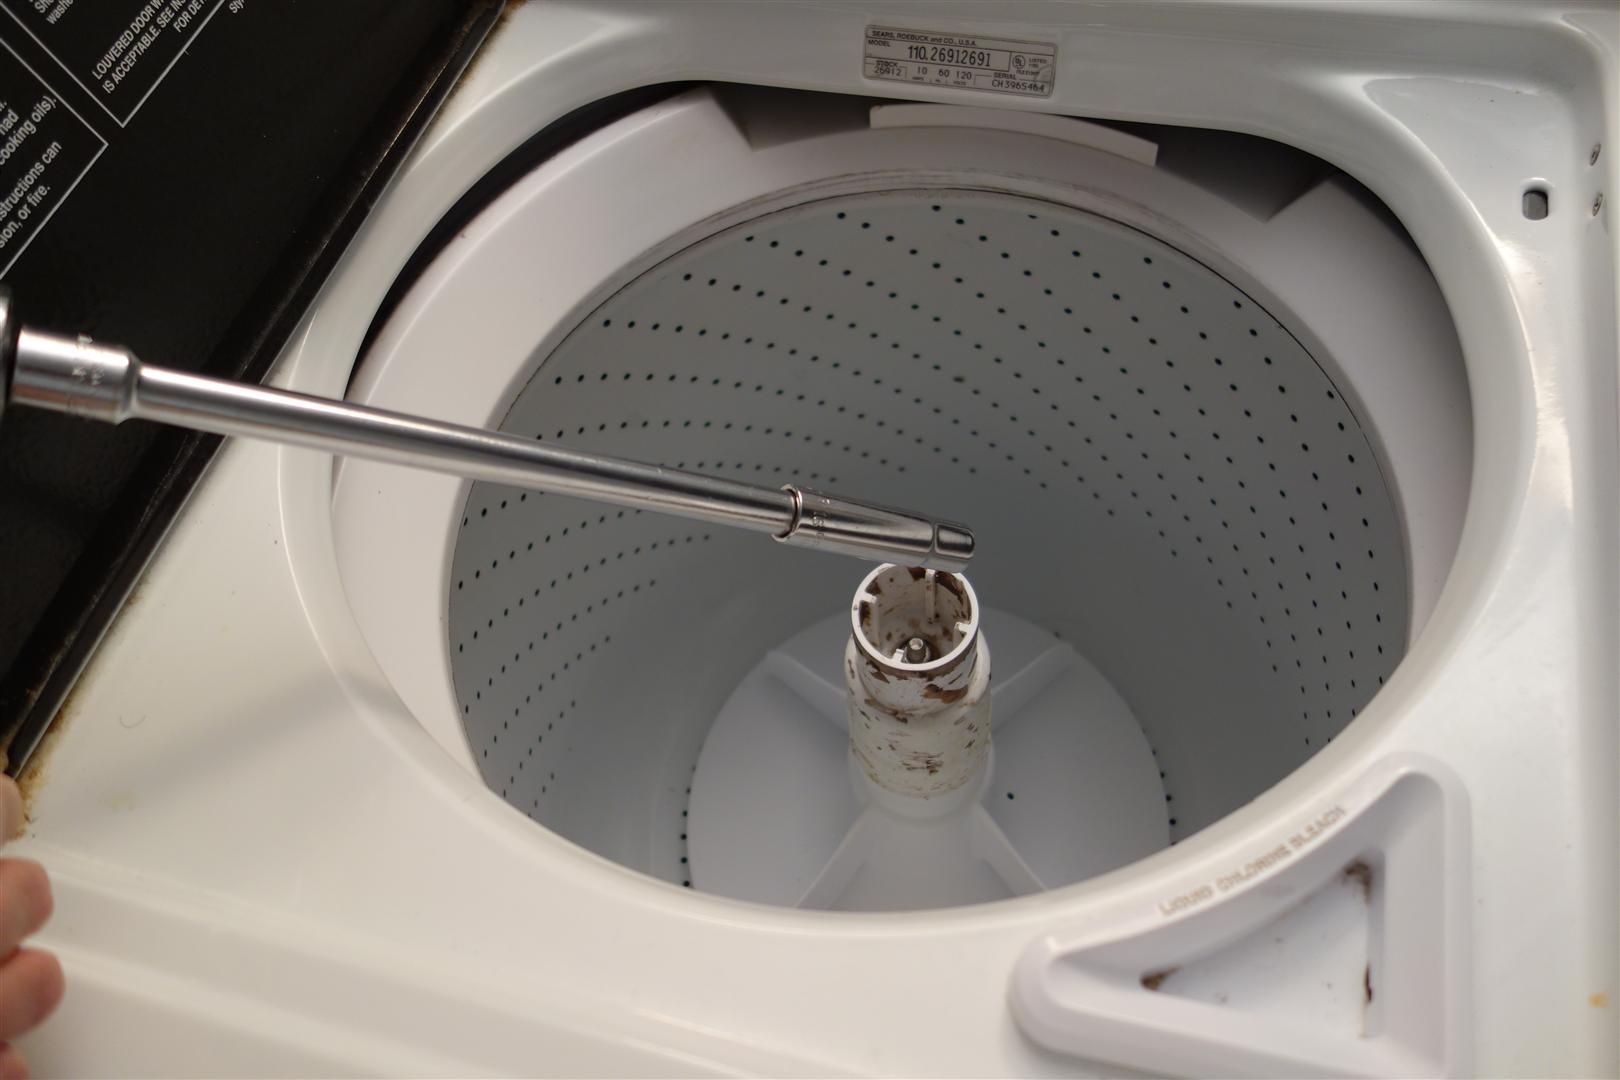
| Use the 9/16" deep socket to
remove the bolt which holds down the agitator.
Sears calls the bolt a "stud and washer" and it is part number 3947922 in case you were interested. |
 |
|
Here is the stud and washer I just removed.
You can see why a regular socket couldn't grab it
|
 |
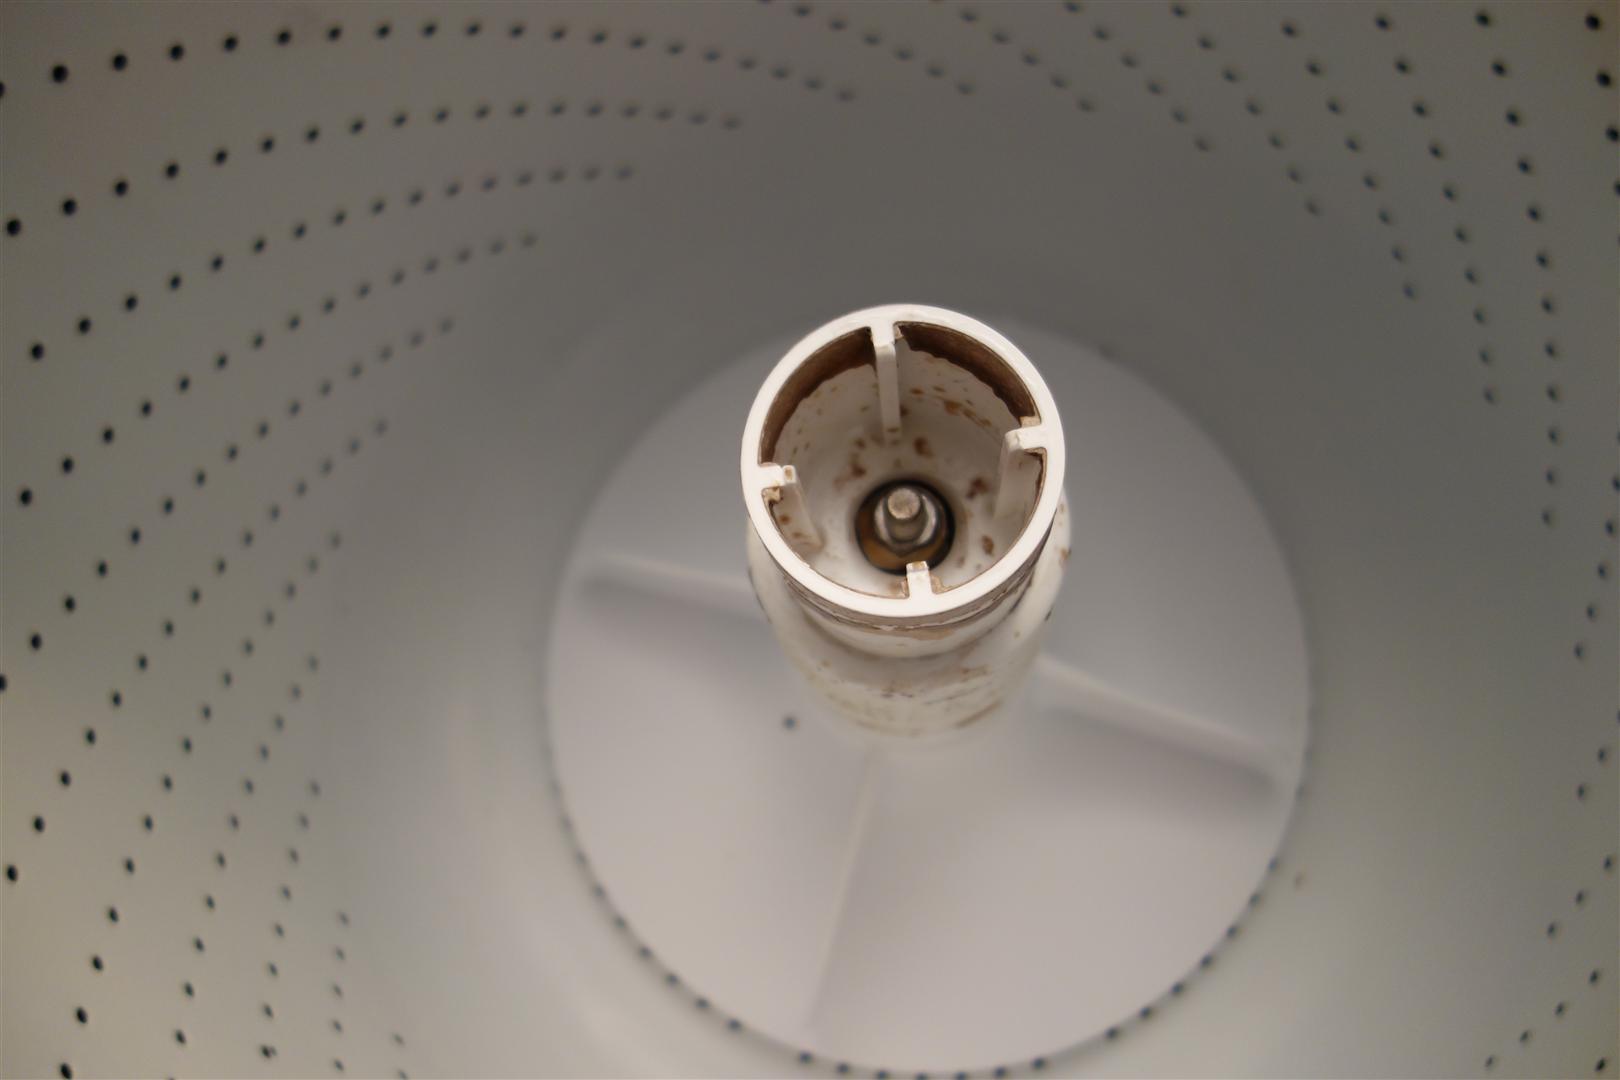
| Pull the agitator up to remove. For some
strange reason I did not take a picture of the agitator. As you can see in
the picture at right, the agitator has already been removed. Next, remove
the washer and clip. At this point we are ready to tilt the machine onto its back to remove the old transmission. |
 |
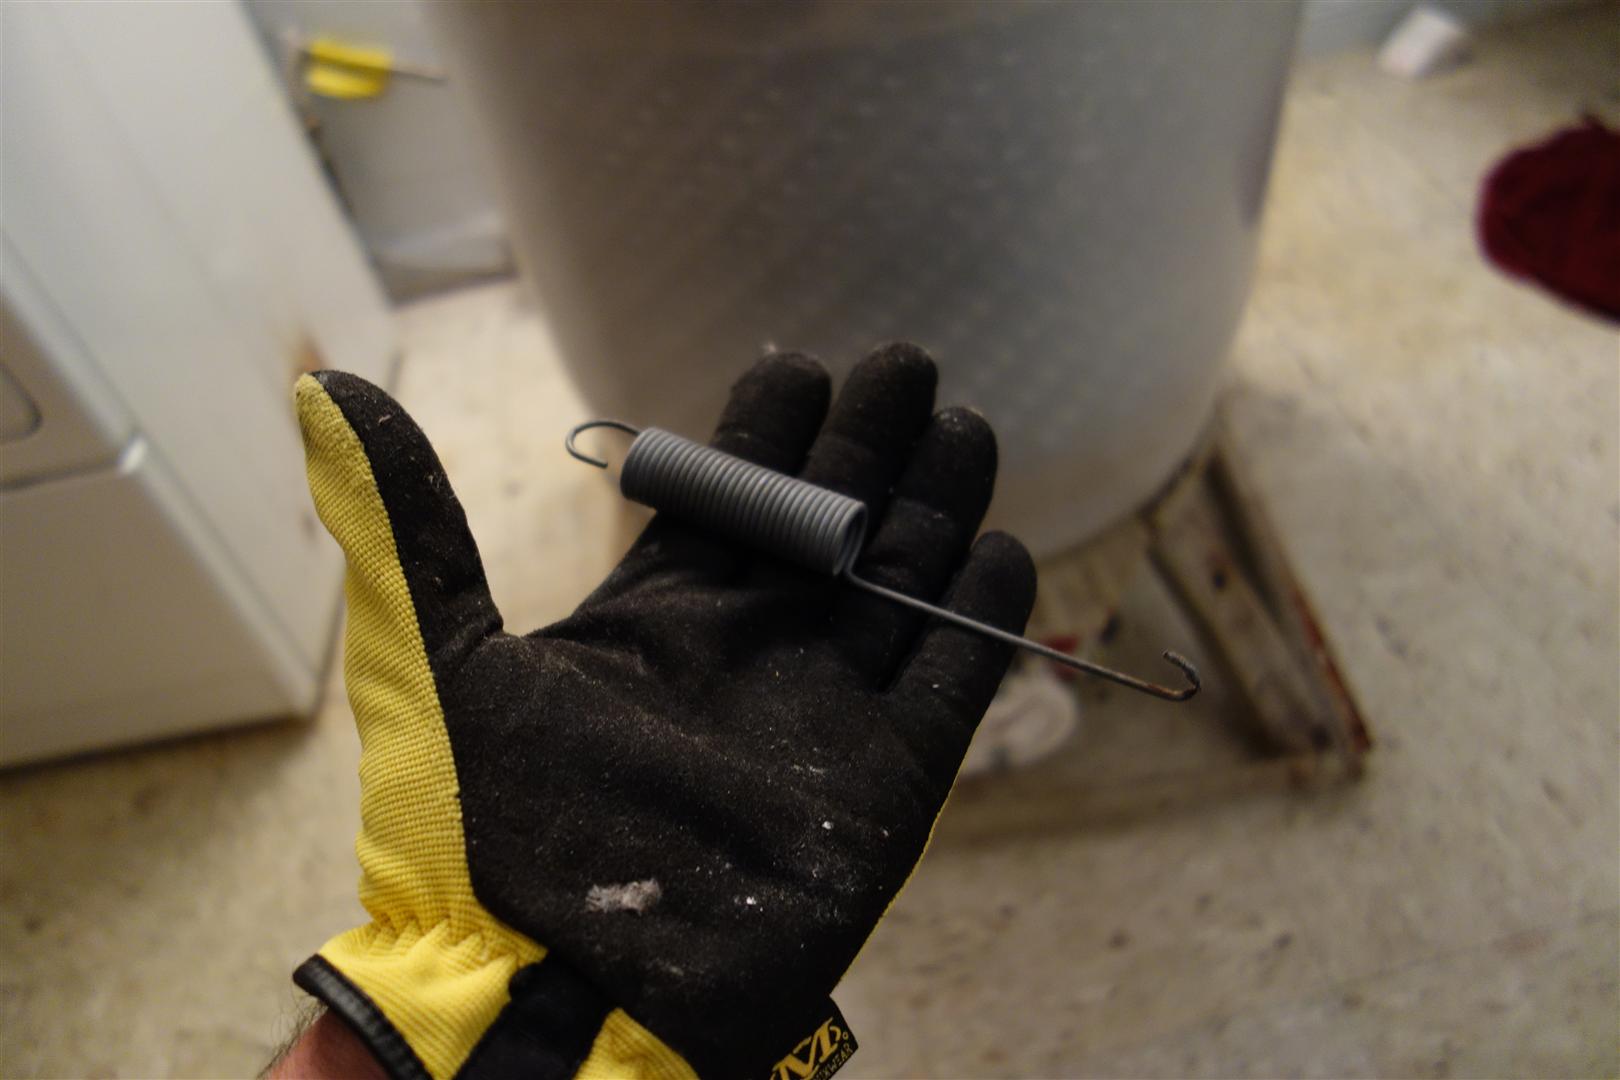
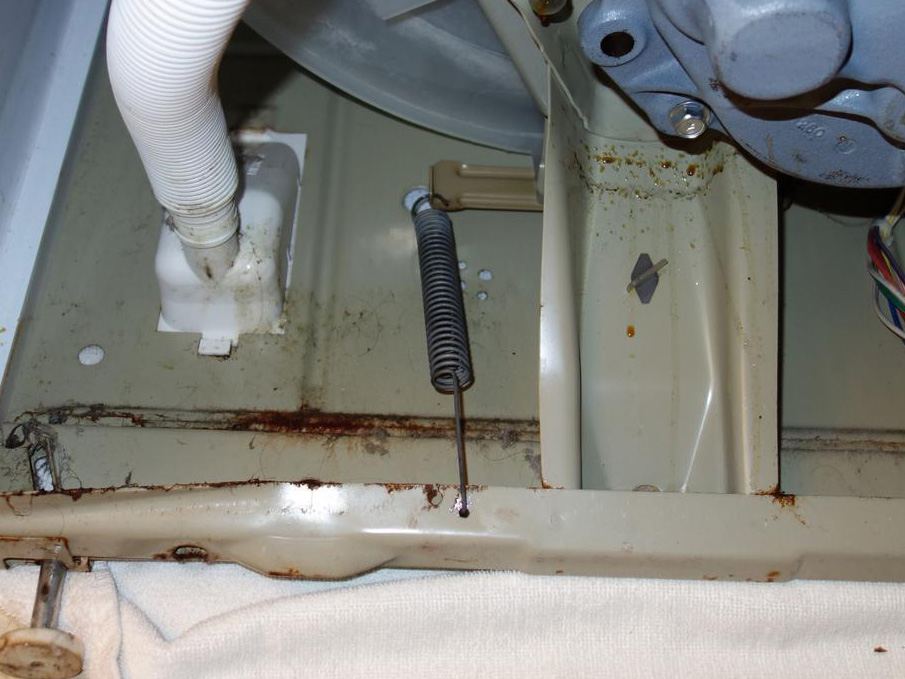
| Uh oh, I found this spring on the floor under
the washer when I moved it. I assume it belongs on the washer, but what
is it? I determined that it is a suspension spring, part # 63907. It attaches between the tub support and the rear frame. It helps offset the weight of the motor, which is on the front of the washer. Hmm, maybe that is why my washer often becomes unbalanced and shakes violently during the spin! Of course simply reattaching it would have been too easy. I should have realized that it didn't just fall off for no reason. |
 |
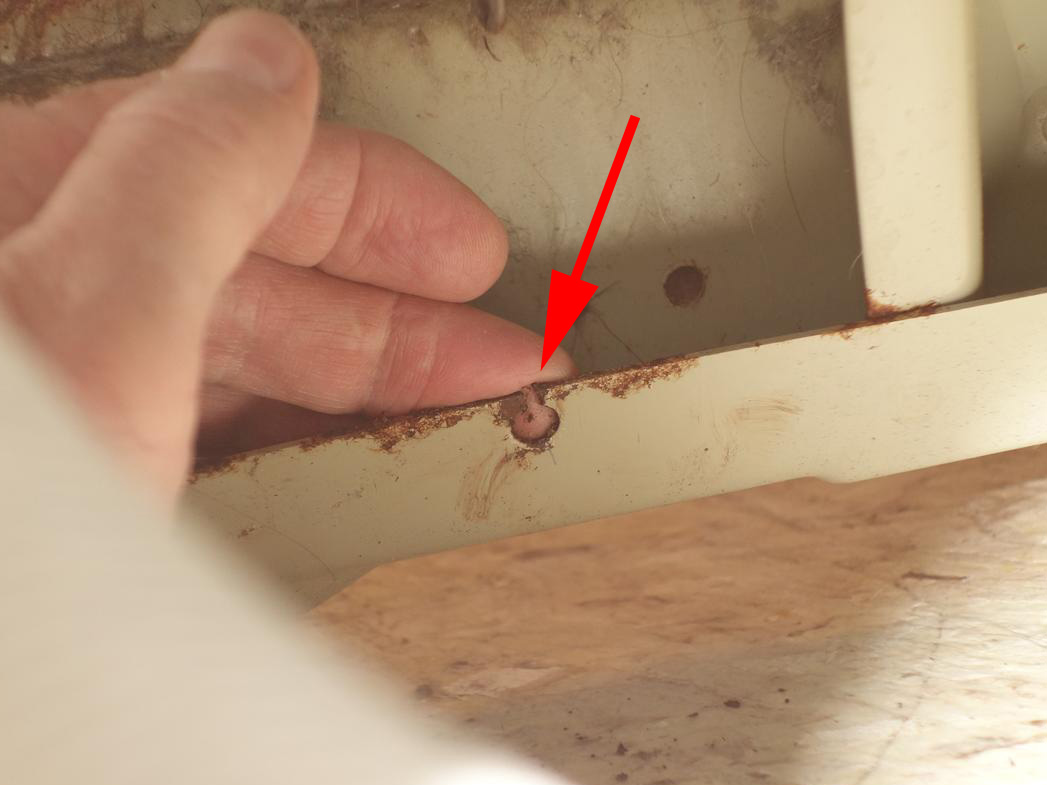
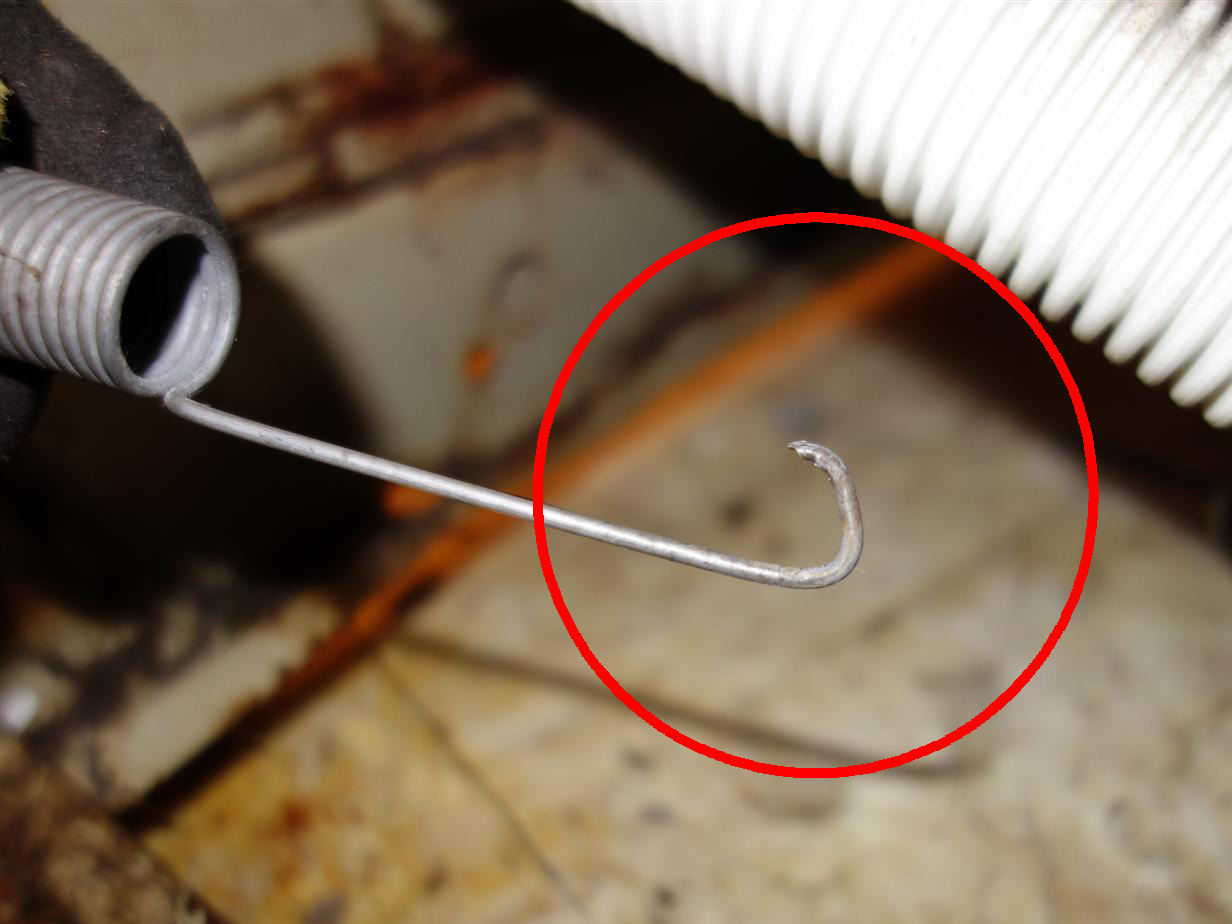
| I attached the top part of
the spring to the tub support, but when I attempted to reconnect the bottom
of the spring to the frame, I discovered why the spring was on the floor.
The hole had worn through! I would need to
drill a new hole in the frame. When I attached the spring to my new hole, the end of the spring broke! Undeterred, I bent the end into a hook shape and tried again. This time it held! Although the spring is attached, I'm not 100% happy because the spring is under more tension than it should be, for two reasons: after the spring broke I made it shorter, and the new hole is lower than the old one was. I plan to buy a new spring and attach it the next time I take the cabinet off. You will be able to see the spring better in subsequent pictures when the washer is lying on its back. OK, back to the transmission repair... |
 |
|
Prepare to tip the machine onto its back. Place a large
towel or two on the floor to protect the washer and to soak up any water
that drips out of the machine. Careful: the machine is heavy and awkward to move. Get help if you need it. You do not want the washer to fall, and you especially don't want it to fall on you! Tip: Water will start leaking out of the drain opening, the small white rectangle visible on the lower right of the back of the washer, as soon as you start to tilt the washer back. There will be about a cup or two of water. You can try to catch it in a pan, or just give up like I did and let the towels soak it up. In retrospect, I wish I had tried to catch the water in a pan. It would have made the cleanup easier. |
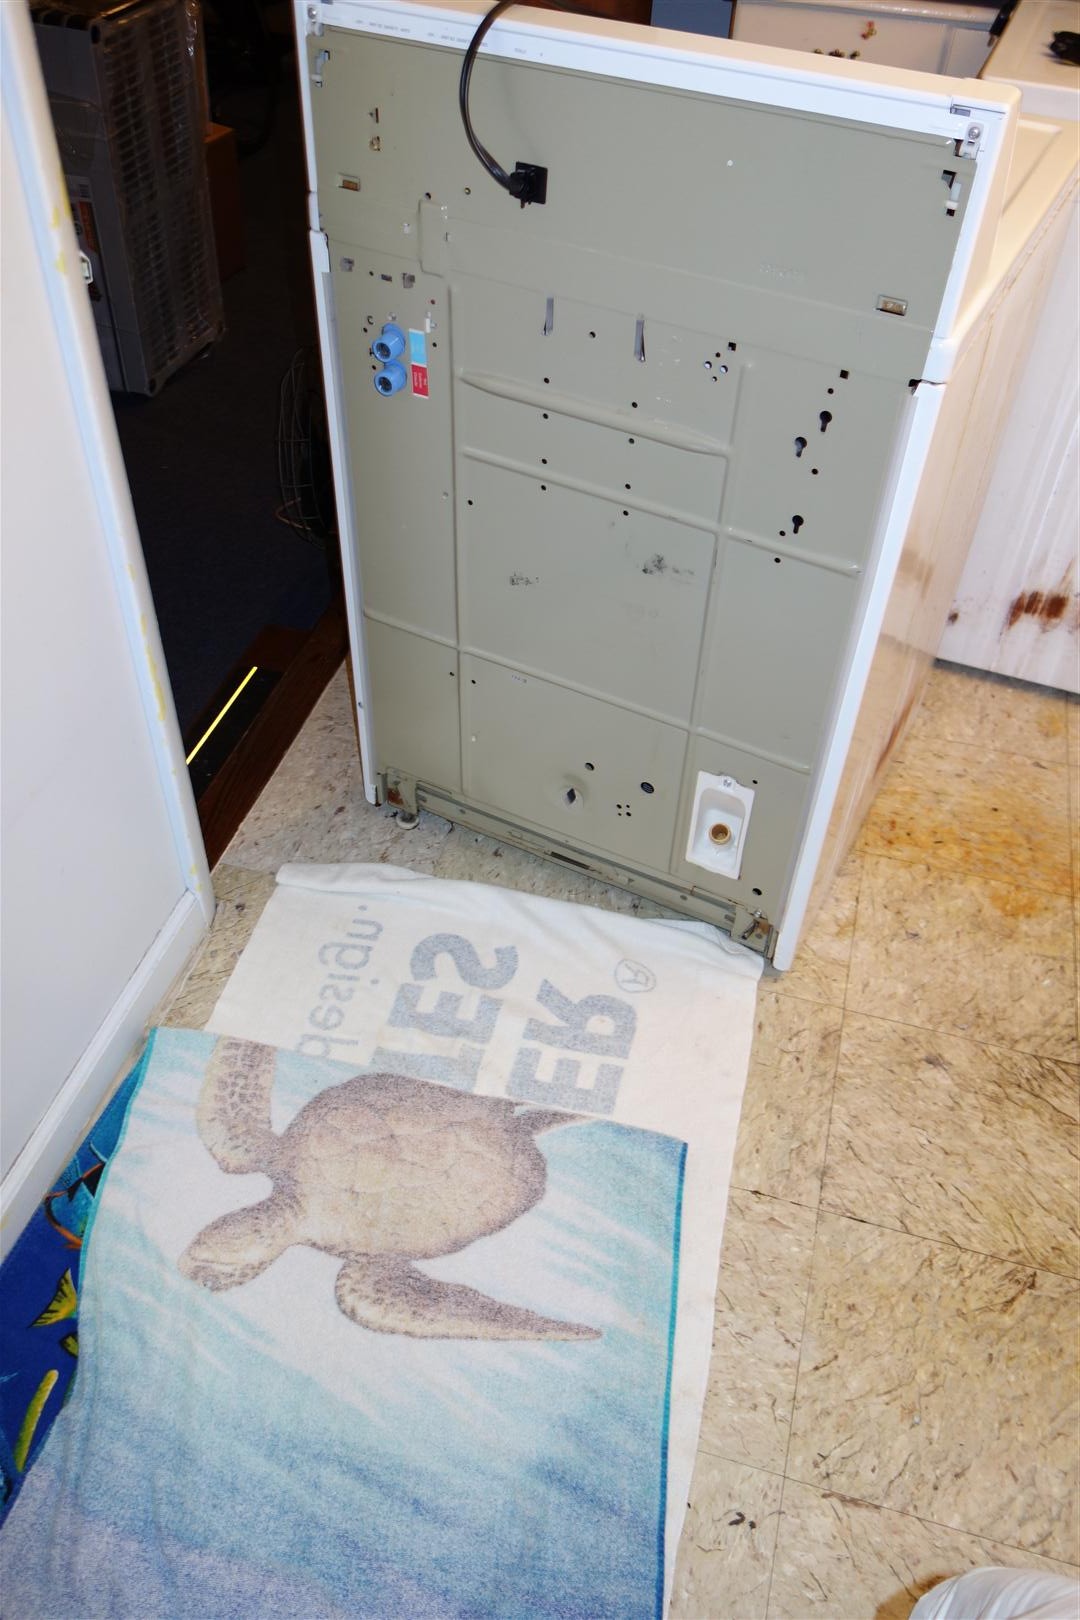 |
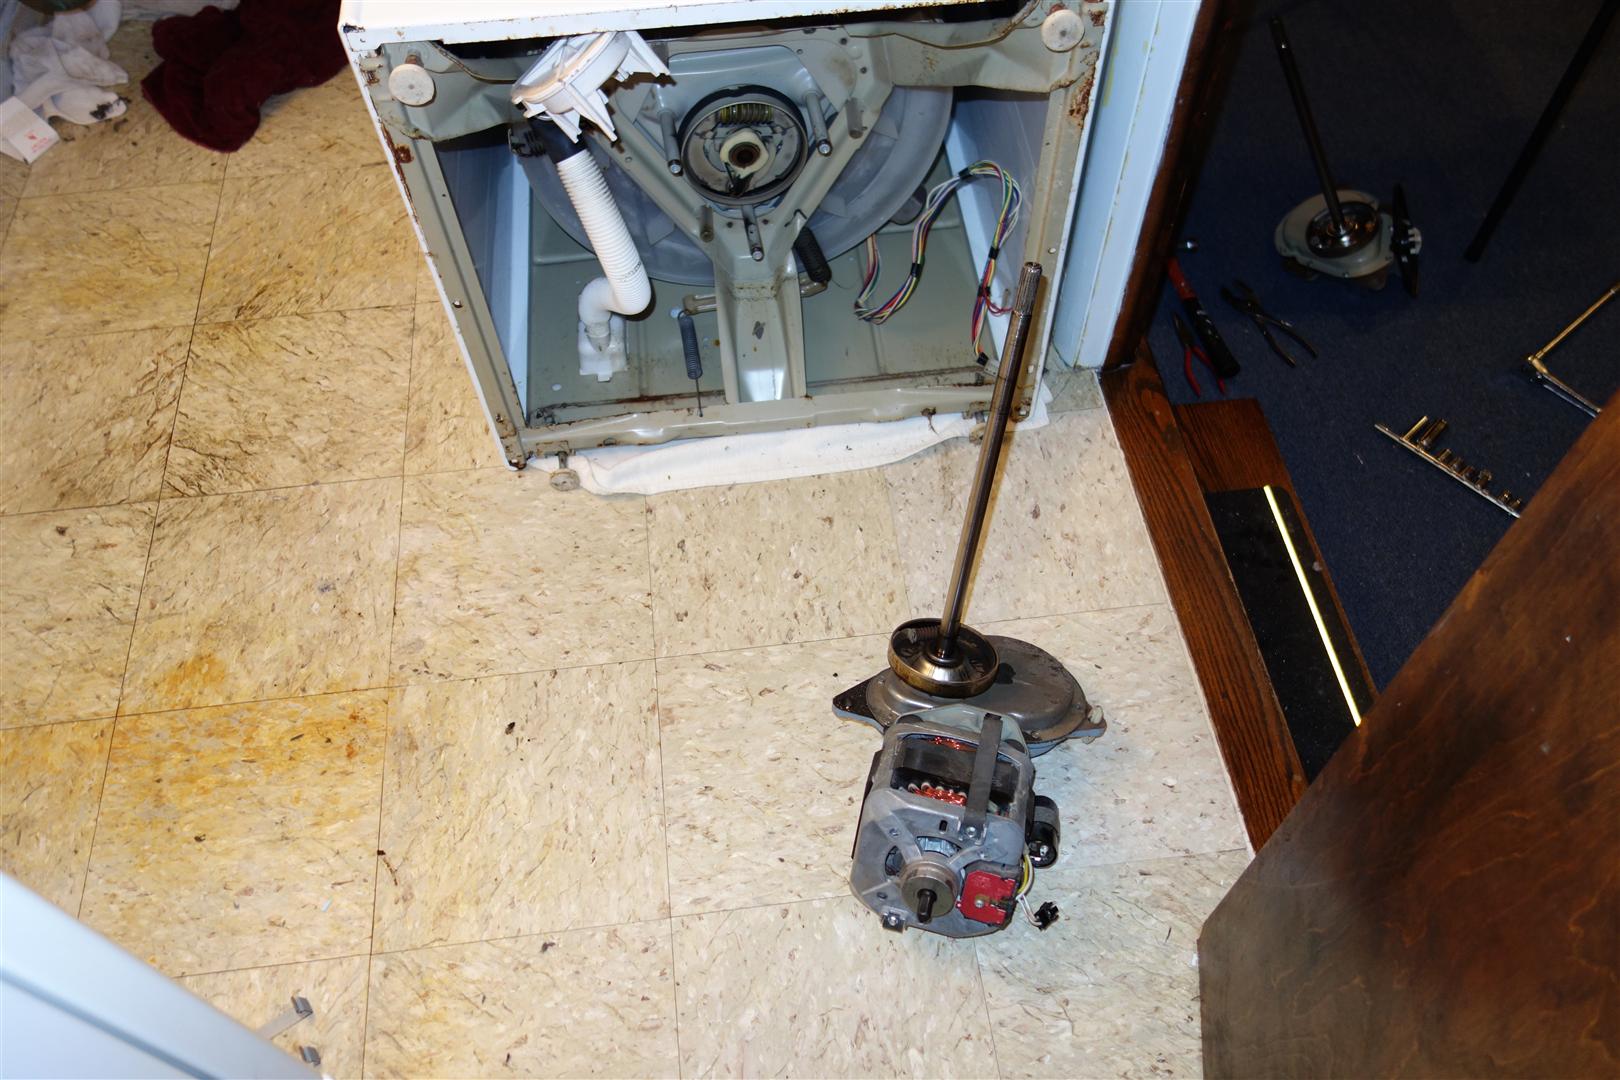
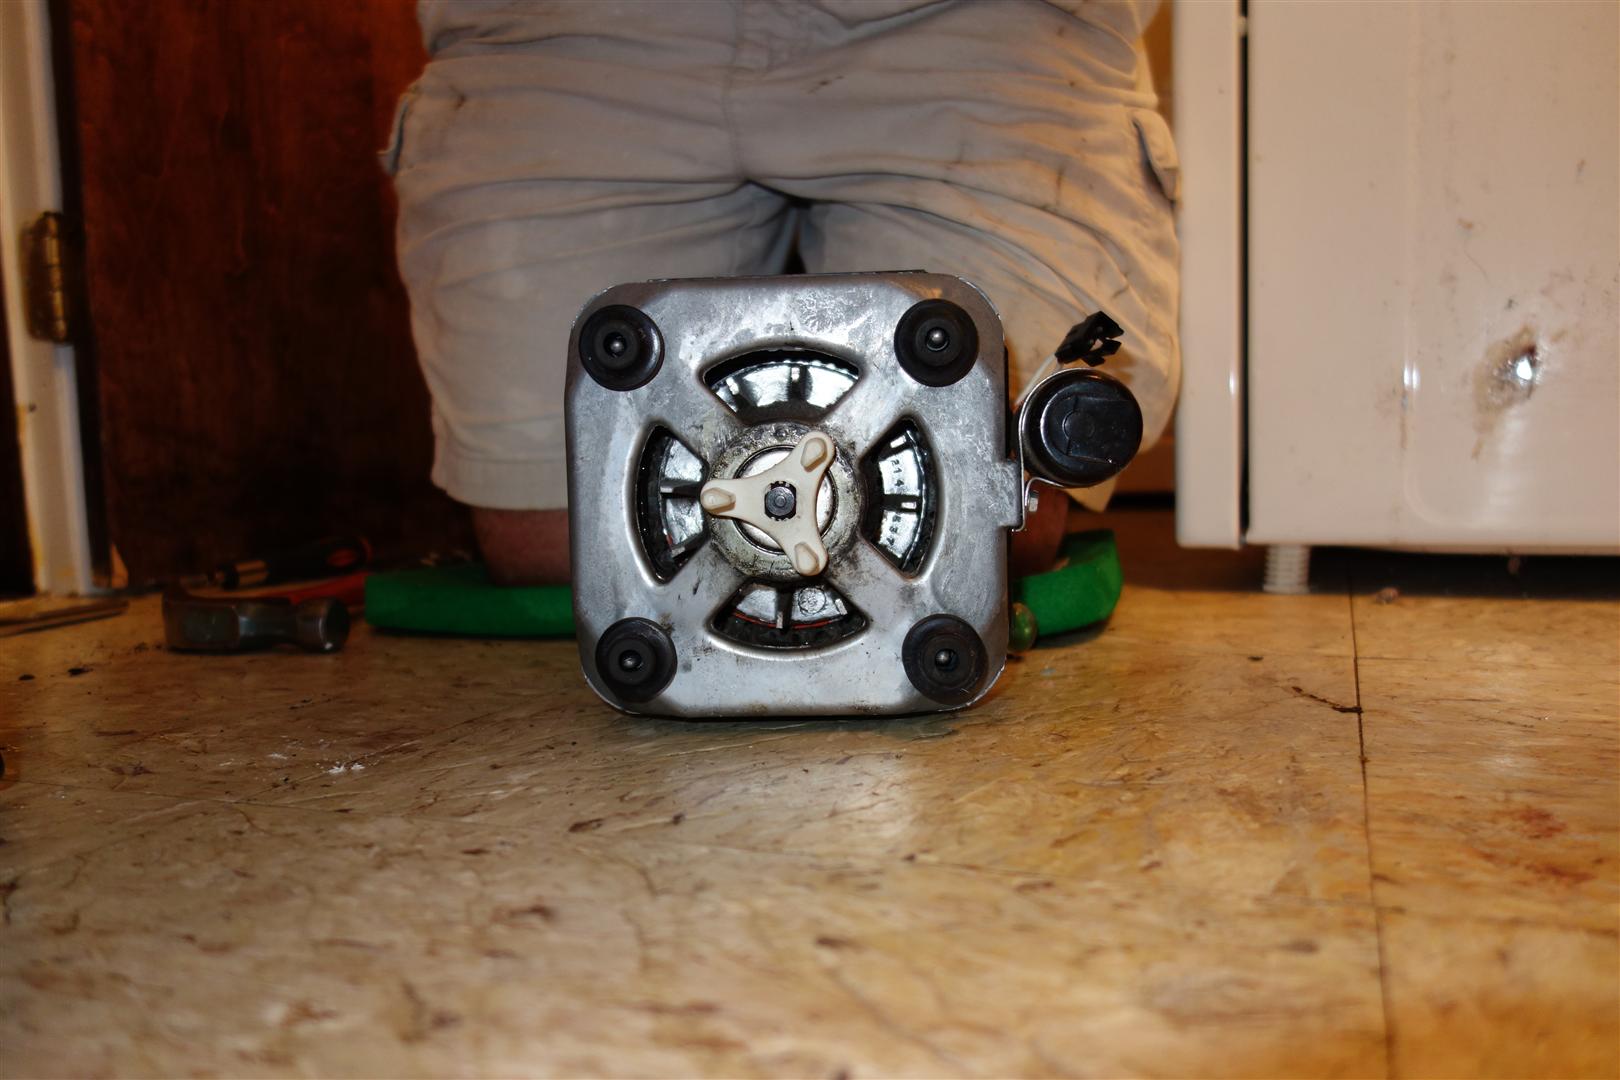
| Here is the washer on its back. Normally
you would never want to have the washer on its back, side, or upside down
because unless the washer is standing on its feet, the transmission oil will
leak out. Since I'm replacing the transmission, I don't care if the oil
leaks out. Click the picture to see some of the parts we will be discussing shortly. |
 |
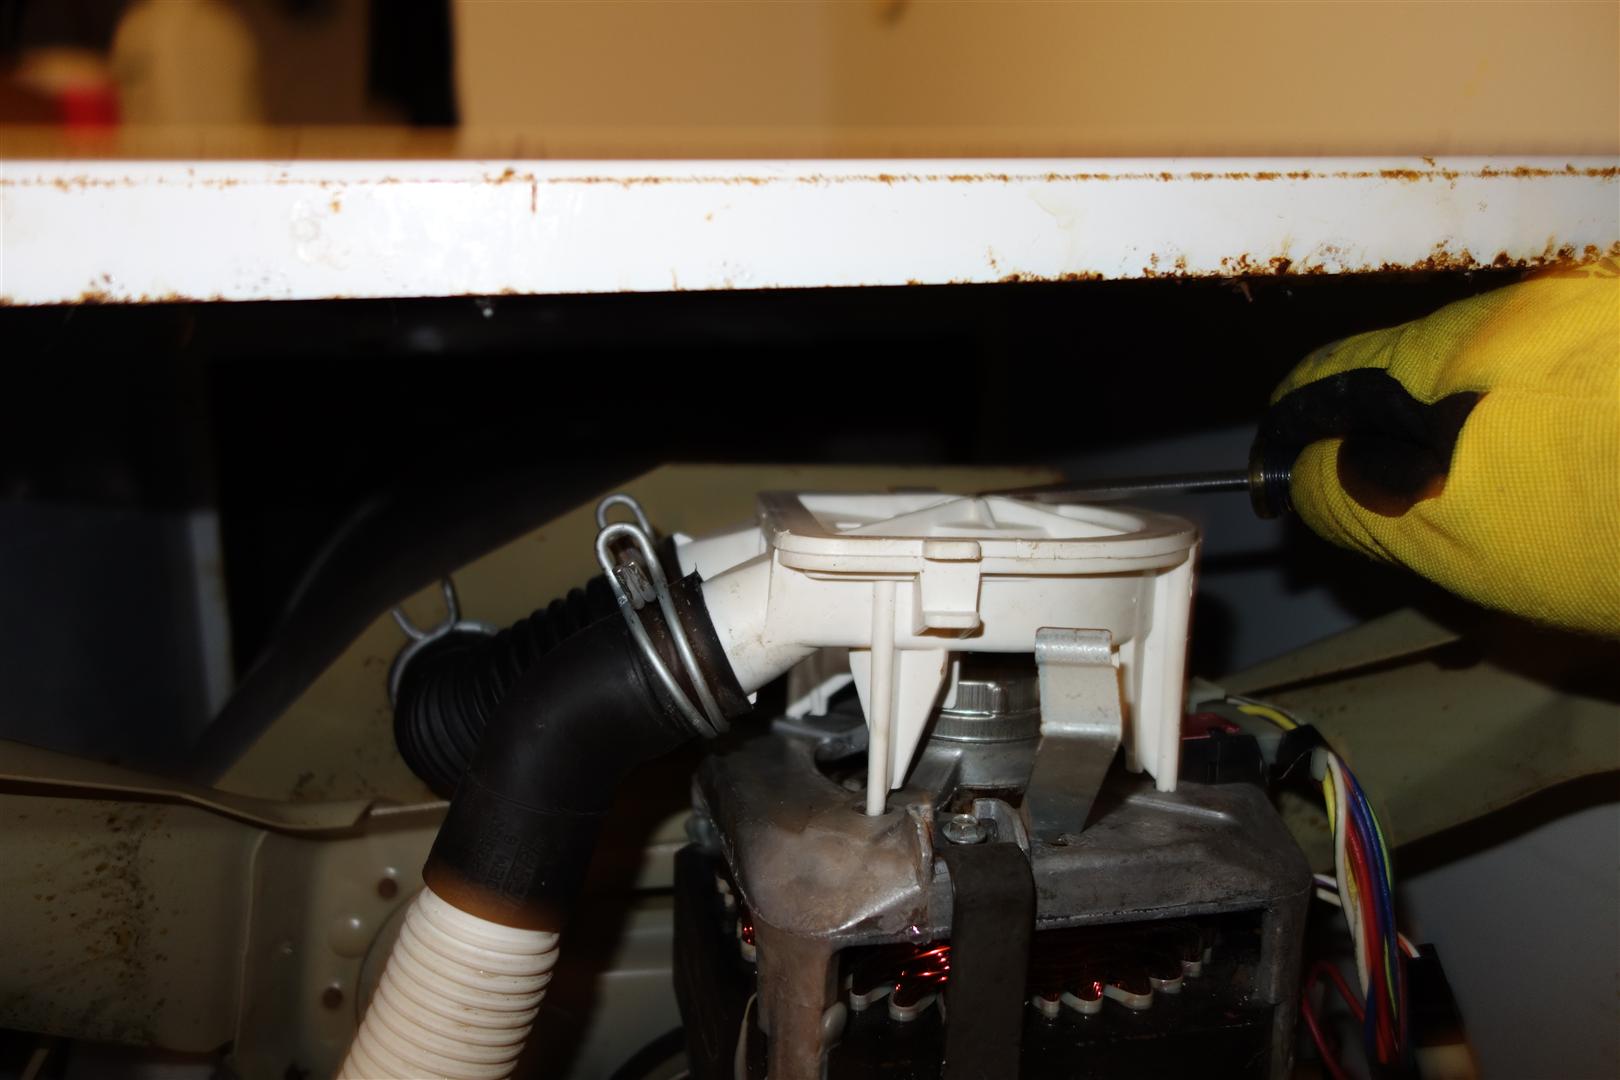
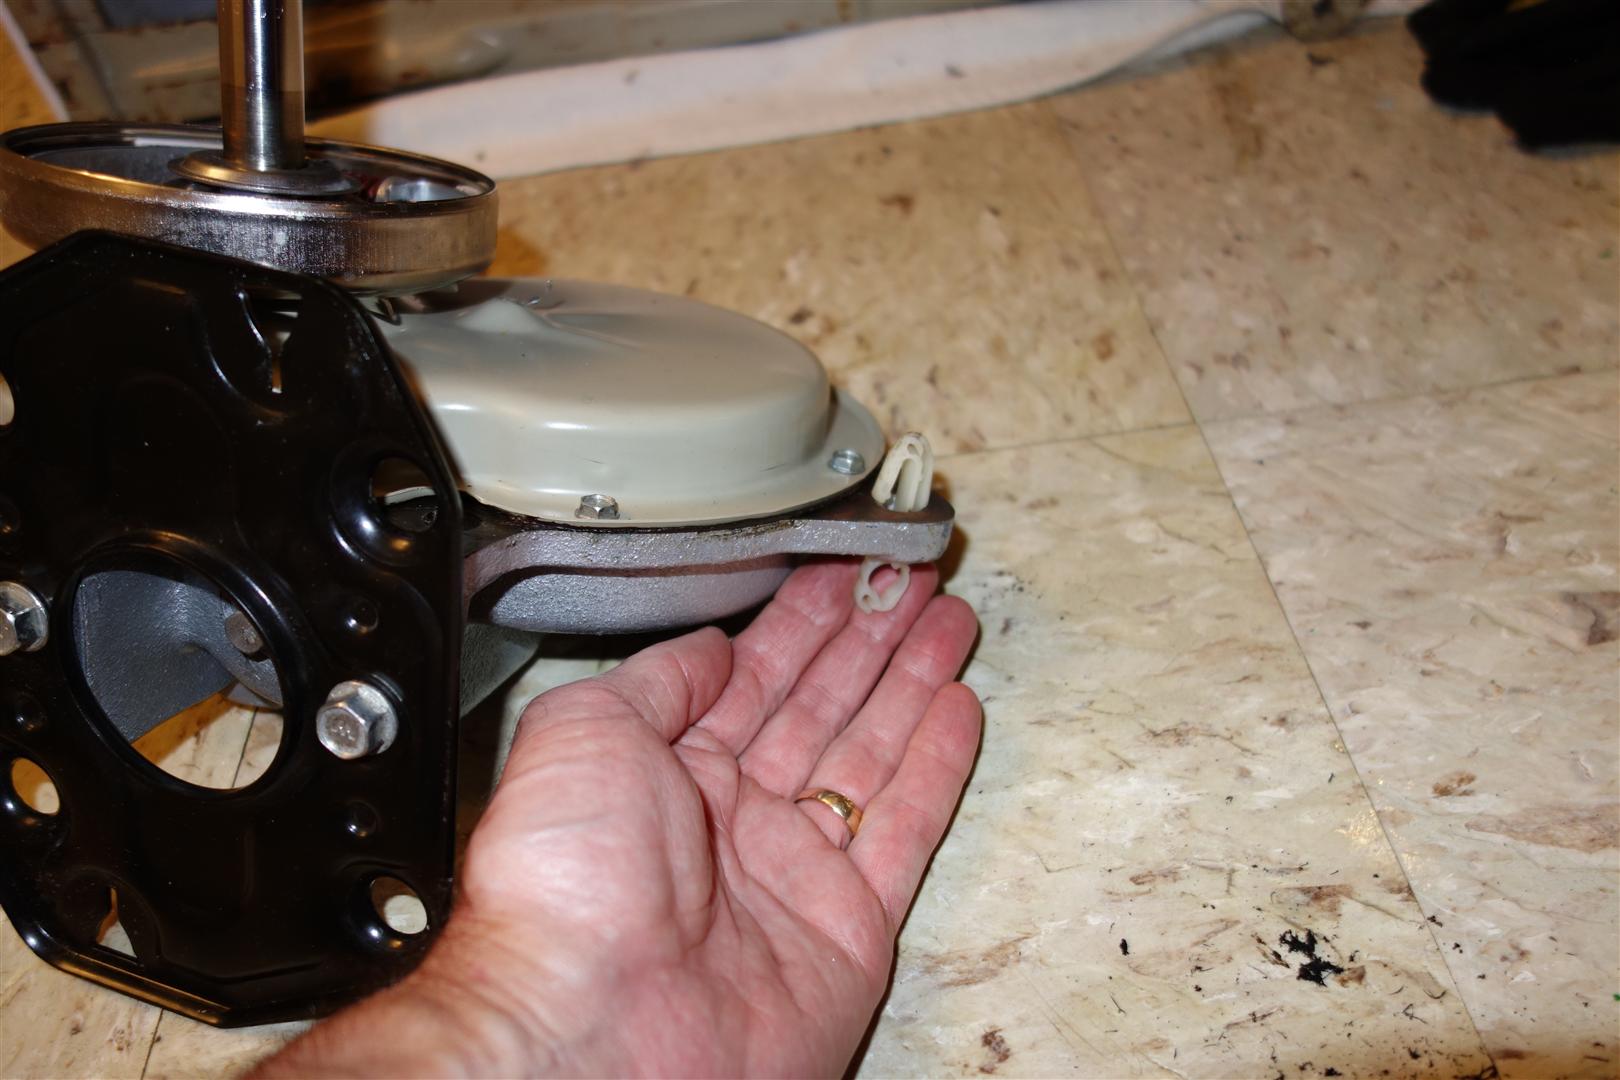
| We need to remove the water pump from the motor. It is held on with two metal straps. You can snap them up with your fingers but its easier if you use a flat blade screwdriver. In this picture you can see I have snapped off the front (bottom) clip and I'm working on the back (top) clip. |
 |
| Once the clips are detached, pull the
water pump up and away from the motor and move it out of the way. There is
no need to disconnect the other hoses from the water pump unless you like
making extra work for yourself. Just get the pump out of the way so you have
room to work. Take the metal clips off the motor and put them someplace safe where you won't lose them. You have to turn them 90 degrees to release them from the motor, then they will slide right out. |
 |
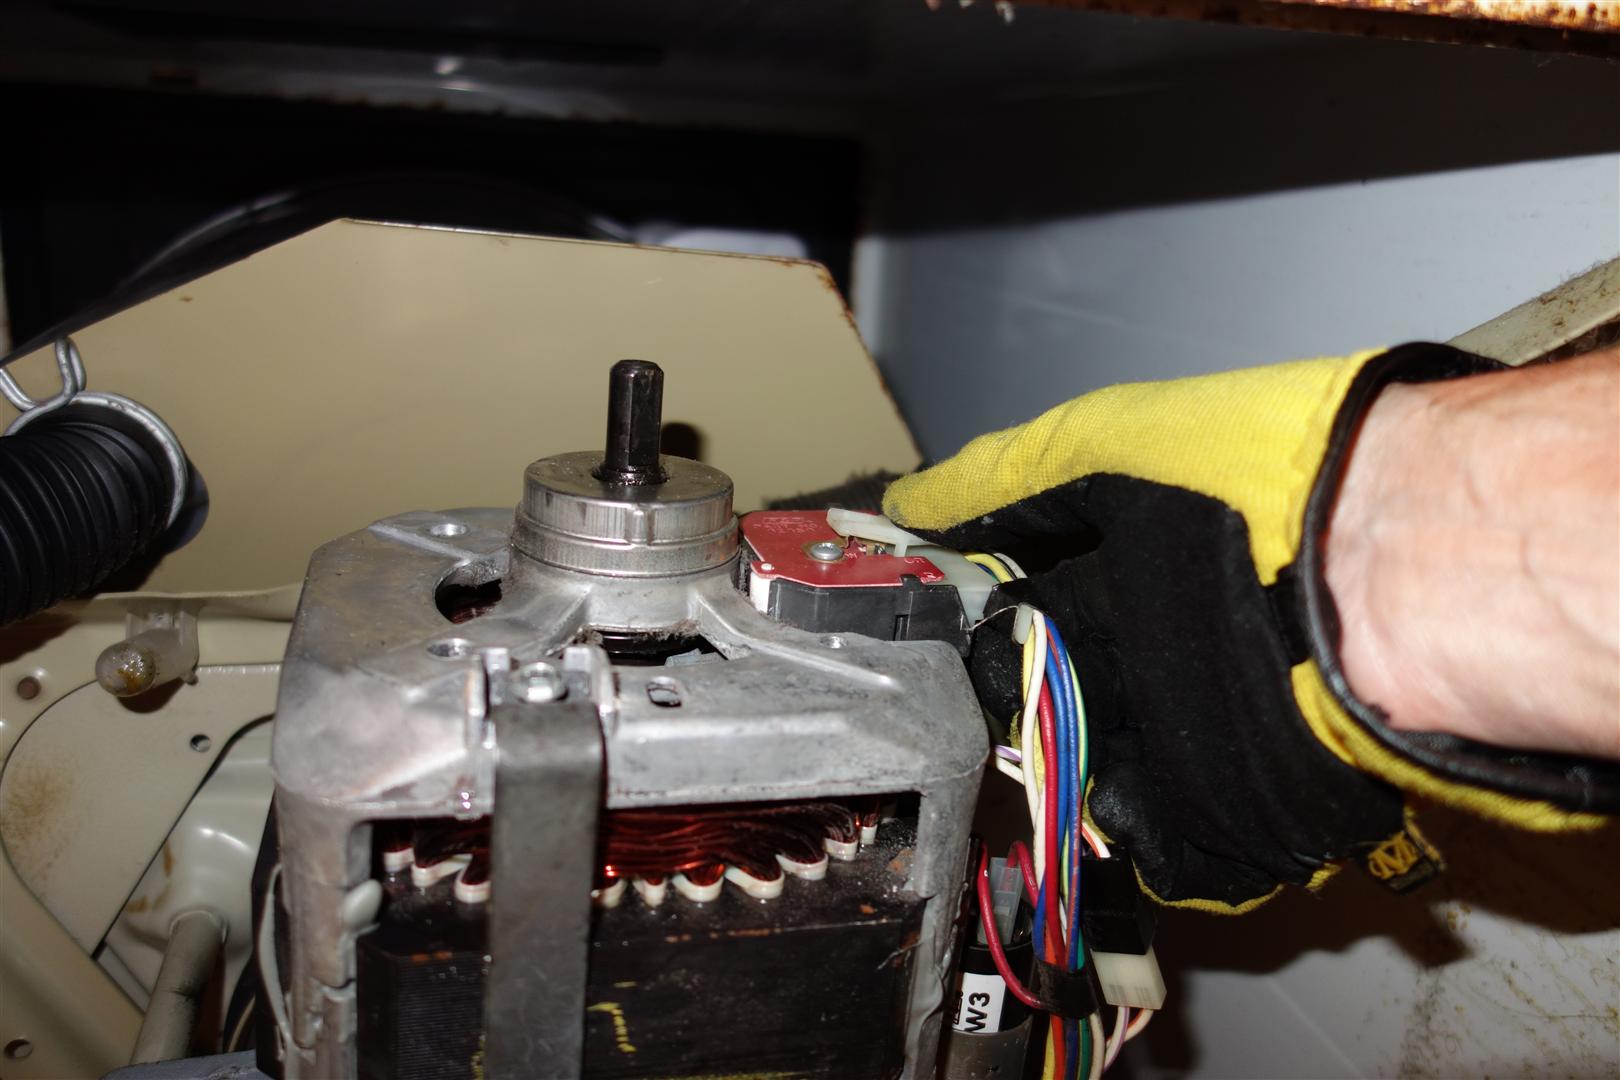
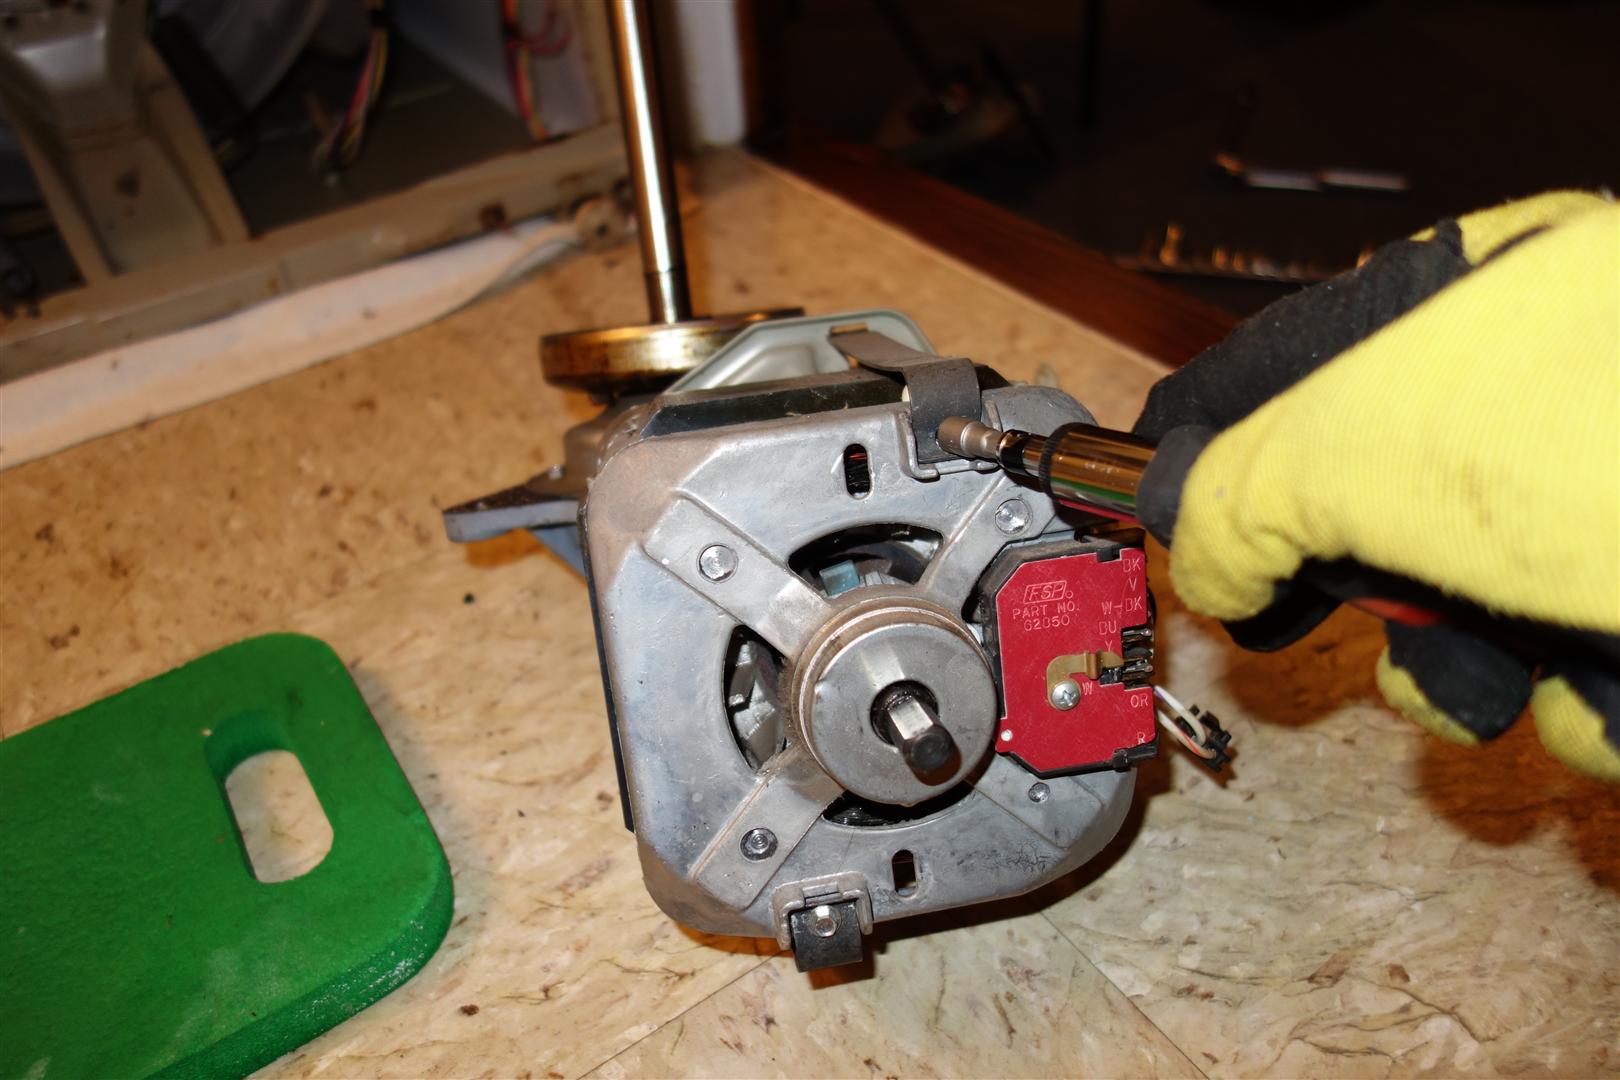
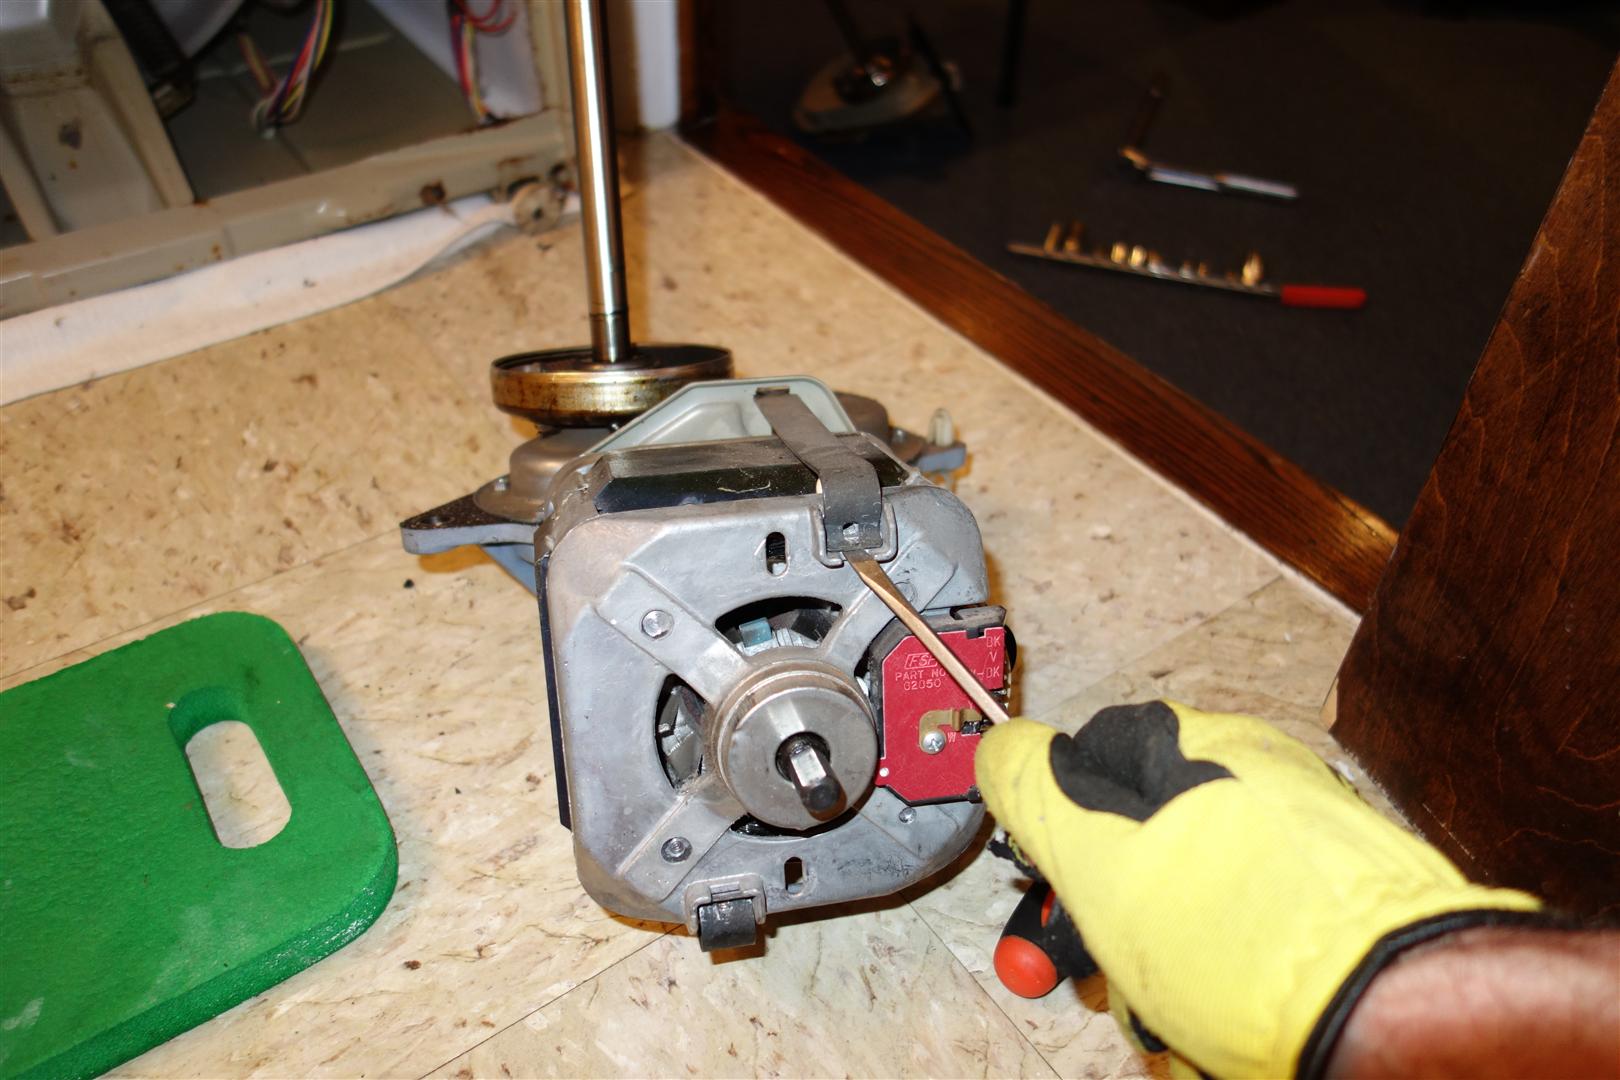
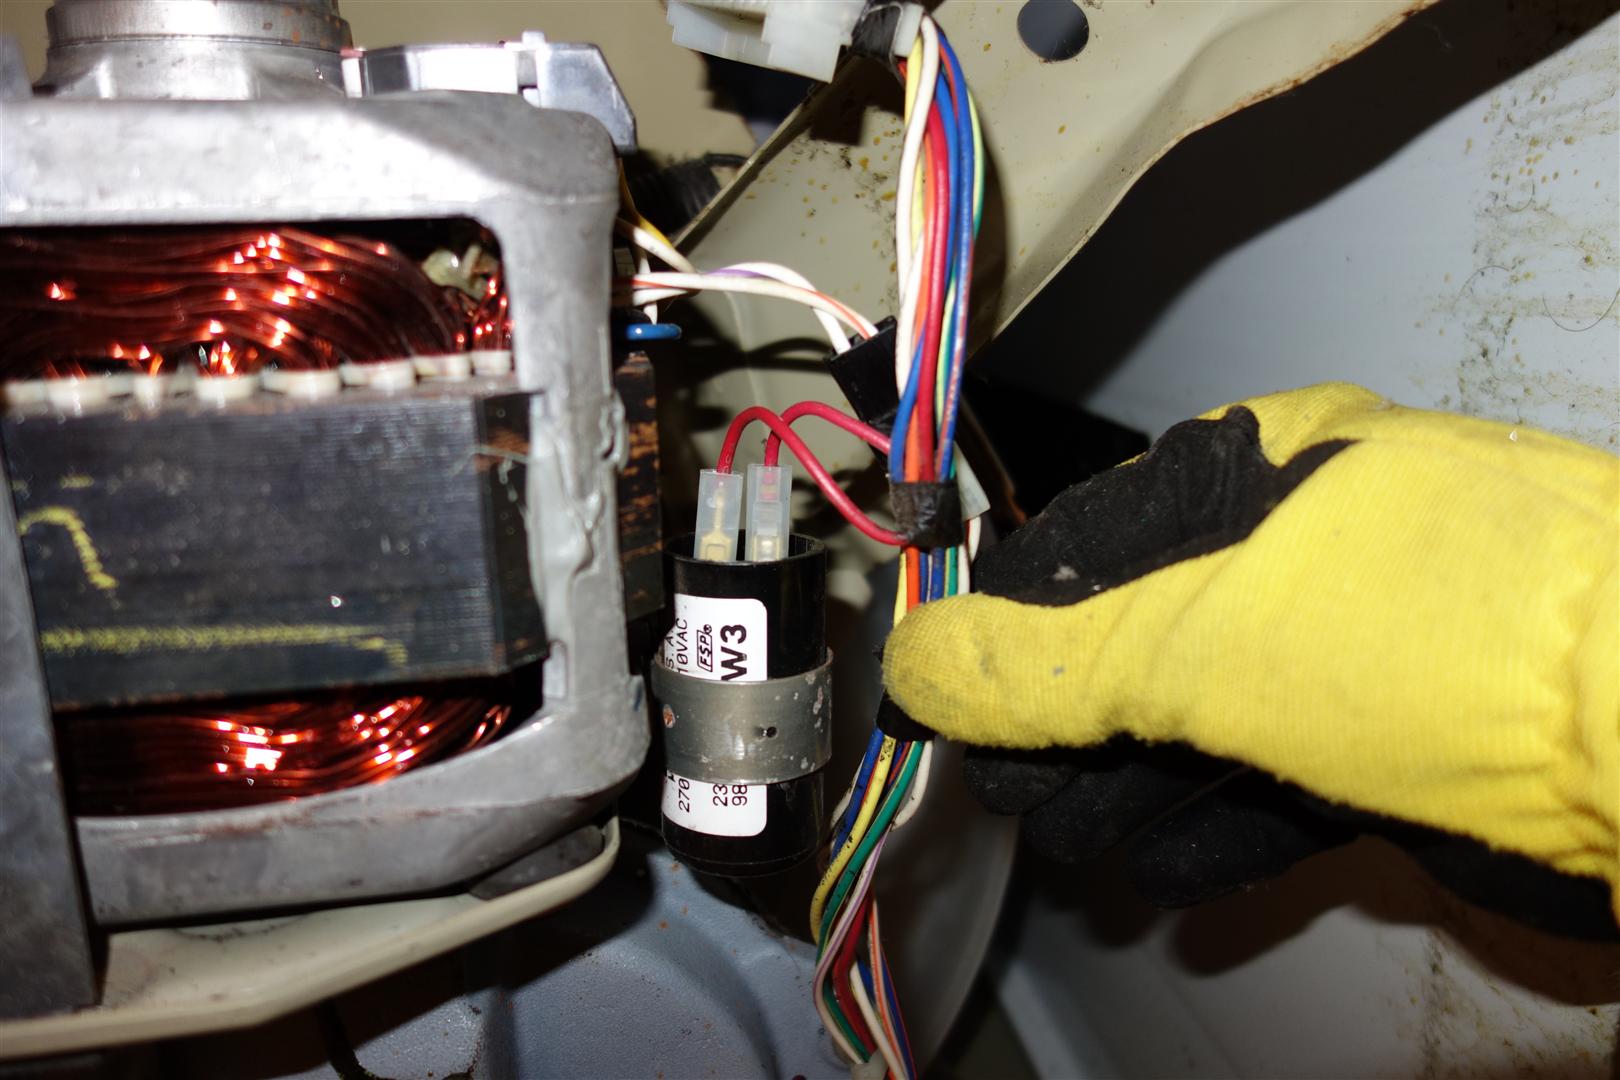
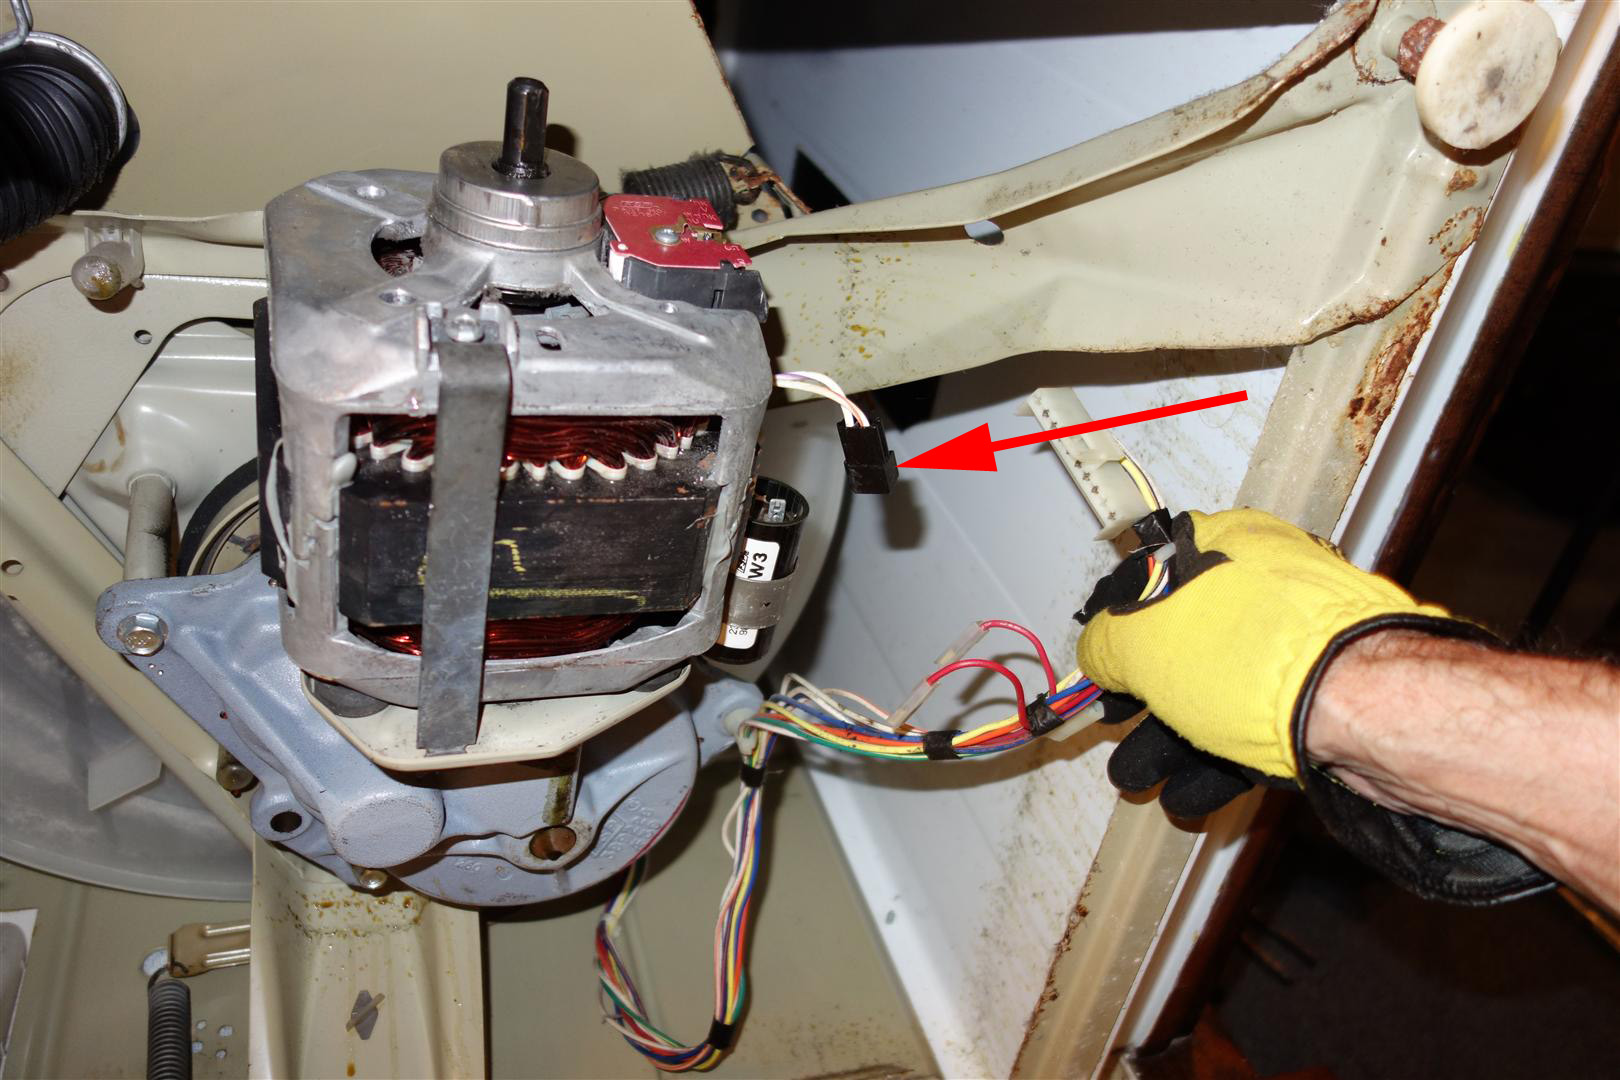
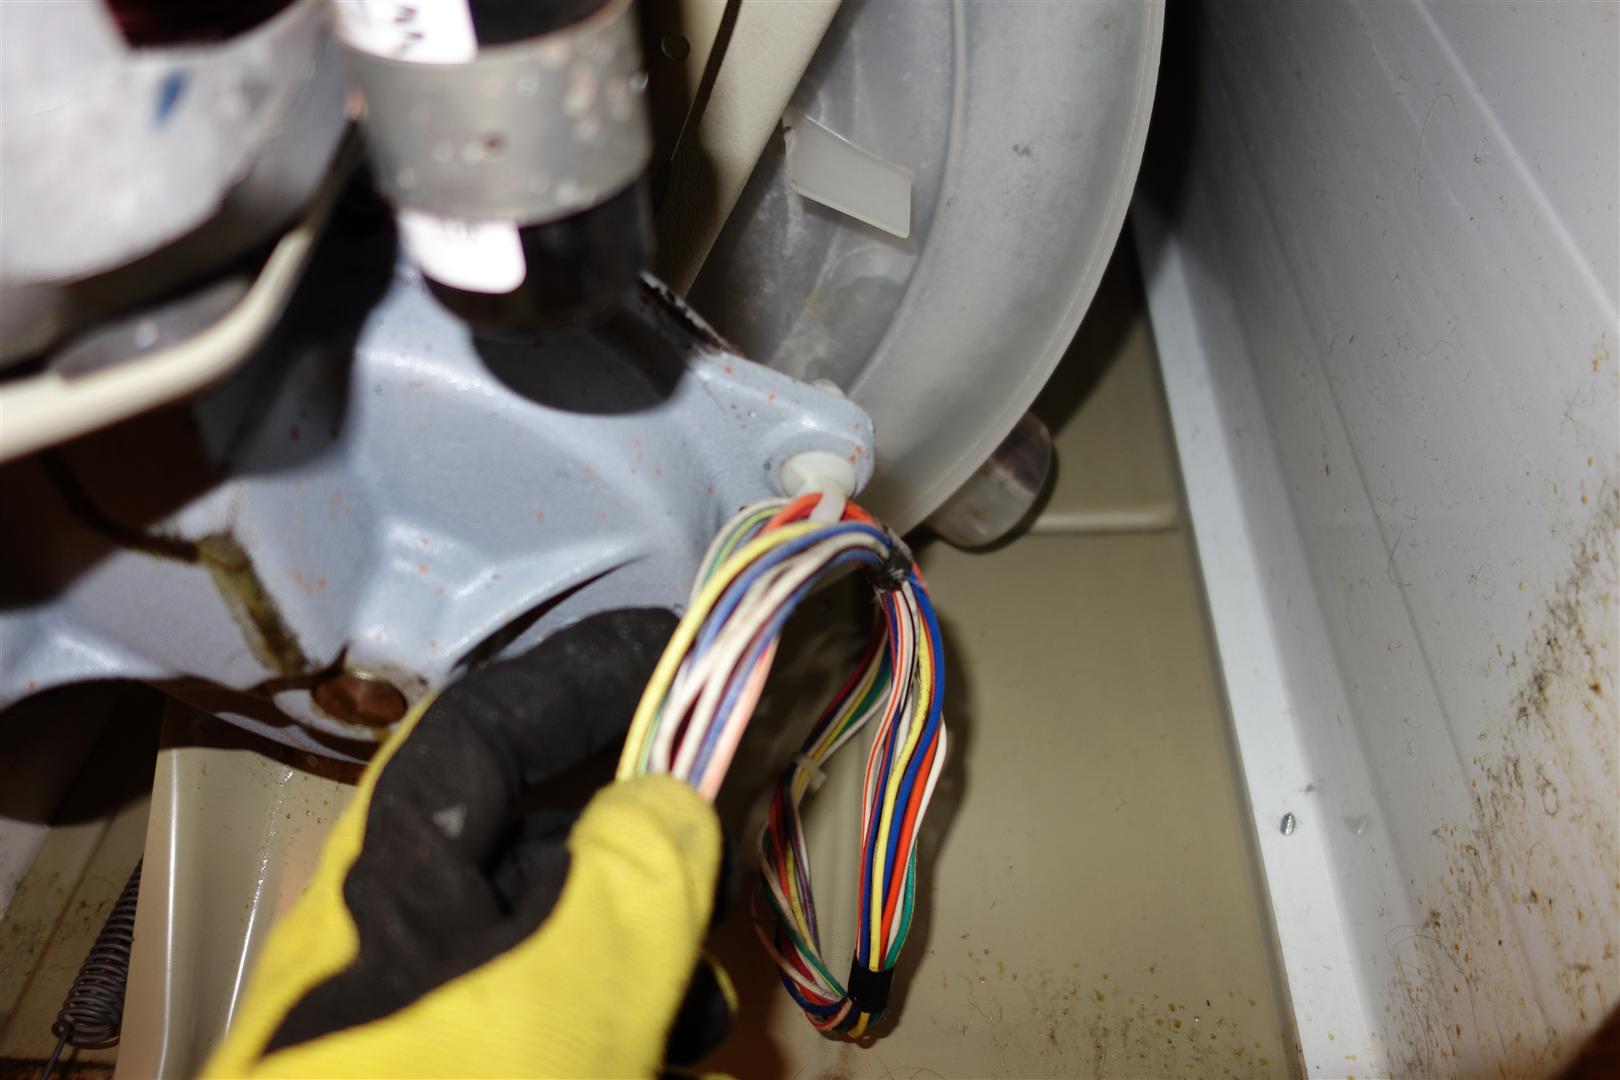
| The last step before removing the
transmission is disconnecting the electrical connectors to the motor. There
are three connectors. You really can't mix them up because they are
different sizes, but pay attention to where they go. Here is a close-up of the second connector to the motor start capacitor. Be careful, it is never a good idea to discharge a capacitor into your body. This is the third connector. Last, remove the bundle of wires from the plastic clip on the transmission. Use a flat blade screwdriver to pry it open. Don't damage it or the wires. |
 |
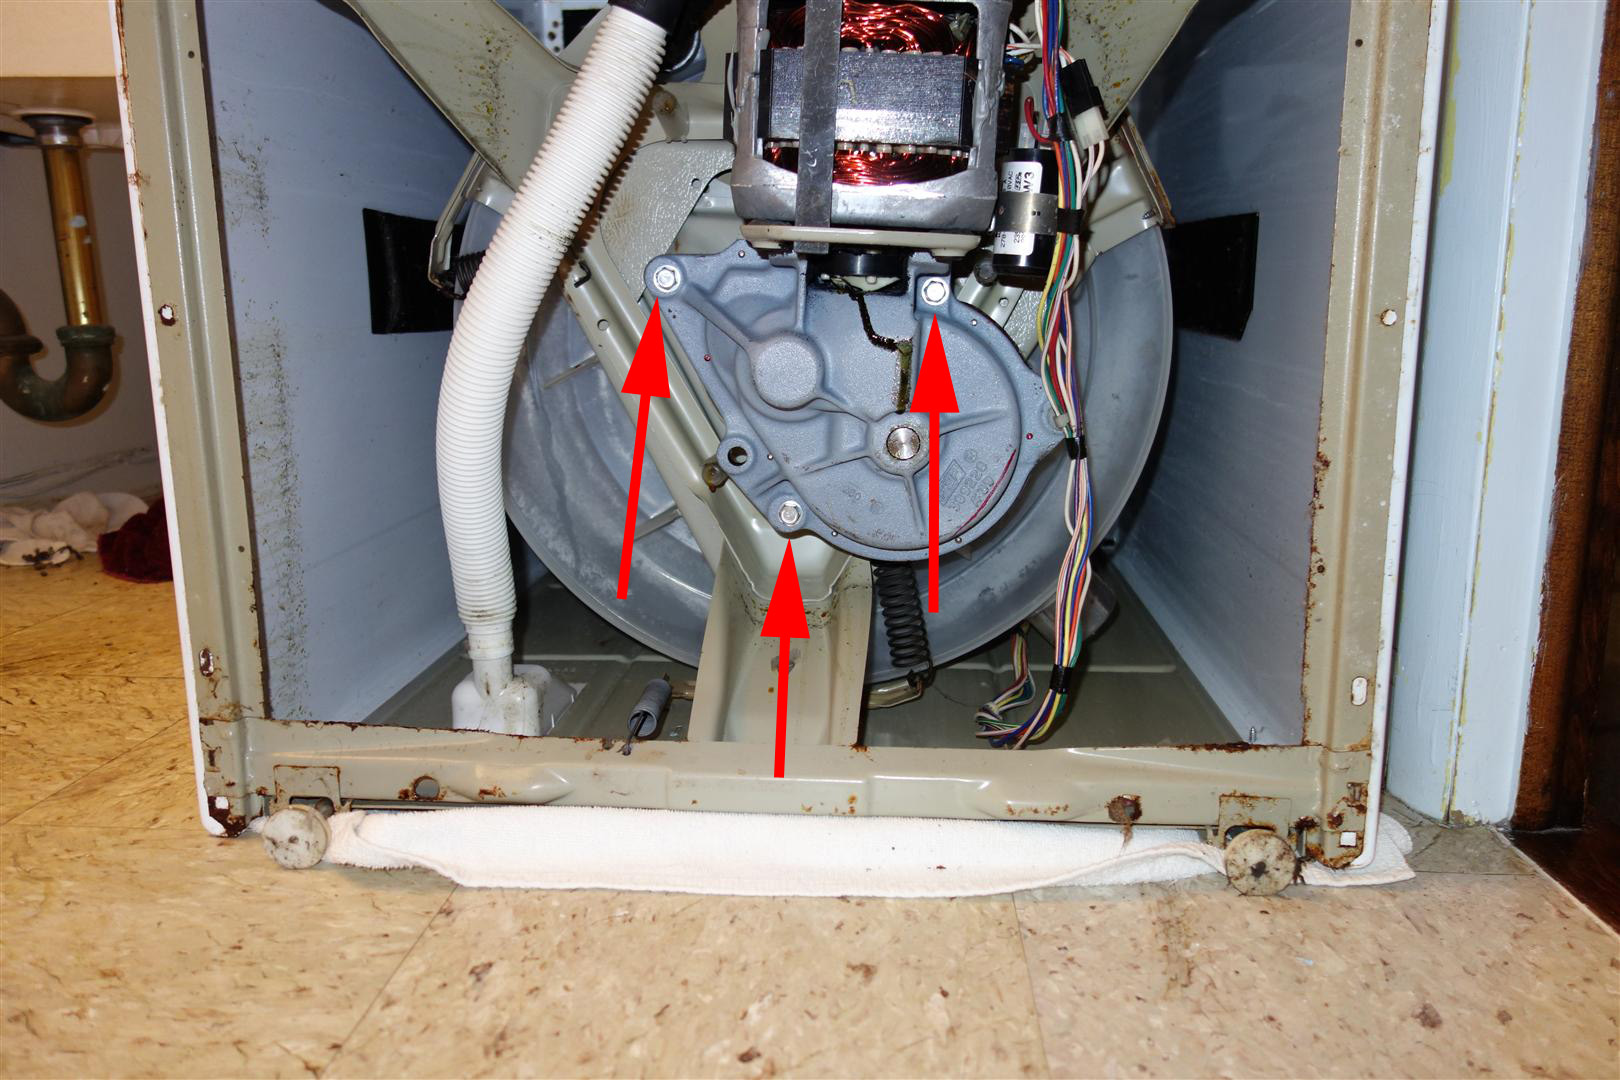
| Now you will need a 1/2" socket wrench
to remove the three bolts which hold the gearcase (transmission) and motor
assembly to the frame. Click the picture to see the location of the three
bolts, but its pretty obvious just looking at it. Once you remove the bolts, you can remove the transmission. Don't worry, it won't fall out when the bolts are removed. You will need to give it a firm tug to start, and then it should slide right out as pretty as you please. Careful, the motor and transmission assembly is heavy! Hold it firmly and put it down gently. |
 |
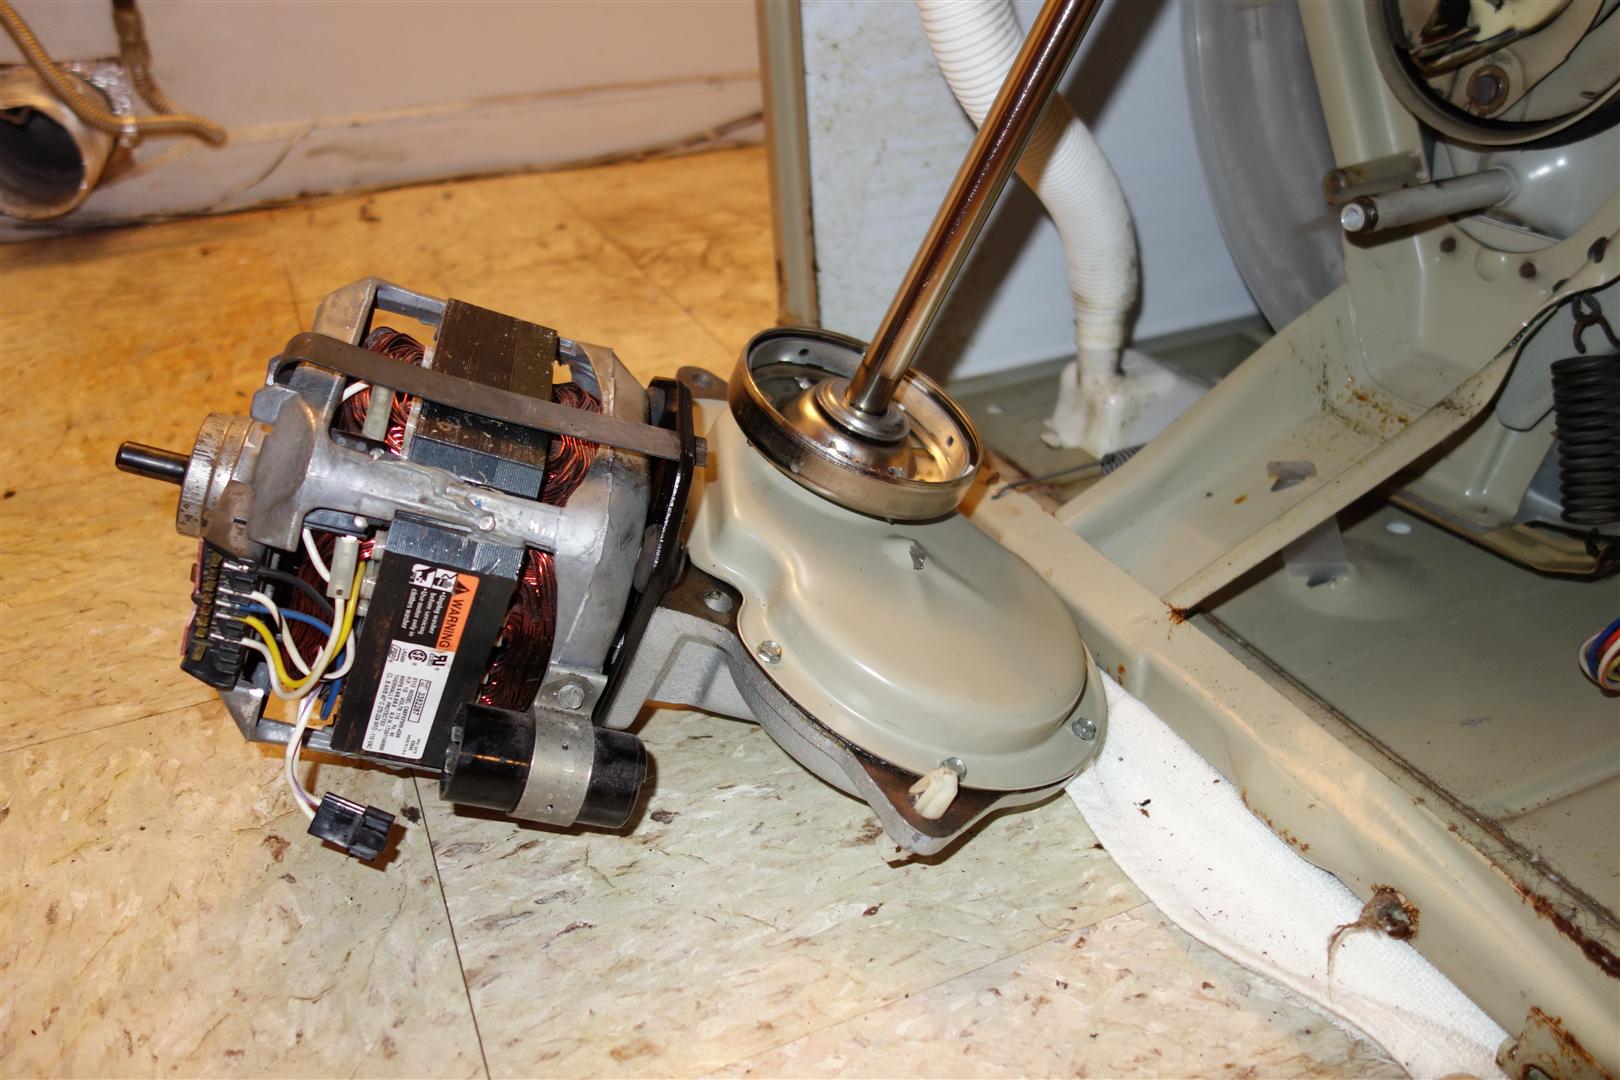
| Here is the washer with the gear case
and motor assembly removed.
|
 |
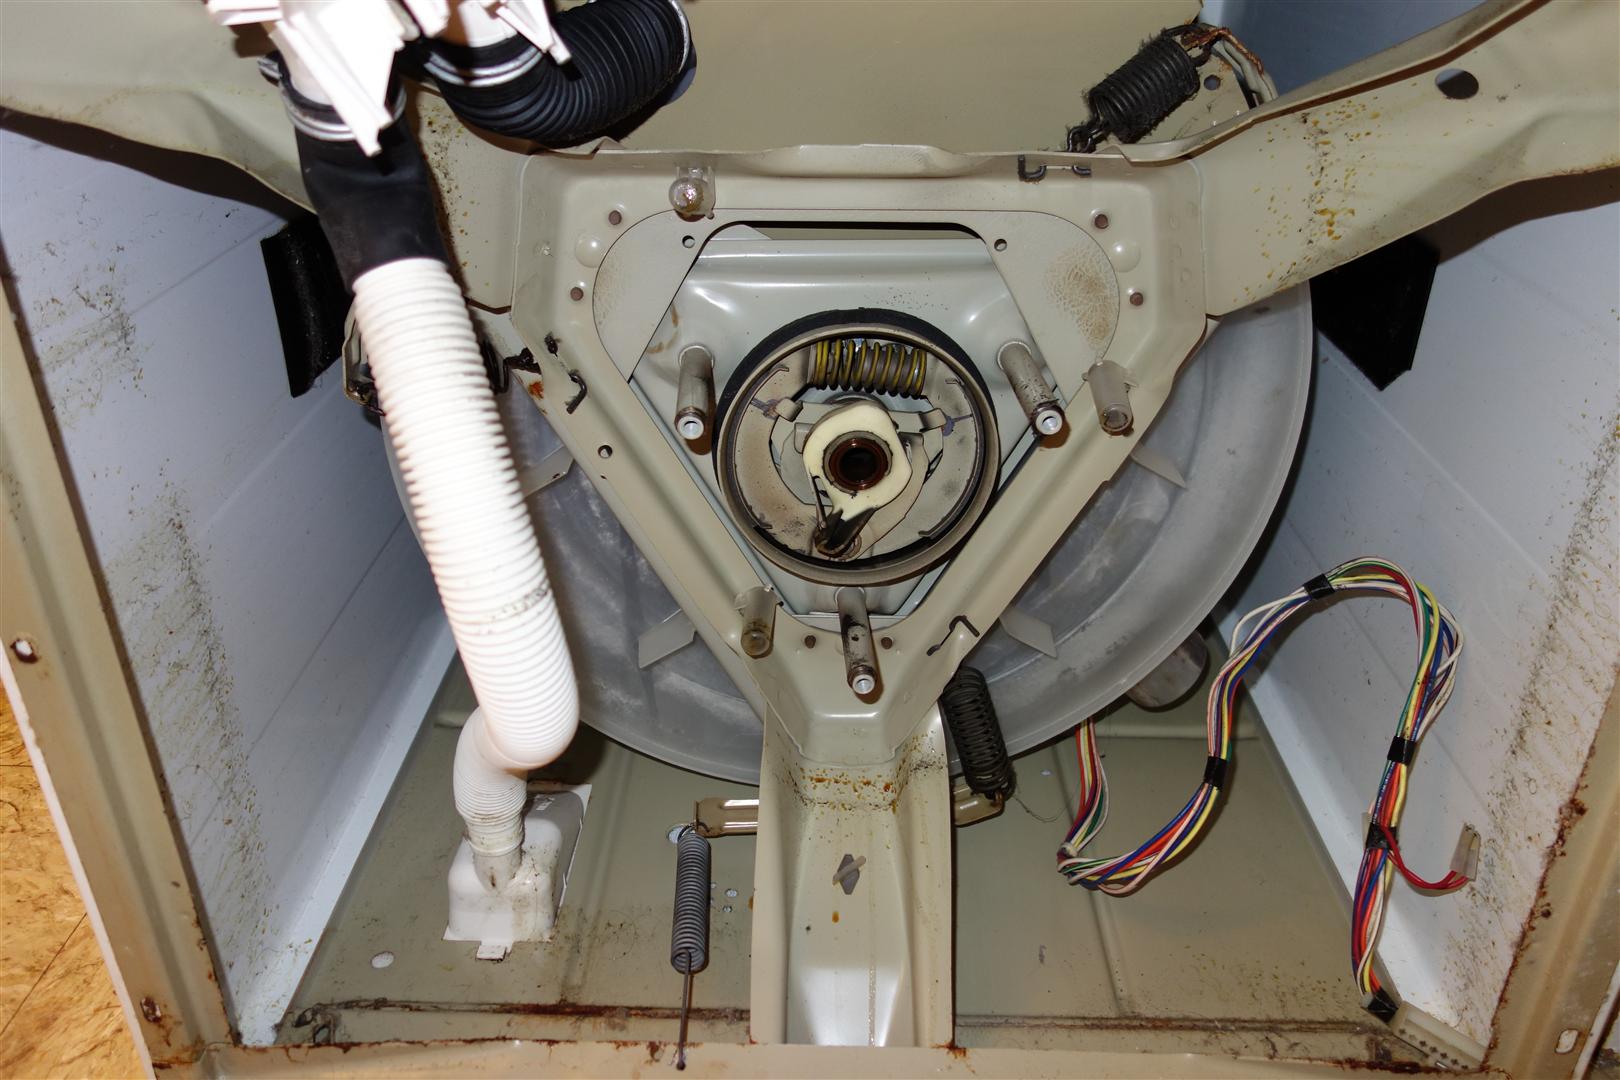
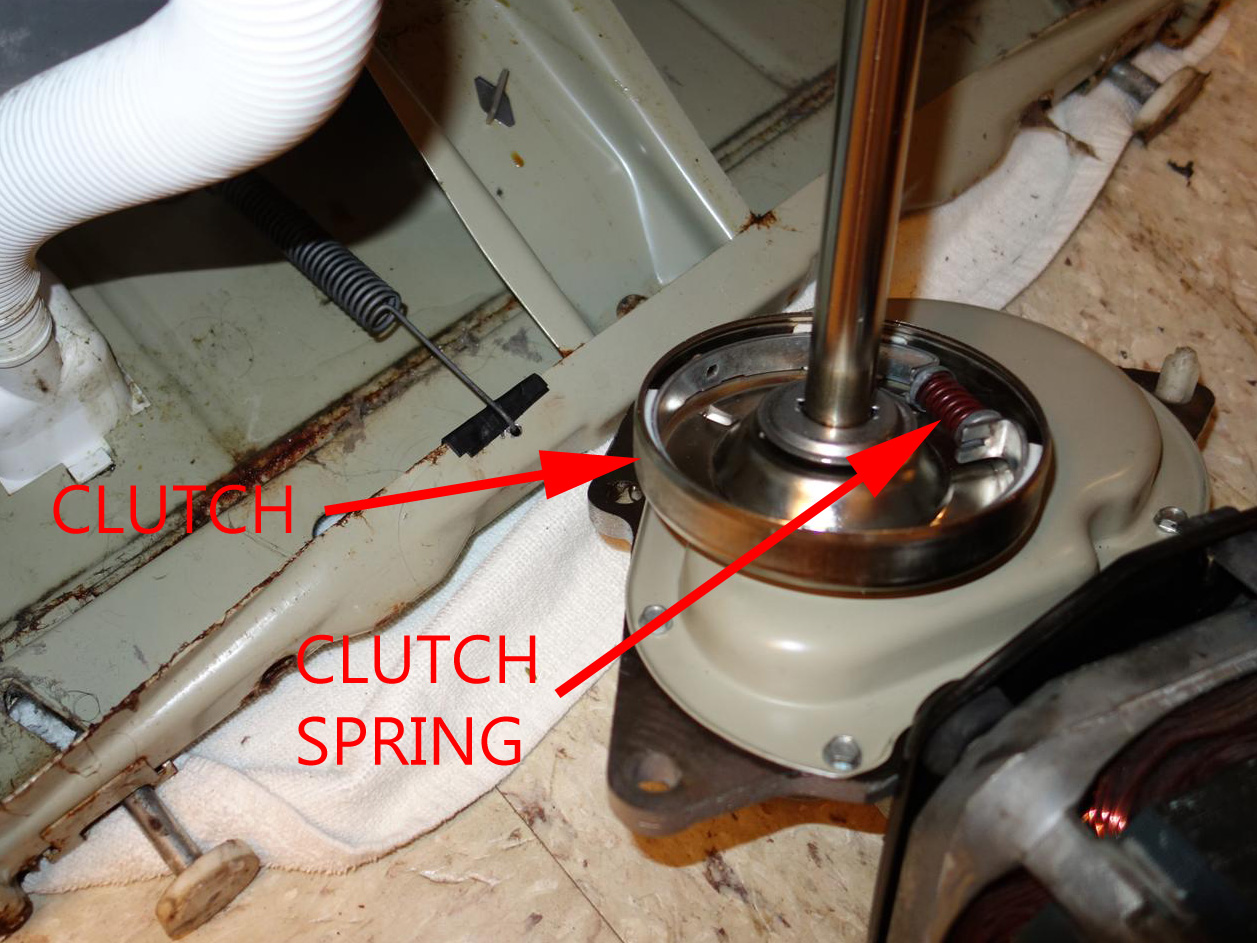
| This is a close-up of the washer without
the transmission. Note the brake cam and spring. When you reinstall the new
transmission, you will want to make sure that the clutch spring does not
contact the brake cam or spring or it won't fit snugly together. Just rotate
one part or the other so that the clutch spring fits into the empty space
next to the brake spring. Click here to see the new transmission with clutch and clutch spring highlighted. |
 |
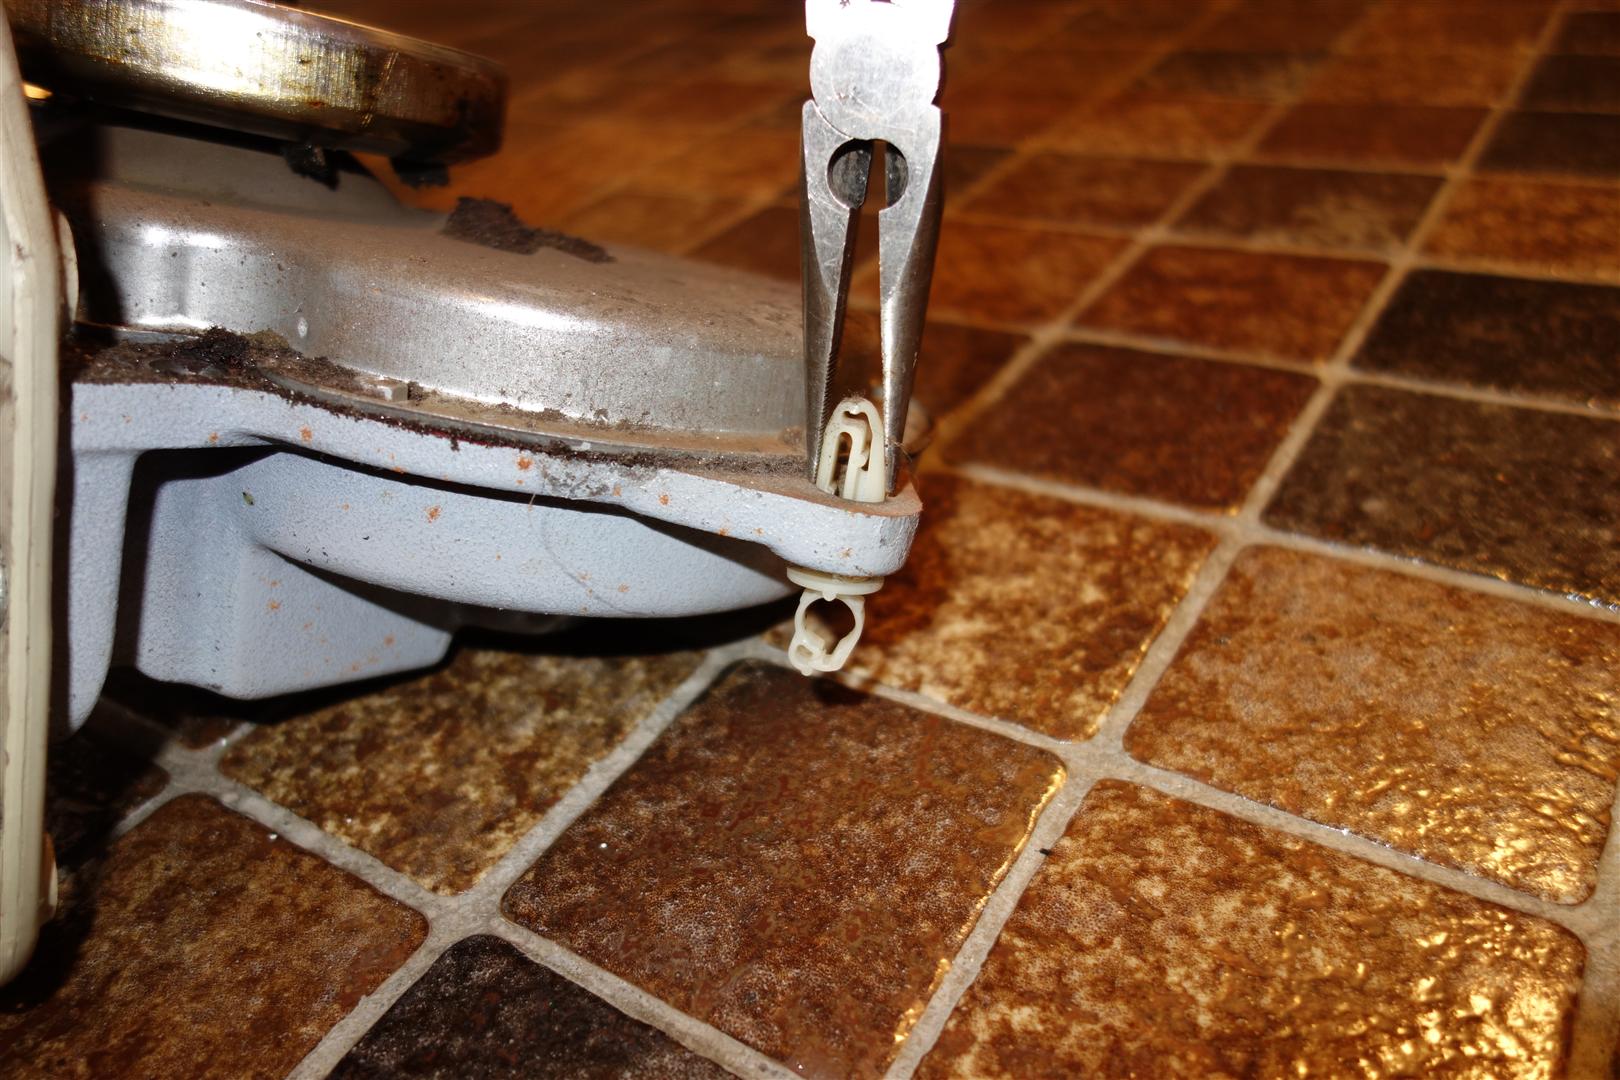
| Oh, before you forget (like I almost did), you need to remove this plastic wire harness clip from the old transmission. The easiest way is to pinch it with a pair of pliers and push it through the hole. Don't break it. In case you do, it is part number 388498. |
 |
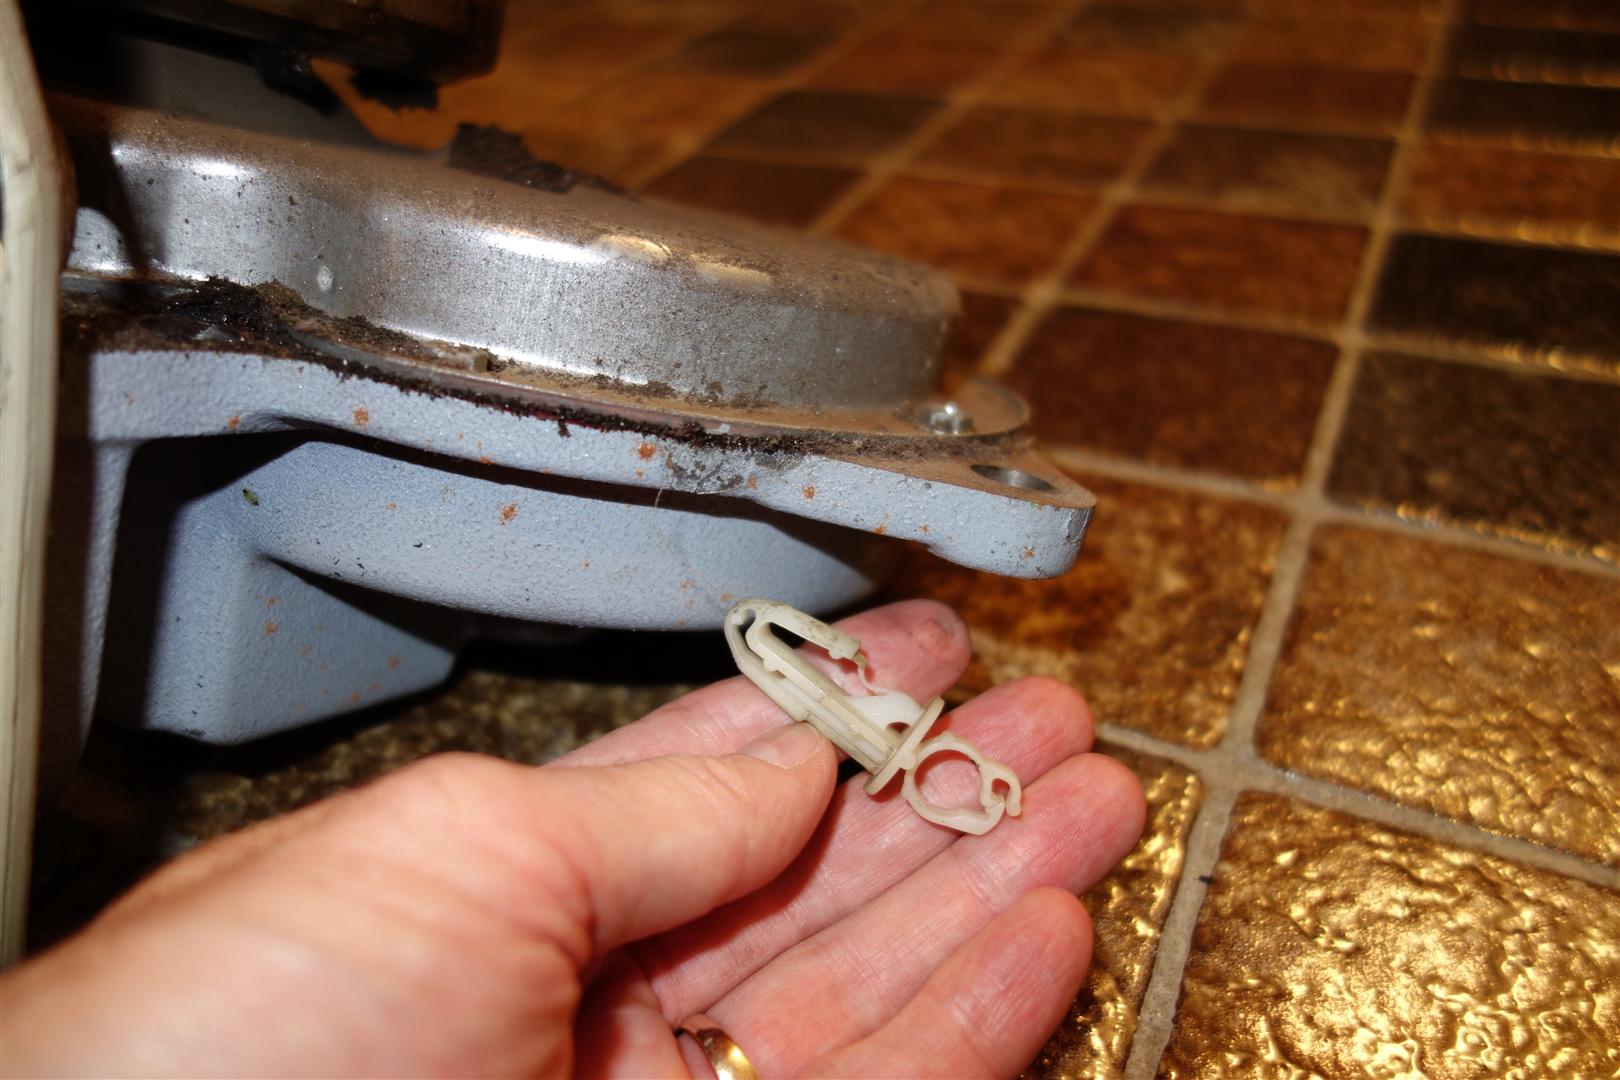
| It comes right out, and before you lose it, pop it into the corresponding hole on the new transmission... |
 |
| Like this. The clip keeps the wires tidy
and out of the way. To my surprise, the new transmission I purchased included a mounting plate. The mounting plate is the black painted thing seen here attached with two bolts to the transmission housing. I knew I paid for a new clutch and motor coupling, but I did not expect a new mounting plate. That was a bonus, and made me feel slightly less upset about the way it was packed. The reason I mention this is because if you did not get a new mounting plate (probably not) then you will need to remove the mounting plate from your old transmission and install it on your new transmission. Not a big deal. |
 |
| But first you must remove the motor from the old transmission. It is secured to the mounting plate by two metal retainer clips. The metal clips are held on with 1/4" screws. Remove the screws with a 1/4" socket. |
 |
| You can pop the metal
retaining clips off with your fingers, but I prefer to use a flat bladed
screwdriver. BE CAREFUL: the motor is heavy and when you pop the second retaining clip off, the motor will fall if you're not holding it. The motor coupler is between the motor and transmission, but it does not hold the motor and transmission together. |
 |
| The motor has been removed. Turn the
metal retaining clips 90 degrees to remove them from the mounting plate. You
can see here the top one has been removed. You will need them in a minute to
attach the motor to the new transmission. Next you need to remove the transmission mounting plate and attach it to your new transmission. The mounting plate is held on with two bolts. I did not need to do this since my new gearcase came with its own mounting plate. Important: Don't lose the motor grommets. There are four. They look like little black rubber donuts. You can see two of them stuck to the transmission mounting plate. The other two are on the motor, shown in the next picture. Put all four on the motor. |
 |
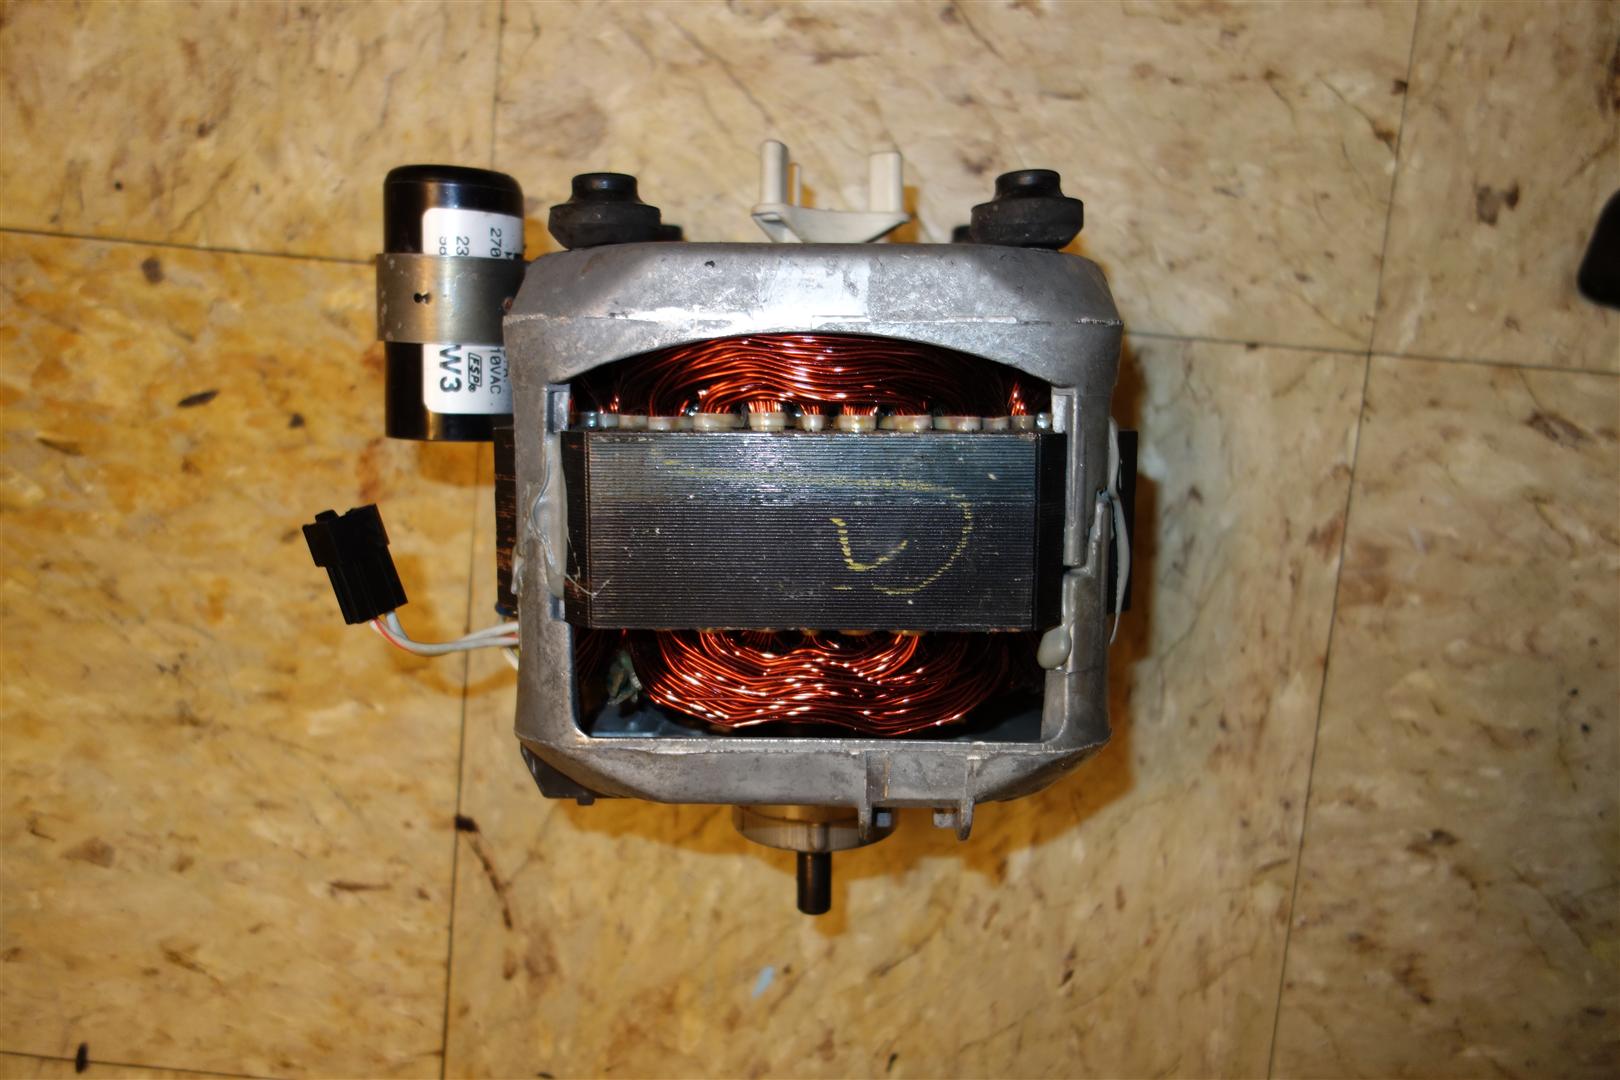
| Here is the motor removed from the
transmission. You can see the other two doughnuts aka motor grommets attached to the
motor. There are four pins on the motor that the grommets slide onto. Make
sure you attach all four grommets or your motor won't seat properly on the
new transmission. Since I have a parts list in front of me, just for fun the
grommet part number is 62691. They are also called vibration dampers. Of course you do have to remove the old motor coupler from the motor since we are reusing the motor and you need to install the new motor coupler on it. Don't be cheap and reuse the motor coupler, even if it looks OK. Just replace it. |
 |
| I didn't need to remove the motor coupler
from the transmission since I'm replacing both the transmission and the
motor coupler, but I was curious about its condition.
It doesn't look too bad, but I have no intention of reusing it. It would be stupid to spend all this time taking the washer apart and not replace a $5 motor coupling, the part most likely to break in any direct drive washer. It is always best to start fresh with a new part. Your time to do the job is worth a lot more than $5. |
 |
| Here is the old transmission and new
transmission side by side. Can you tell which is which? If you've been paying attention, you will remember that my new transmission came with a shiny new black mounting plate. If your new transmission did not come with a clutch, install a new clutch now. Do not reuse the old clutch, tempting though it may be. The clutch slides down the shaft and is secured by a retainer ring and thrust washer. Sorry, I don't have details of this step but just look at your old one to see how it is attached. It's really pretty easy. |
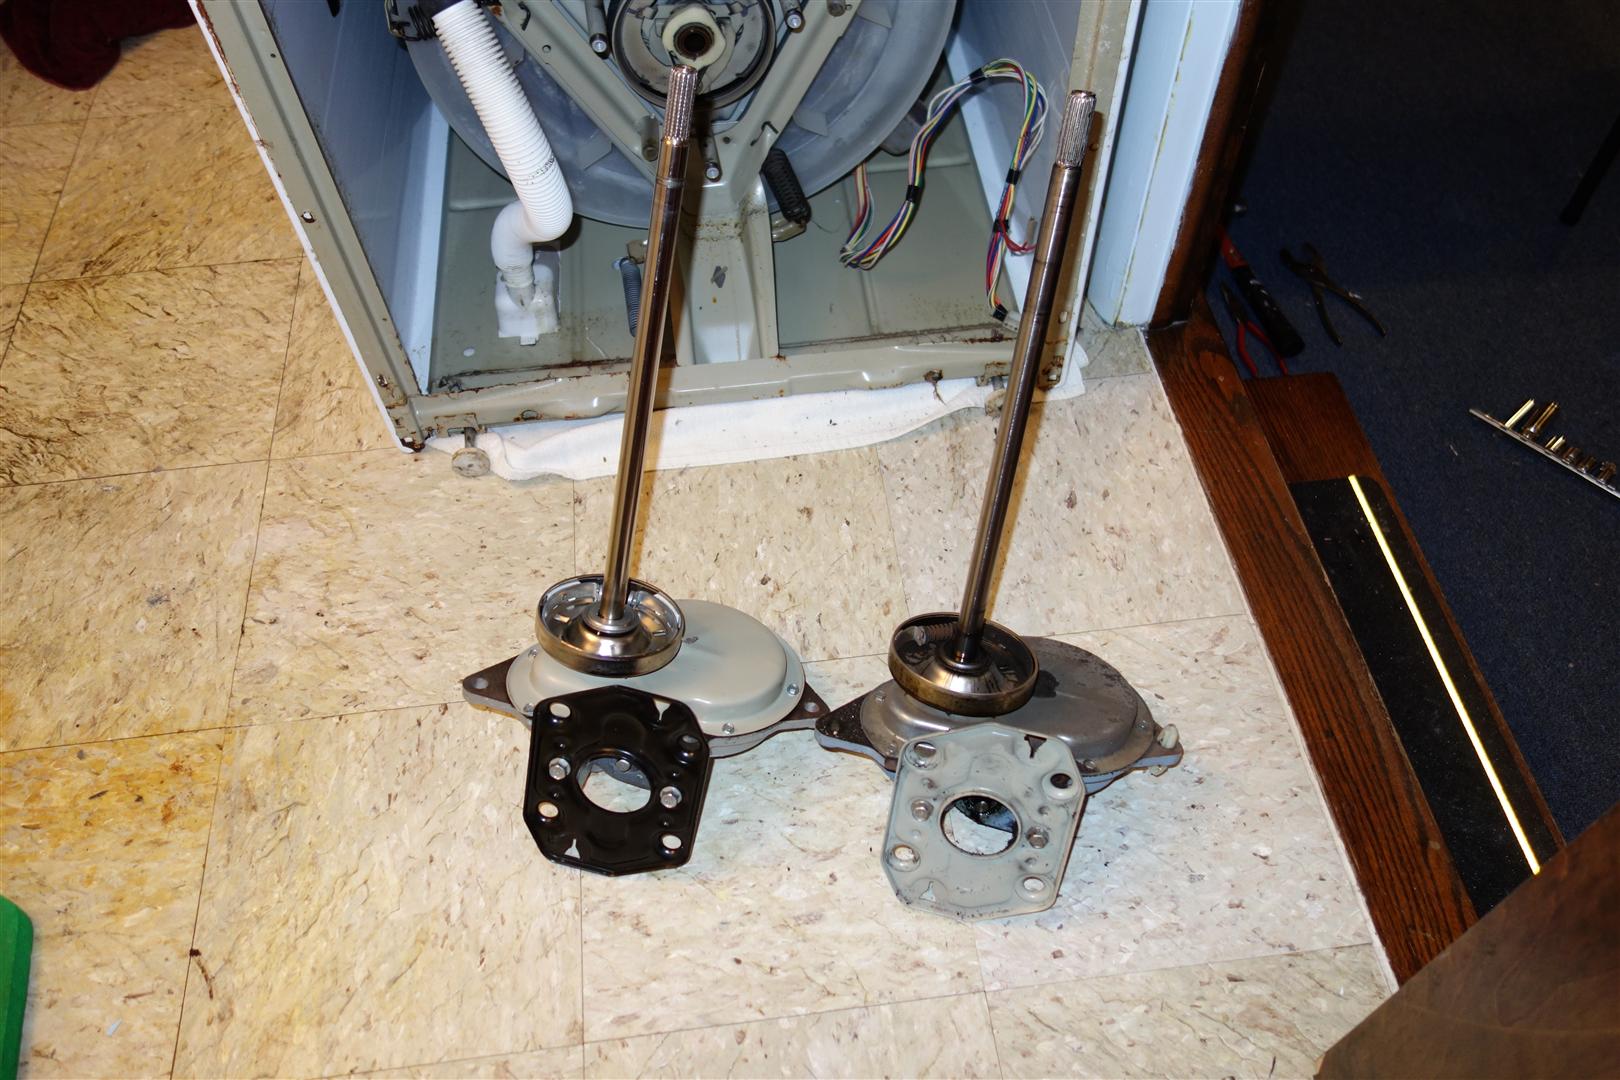 |
| From another angle. The old gear case looks
pretty grungy. I thought about opening it up and trying to repair it, and although it might have been a fun mechanical exercise, ultimately it would have been a waste of time for me. I ended up putting it out with my trash, and much to my surprise, the garbage men picked it up and hauled it away. To finish the job, we need to attach the motor coupler, mount the motor on the new transmission, remove the piece of tape from the tiny hole (not yet), slide the new transmission into the washer and secure it with the three bolts, reattach the electrical connectors and pump, and stand the washer back up. Then reassemble the agitator and we're done! |
 |
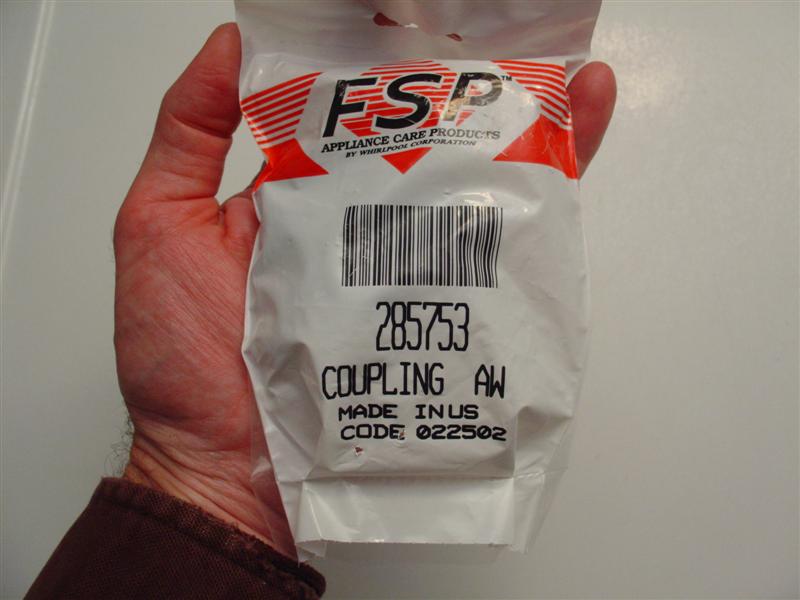
| The motor coupler consists of two hard
plastic gears, one of which goes on the motor shaft and the other on the
transmission, with a thick black rubber isolator between them. The newer
motor couplers have a metal sleeve inside the plastic pieces
that mount on the motor and transmission shafts. Generic parts are just fine. Search online by part number 285753 and you can find them for less than $5 shipped. I always buy them two at a time in case one breaks. Call it cheap insurance for peace of mind.
|
 |
| Put one half of the motor coupler on the
transmission shaft. There are two flat sides of the shaft that line up with
the
flat sides on the motor coupler. Pay attention and don't force it on. It can
be hard to get started. Make sure it is square. Don't damage the part. If you need more details or some tips to get a reluctant motor coupler on, see my main Kenmore washer repair page, and then come back here. Once the motor coupler is seated, use the back of a screwdriver to gently tap it down, so that the end of the shaft is flush with the inside of the motor coupler. |
 |
| What is wrong with this picture? I got careless. I was more worried about the camera and taking pictures, and was not paying attention. I felt really stupid when I realized what I had done, but in retrospect it was kind of funny in a stupid way. Fortunately no harm was done, I just wasted a little time. I'm not ashamed to admit my mistake, and now you know to be careful and not make the same mistake. |
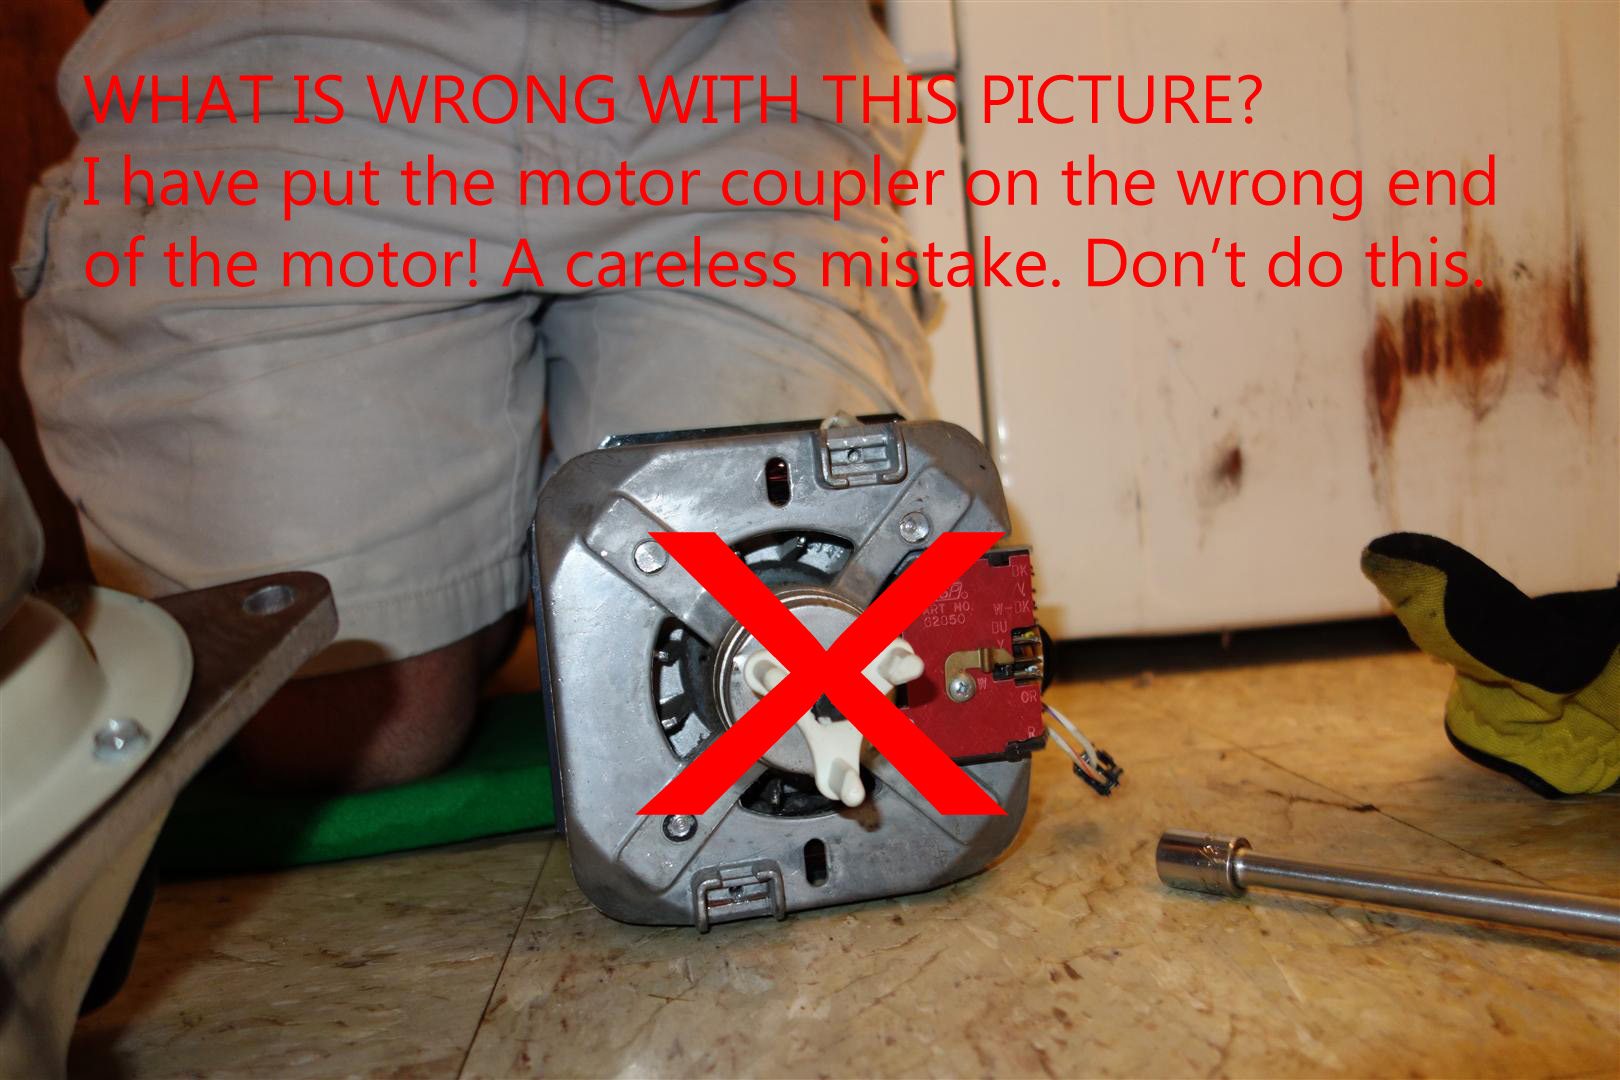 |
| Yes, that looks much better. The motor coupler
goes on the side of the motor with the rubber grommets. Note that all four
grommets are in place. This is what the motor looks like from the top down, ready to mount onto the transmission. Now let's mount the motor on the transmission, reversing the steps above. For more details, see my main Kenmore washer repair page, and then return here. |
 |
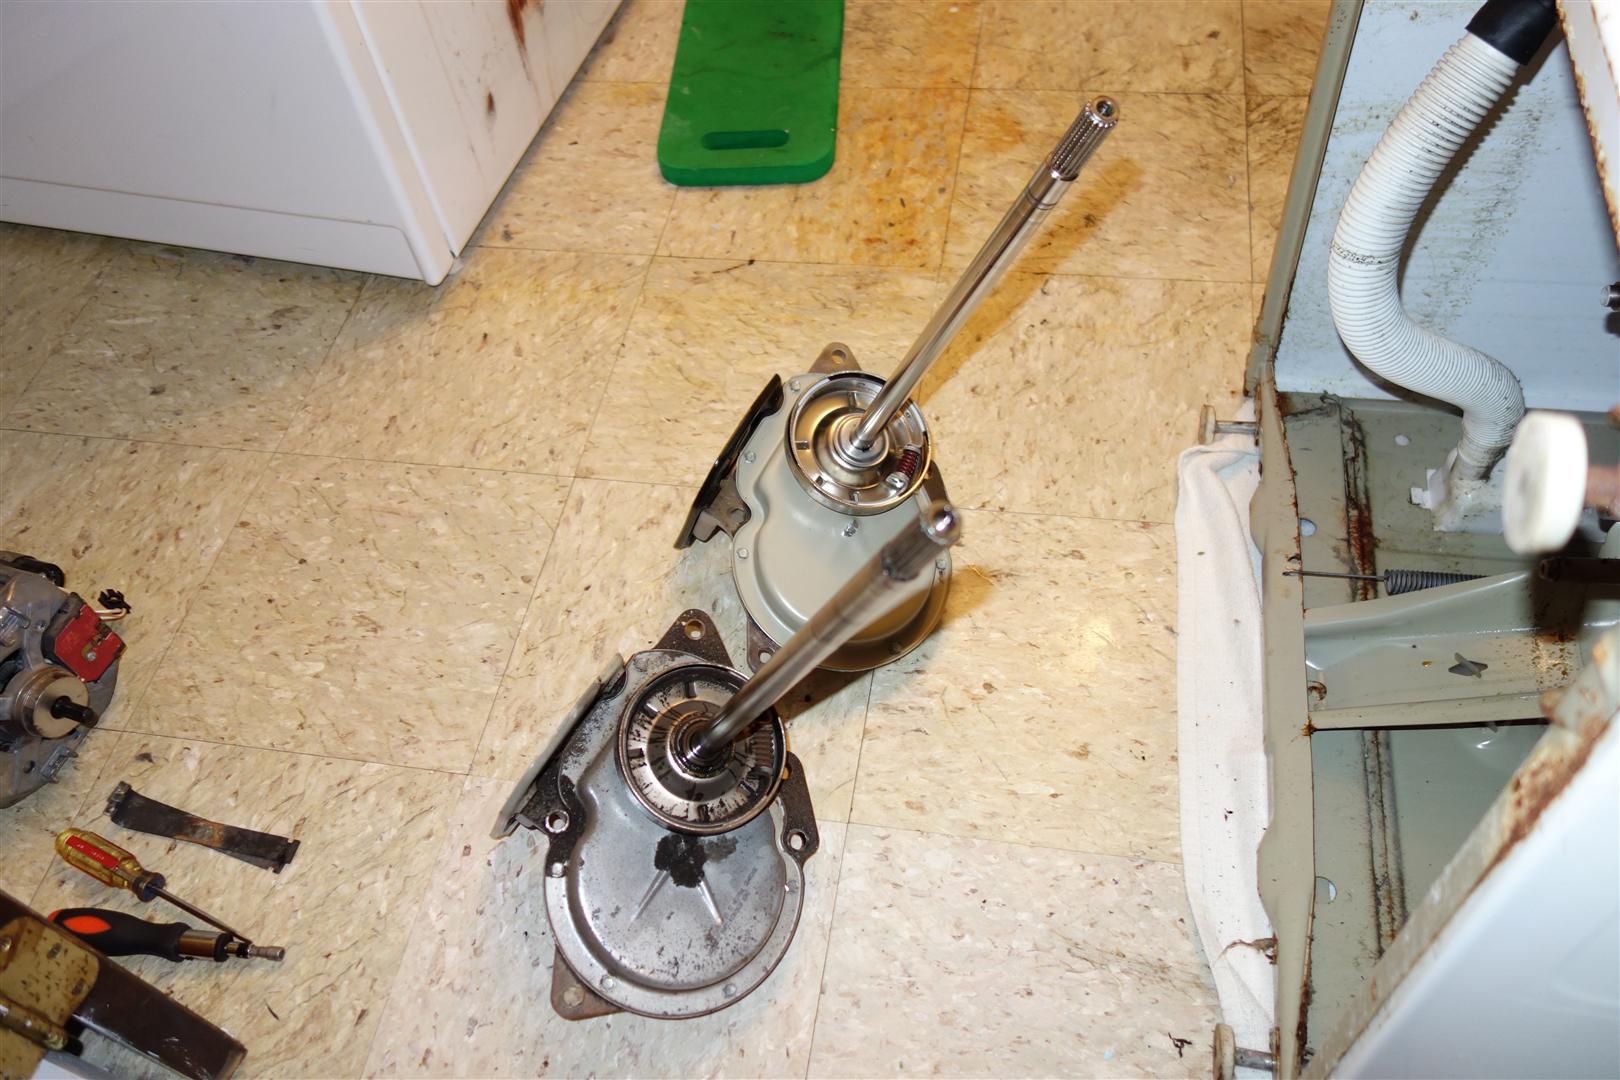
The motor is mounted on the transmission and we are ready to install the entire assembly into the washer. Make sure the clutch spring and brake cam spring are offset so they will not interfere with one another. If they hit each other, this will prevent the transmission from seating properly. Remove the piece of tape so that the tiny hole is exposed. Important: Once you tilt the transmission, the clock is ticking. Oil can leak out of the hole so you will want to work quickly. The oil is fairly thick so it's not going to pour out like water, but you definitely don't want to leave it on its back like this for any length of time. Five minutes should be enough time to finish what you have to complete in order to get the washer upright. I am putting my camera down so that I can work faster. I'll describe what I'm doing. |
 |
Slide the transmission assembly into the washer. Secure with the three bolts. Reattach the three sets of wires and the pump to the motor. Secure the pump with two metal retainer clips. If in doubt, see instructions above and reverse steps. There is also more detail on my main washer repair page if you need it. Stand the washer up. Don't hurt yourself. Get help if its too heavy. You just saved a lot of money repairing your own washer. You don't want to spend it on doctor bills. |
|
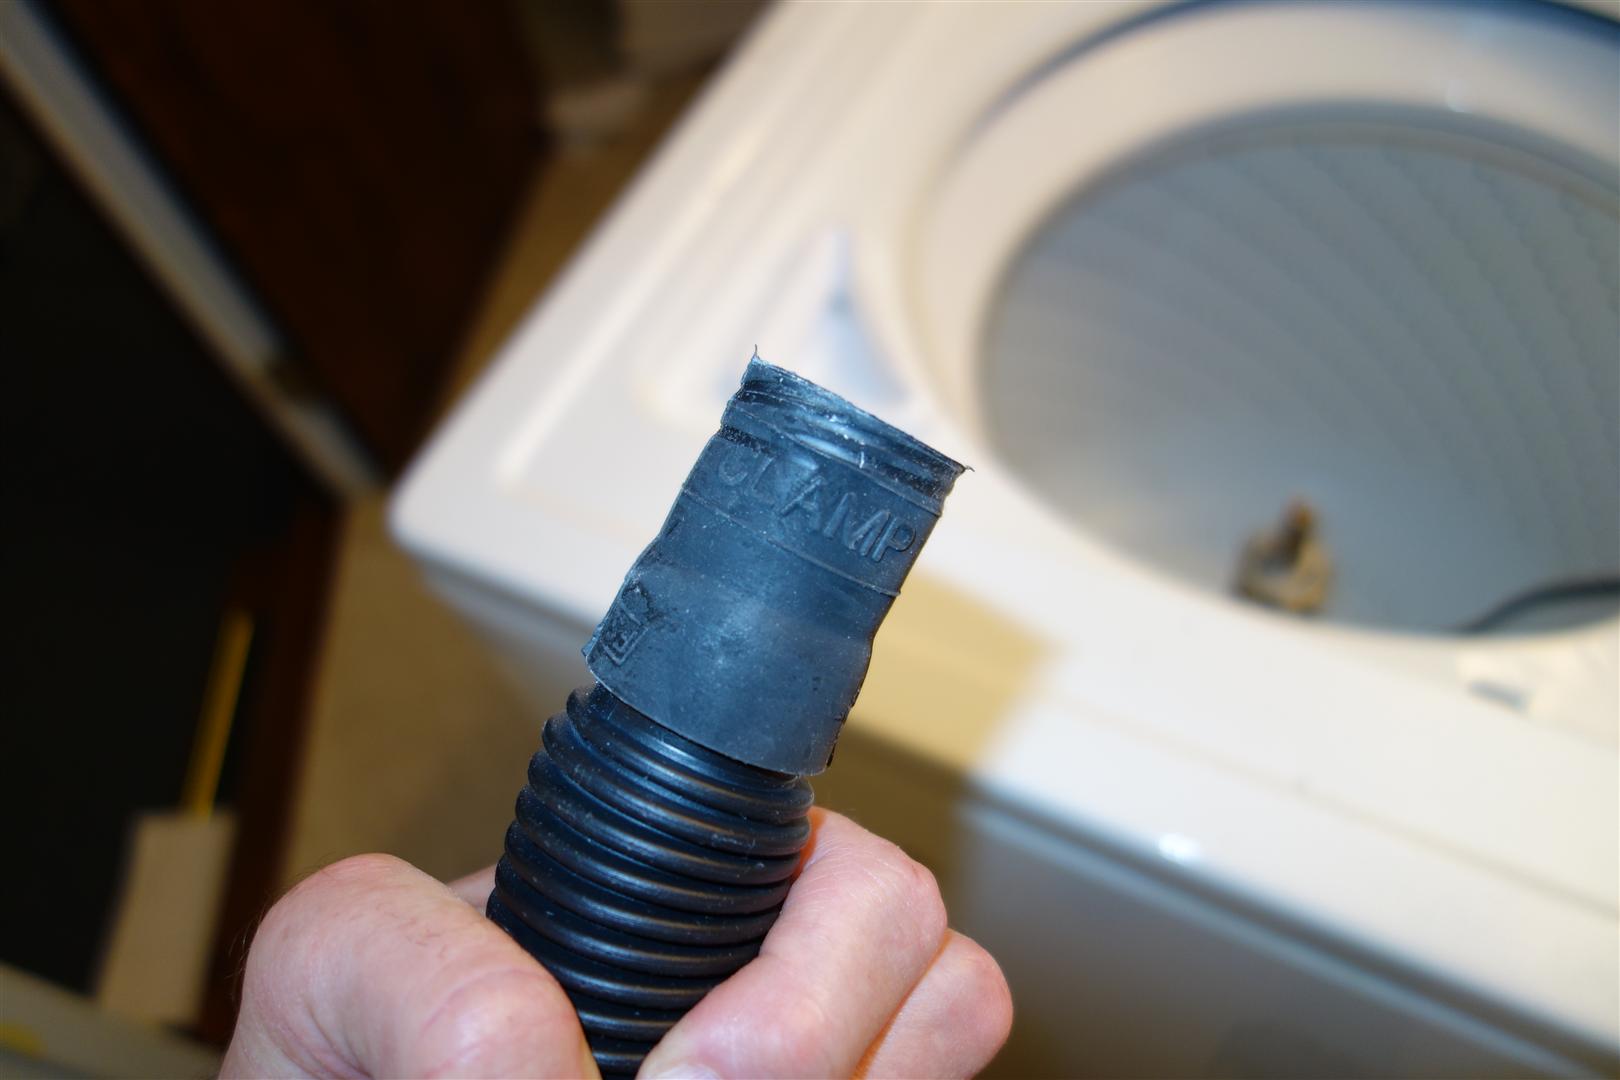
| Reassemble the agitator. Reverse my
instructions above. Reconnect the water supply hoses and the drain hose. In case there is any doubt, the drain hose is marked where the hose clamp should be positioned. Turn on the water. Plug in the washer. |
 |
| Now it is time to test out the washer. For a test load, throw in the towels you had on the floor. Run them through a normal cycle. Check for any leaks, unusual noises, vibration, etc. If you have been careful, there should be no problems. |
 |
| Good news! It's working perfectly! I have some videos
of the spin cycle before and after if you're interested. The "before" video
is at the top of this page. The "after" videos are down below.
They are all on YouTube if you search "Kenmore 90 series washer" or go to my YouTube channel. My name is Jim, and if you have any comments or questions, feel free to email me. Click the Comments? links at the bottom or top of this page. |
 |
I am happy to provide this information for free, so please do not feel obligated, but it does cost me money to maintain this website. If I've helped save you time, money, and a little aggravation and you'd like to say thanks with a small donation, I really do appreciate it.
| Home |