| Home |
Comments I have received about my
Miele repair page
Here are some of the comments I have received about my
Miele vacuum cleaner repair web page. I try my best to
reply to every email I receive and to offer any suggestions I have for repair.
There are also quite a few tips in here about other Miele models, so if you're
looking for something specific, search this page.
Hi Jim,
Thanks for the reply.
I checked further and it turned out to be the cord. Thanks for the tips.
Best regards,
Mark D.
Thanks a great site and even though we had problems with a Miele 700 HEPA we managed to take the machine apart and reconnect the jumped connection......we are not that practical and this site gave us confidence that it could be done.....the 700 was broadly the same but slightly less complex that the one in the pictures
FABULOUS!!!! Thank you very much for going to
the trouble to educate us Miele lovers!! My machine has just packed up (it is 11
years old now!) ; I have got to the point of realising that the black electrical
connector seems to be at fault. So I am searching the web for suppliers.
Many thanks!
Emma P.
Wiltshire
UK
Jim,
Thanks, you were right about the need for washers to keep the cord-reel contacts
under pressure. I previously tested with an ohm meter with the vacuum
disassembled, and continuity through the power cord looked fine, but motor would
not run until I shimmed it. Now to get some ~0.55" ID washers, and I'll be in
business.
Thanks much for your follow-up note, really appreciate the help. Happy to
contribute to you and others who make this information easily available.
--Dan
Subject : Miele Silver Moon
Jim,
I pulled my Silver Moon apart today using your photos and text as a guide.
Though not the same machine and year the designs were somewhat different but not
enough to deter me as I could see what had to happen.
Using your info, the concept of dis-assembly was the same and once apart I said
hmmmmmmmmmm, now what?
Thanks again for your thoughts on "the cord winder more than likely worn (loose)
and had developed side to side play on the spindle"
With this in mind, I pushed the spindle to the side while I placed a meter on
the power terminals while plugged in, sure enough 115vac when pushed and 0 when
not, no matter how far out or in the cord was.
I found a couple of washers in the garage that fit and put it back together and
it worked great!
The wind up was a bit slow and so I decided to pull it apart once again (piece
of cake the second time) and I made a trip to the hardware store with my
calipers and bought a washer, that combined with one of the two original ones
gave me a combined thickness 0f .170 the original two were .216.
I smeared a little graphite powder on them, threw it back together and voila!
Everything is as good as new!!
I can't thank you enough for your info Jim, my cost to repair 43 cents!
John B
Englewood, Fl
I wanted to thank you very much for creating the
website on repairing the Miele vacuum cleaner. I accidently let the electric
cord rewind crookedly and it got off of the reel inside the vacuum. My husband
took the vacuum apart as I read your instructions to him and we had it fixed in
no time at all. Thanks so much!!
Thanks for the info. My wife has a model 500 and
your information was very useful. I was able to take it a part, which I was not
able to before I found your site. I was able to get the spring to work without
purchasing a reel assembly.
Thanks again
Jimmy L.
Atlanta Ga.
Well done! Needed to change the switch. Without
your site, I could not have safely removed the top cover. And your referral to
the Potomac site was spot-on. Got the part in a couple of days, and the repair
took 5 minutes. Cleaning the inside of the vac took the other 15. For $20 all
in, back in business. Thanks again
Andrew S.
Thanks for putting this online. Our switch
quit working and I could not figure
out how to get to it without possibly screwing something up. You gave me
the 'secret handshake' by telling me to just pull it after I removed the two
screws. You are a fine person. Thanks.
Best Regards
Doug
Your web page and pictures are wonderful !
My Miele S514 has intermittent electrical problem, which turns-on/off when the
cord is extracted. I am going to attempt to repairs myself (using Vacuums24x7 as
needed)
Any additional tips or advice appreciated.
James I.
I also have a white star that needs repair. I
wonder if you could help on what the problem might be before I purchase parts.
When I hit the power switch the unit will not come on at all, however, if I hit
the cord rewind and the power switch together the unit will come on. Sometimes
just for a few seconds. If the cord is touched in any way the power goes off
again. And sometimes when I pull on the cord the power comes back on. Any
thoughts on what this could be? Your site saved me a lot of time taking it
apart. With 7 cats and 2 dogs I really need my Miele back. My Hoover upright
can't get all the hair.
Thanks, Carol D.
Congratulations and thanks so much for valuable
information and pictures. Yet another example of philanthropism on the web.
I have a similar winder problem and feel confident enough to take it on thanks
to your site.
Regards,
Niall Mac U.
Ireland
Wow - great documentation. Over the years I've
done some minor fixes to my White Star. But today I fear the on/off switch died.
Need to get this fixed proto with holidays coming. Fortunately I live here in DC
and have some great resources.
Will call Potomac to see what their turn around is.
Chuck K.
Hello. I did a Google search for info on why my
Miele stunk every time I turned it on, even after bag changes. I didn't find the
answer, but I found your interesting, informative, and fun site.
Thanks so much.
Jan S.
Parkton, MD
hi,, thanks so much.. hey I used a zip tie,, works much better i think,, just a
thought.. i so appreciate your time that it took to put that site up to show how
to take the machine apart.. you have saved me a pricey service at a Miele
dealer.. thanks again,, Katie
I, too, have a Miele canister (the red pet version) & my
wife has a tendency to step on the cord release & allow the cord rewinder to
slam the cord back into the vacuum at something just short of the speed of
sound, even though I've told her a zillion times not to do that.
Finally, she did it one time too many & apparently an electrical connection
inside the cord winder assembly was broken or damaged, as the power was
intermittent & dependent upon how much of the cord was not rewound.
I started several times to fix the thing (I mean, jeesh, I paid over $700 for
the machine), but the task was somewhat daunting due to the way the machine is
assembled (job security for Miele repairmen, I suspect). So, the poor little red
Miele just sat in a closet, waiting for the day I really got ambitious or that I
found a Miele repairman who didn't require a second mortgage on the condo to pay
for repairs.
Your site saved me. The self-repair was easy and quick & saved me about a
million dollars.
Bless you!
thank you for the info. "great job"
Thank you so much for your site! You saved me�I knew this
was something I could do, but like you�couldn�t find any DIY sites for the
Miele�I have now used your perfectly laid out instructions and pictures are
great!
Many Thanks!!!
Magdalena
Glad you put this page together. I started to take my Miele apart and only got two screws off and was mystified already. Great details.
Mark B.
Hi There,
Thanks so much for putting your page up. Not only are Miele unwilling to let any
information out, so are the local electrical guys. Anyway, thanks to your page I
managed to ascertain that power was getting as far as the carbon brushes on the
motor and the thing was still not working, so I sent it off to Miele for repair
this morning, as the motor costs twice as much as their all in repair fee which
their operator told me I was still eligible for.
We'll see, but my point is you've put up a really helpful, useful page which is
a model of clarity. Thanks again,
Chris M.
London
Hi! Thanks for your webpage. It enabled me to get this vac
apart much quicker than wading through the process myself. However, I did my
reel replacement for $10 instead of the almost $100 it takes to order the
cord winder with cord. If you are interested, send me a reply and
I will explain what I did. Again, many thanks,
Georgia B.
Thank you..
Just discovered your repair tutorial re: Miele vacuum. For an over-engineered
product from Germany I never expected to have this little baby in the shop as
many times as I have. My old Hoover canister, purchased in 1965 has been handed
down to my daughter who, like me, is a bit of a "vacuum eccentric". It has never
been in the shop!!
My problem sounds like yours in that it involves the cord reeler. Unlike yours
my cord reeler continued to work but when actually used kept shorting our the
motor. I thought I had fooled it by not using the reeler, but alas it has failed
again. Now with your pictures I will beg the husband to attempt some repair
work. Since the Miele is his favorite of our 5 vacuums, I bet he will be anxious
to tackle the task. For me, I love my 55 year old Silver King. Now that's a
work-horse.
Anyway, I just wanted to say thank you for sharing your expertise and pictures.
The job may be more than the hubby can handle, but at least I know I am not the
only one having problems with my "Mercedes Benz" of vacuums.
Karen L.
Hi
I have put up with my cord being permanently stuck out of the vacuum cleaner for
some six months.
Today, I decided that enough was enough!
I searched the net for the replacement cord winder and isolated the exact part
required.
As today is a Sunday, none of the service centers are open so I proceeded to
search for instructions on how to actually install the replacement part when I
had it.
I found your website and followed the instructions. Though varying slightly from
your model, the pictures you supplied were enough to motivate the great journey
to the centre of my S280i.
Low and behold, after about 15 minutes, all is repaired, the cord winds in
perfectly and I am happy to use my Miele once again.
So, thanks for your inspiration and if you ever need photo directions for the
S280i, let me know and I will send them through to you.
Kind Regards
Anthony W.
Melbourne, Australia
Dear Jim,
Many thanks for taking the time to write your DIY guide to vacuum cleaner
repairs. It helped me fix my errant vacuum and saved me spending any cash. Next
time it goes kaput or I need advice on
raccoon wrangling I'll be sure to check out your site.
All the best,
Mark E.
Thank you Jim! Thanks to your feedback, we were able to
simply replace the plug! (We got a sturdier one than what came with the vacuum
cleaner - it should withstand those frequent yanks much better.)
Even though your pictures make it look very easy, I'm glad we didn't need to
take apart the vacuum cleaner - this time! But I will check your website if we
ever do!
Thanks again and take care.
Claire
Hi,
I was really happy to see your webpage about how to fix the cord winder. I can
barely afford the part, but this will help me a lot, especially since I have the
exact same vacuum as the one pictured. I have a question. The problem I have is
that I can get the vacuum to turn on if I fiddle with pulling the cord in or
out. Eventually it will make a connection and go on, but it is intermittent (the
button you push to turn the vacuum on hasn't been able to stay engaged for
awhile so I have had to use tape along the top of the button and then down the
side of the machine to keep it pushed down so the vacuum stays on). Would this
still require I replace the whole cord winder, or is this a connection I can fix
like you did with the electrical tape? Thank you so much for your help!
Megan
Hello,
I came across your tutorial after having a smoking connector this morning. We
tend to inadvertently pull the plug out of the electrical socket more than is
good for it and this time the connector started burning � left a black mark on
the socket plate.
Do you know if there is a way to replace the cord?
We recently started having the intermittent electrical short too � probably
because of this issue.
Thanks,
Claire from Danville, CA
Thanks to your site I managed to take my "English" Miele
to bits without struggling. For now it works at full power as I have had to
bypass the burnt out circuit board.
Thanks again
Tim H.
Toddington
England
Appreciated the Miele disassembly instructions!
Thanks very much!
Sebastian W.
Pret A Manger
Just wanted to give you big thanks for this Miele repair
info. Like your wife, I treasure my Miele. I have repaired the cord end itself
numerous times, but now its time for the whole cord winder. Luckily, I've had
mine for 8 years, and with the exception of the electric plug itself needing to
be replaced, I haven't had any problems. When I went to my local guy to fix the
cord, they wouldn't touch it. I figure I can fix it myself, but like you, could
find very little on the web and precious few dealers who even sell the cord
winder at a reasonable price. THANK YOU for taking the time to share your
experience and provide it to the rest of us!
Sincerely,
Georgia B.
Hi Jim;
My name is Joe from Vermont, and I was having a dickens of a time with the
vacuum until I was fortunate enough to find your helpful site. I was able to
disassemble and diagnose, but it will be a job for the repair shop.....at any
rate, thanks again for the useful info (pics were great) my best to you and
yours. This is what I love about the 'net!
Regards, Joe
I am so grateful for your repair site! Thank you!
Now my Query:
My cord winder won't work. Is it likely to need a part or is it just tangled?
I'm not wanting to disassemble it and lack a vac while I wait for a part!
Rob
Thanks for the information on how to take the Miele apart.
Our problem was when we pulled out the plug the vacuum would shut off. I took it
apart and cleaned the contacts and put it back together and hopefully it will
continue working. It sure made taking apart the vacuum so much easier with your
directions. That was very thoughtful of you to do this other people. Thanks,
Tony
So even though the whole switch assembly on mine rises and pivots off the back and doesn't pull straight up. And the guts are mounted to the base and not the top, your guide was very helpful.
My problem was a lack of continuity of power off the reel going to the switch - motor. There are contacts on the reel that rotate 360 degrees to the stationary reel support part. One leg was mostly not making contact so it would not run, or cut on and off as the reel as pulled. The solution that I got years ago from a repair tech is to put a large metal washer on the opposite side of the reel which creates just enough increased pressure on the reel to create a new contact point and solve the problem � at least for a time.
Hopefully this can be shared with others.
Thanks
Paul
For the record, my own vacuum cleaner is dead after 13 years of service :(
S�bastien L.
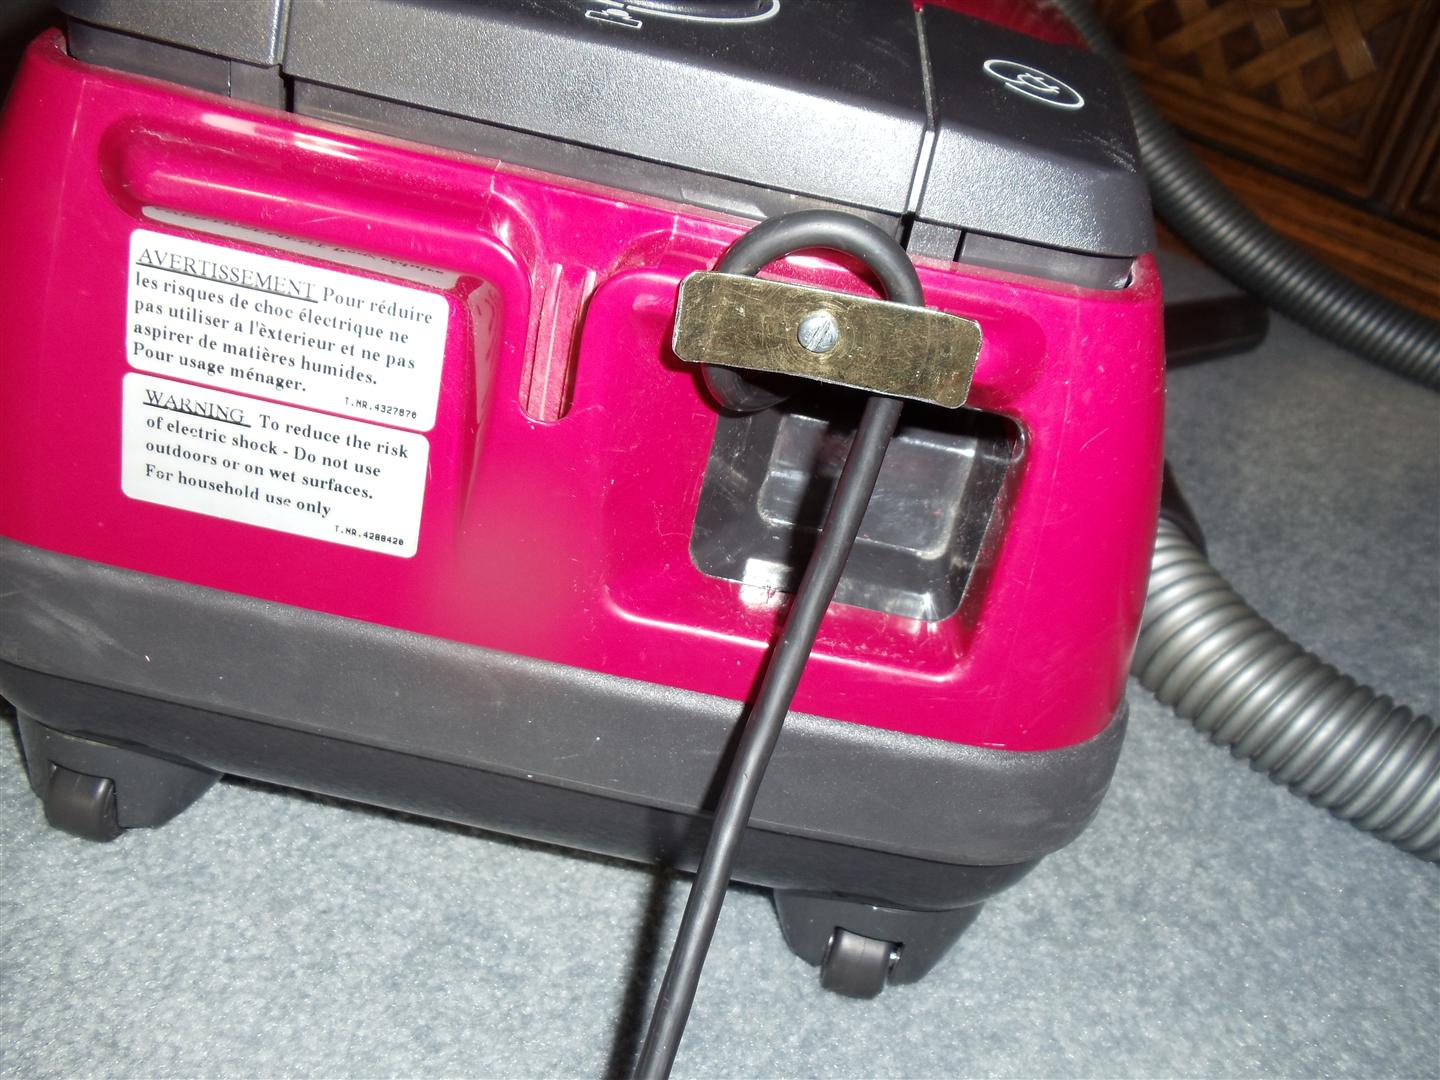
Hope the pictures show what I have done. I just pull cord out all the way & lock with the turn latch as in picture or pull out as much as needed & lock. My winder still works but won't hold in place. I thought on this for months before coming up with this idea. The new winder was like $180.00. Click icons to view.
Jim
Fernando
http://sosx-macnando.blogspot.com/2011/12/my-first-post-repairing-miele-vacuum.html
Believe it or not I purchased a not working Miele Red Star canister from a estate sale for $5! They told me that they had used it that morning but couldn't get it to work for me. So I offered them $5. (They wanted $25 before when it worked which was a steal, they didn't know the true value of this fine brand)
Took it home and then searched the web for help and came across your site. It was a breeze opening up.
After a time testing different wires it turns out all it needed was a $1.99 plug from Home Depot. Clipped off the original one and attached the new one and my $6.99 investment should last me for many years!! What a well made machine.
Going to send you $6.99 and double my investment. :-)
Thank You again.
William
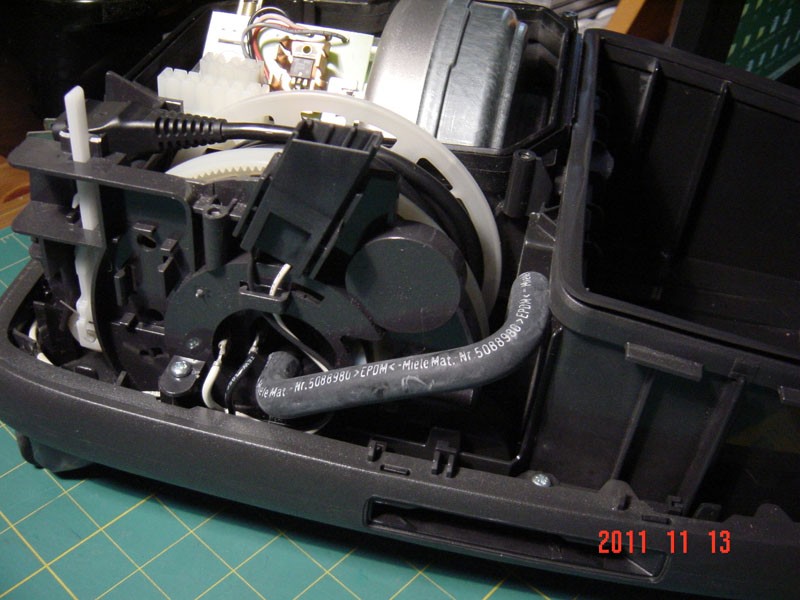
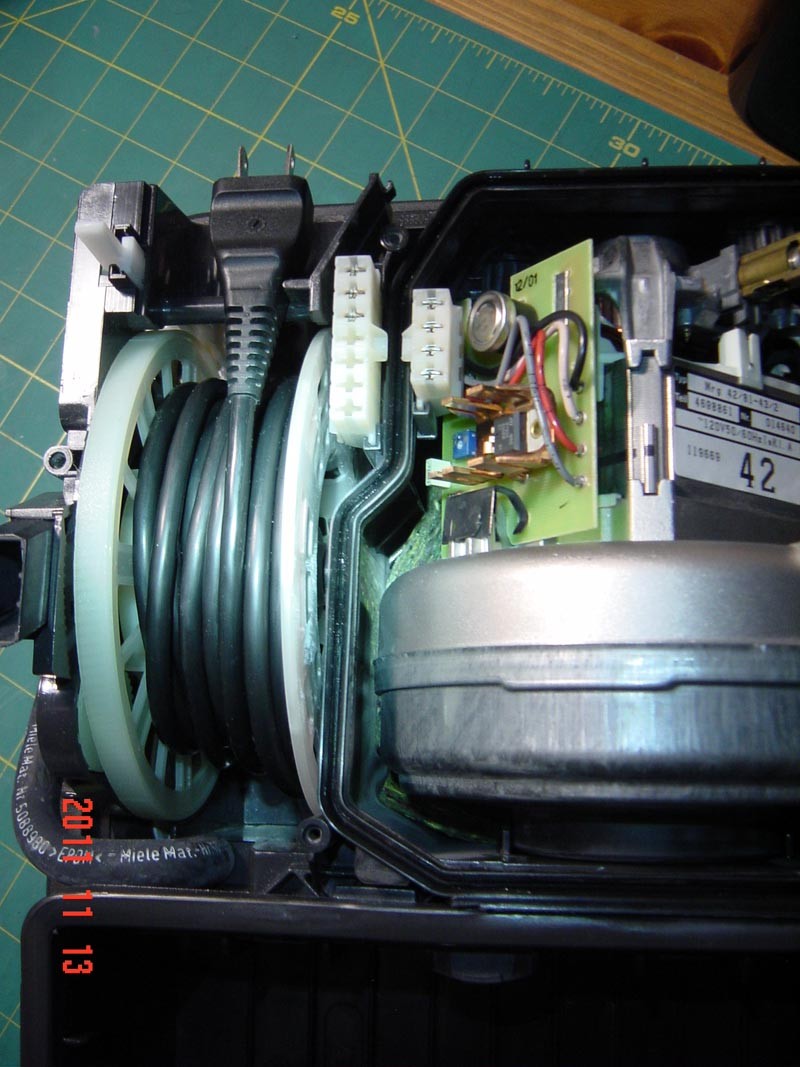
I would like to contribute photographs and some helpful information to your website! I have a Miele S514 Solaris vacuum exactly 10 years! I have NO problems whatsoever with it. However, I like to plan ahead, so I embarked upon an Internet quest to obtain facts and information and a spare motor. This is how I found your web site earlier this year.
I have several sets of photographs showing my S514 disassembled with the various internal parts clearly shown in good lighting. [1] [2] [3] [4] [5] [6] [7] [8] [9] [10] [11] [12]
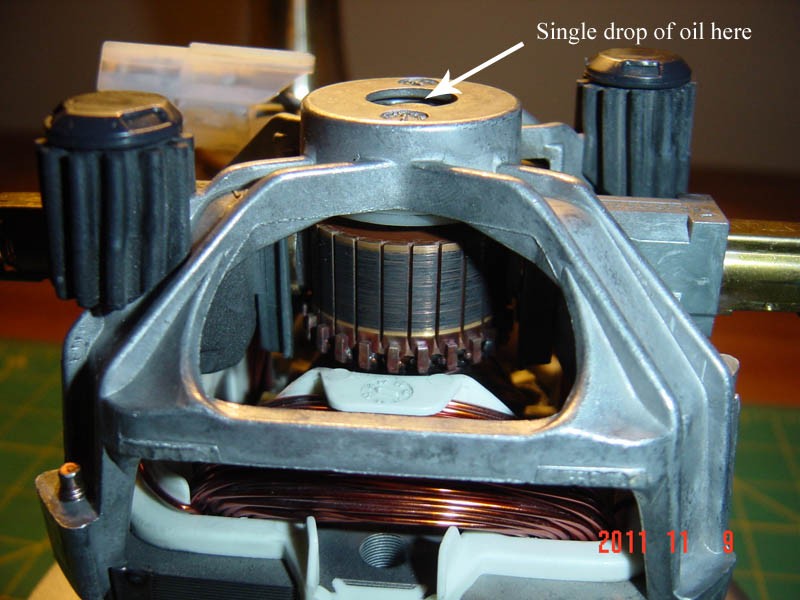
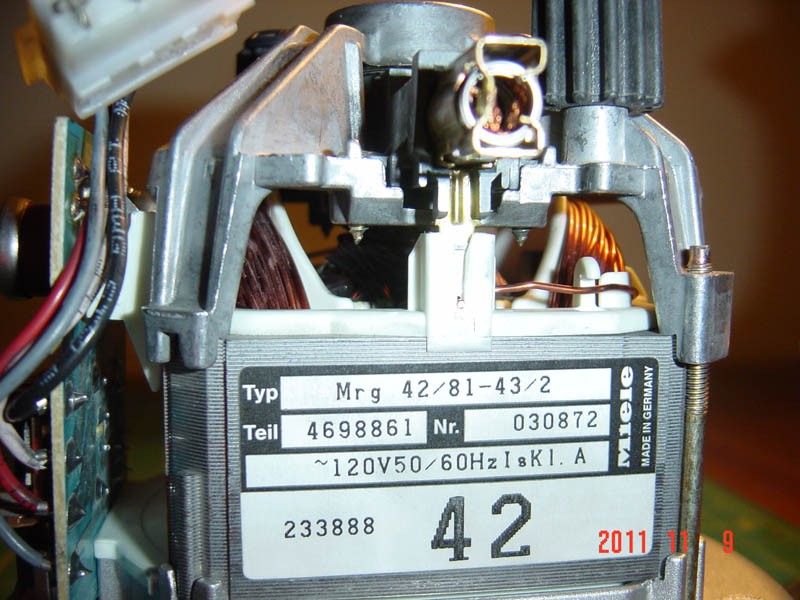
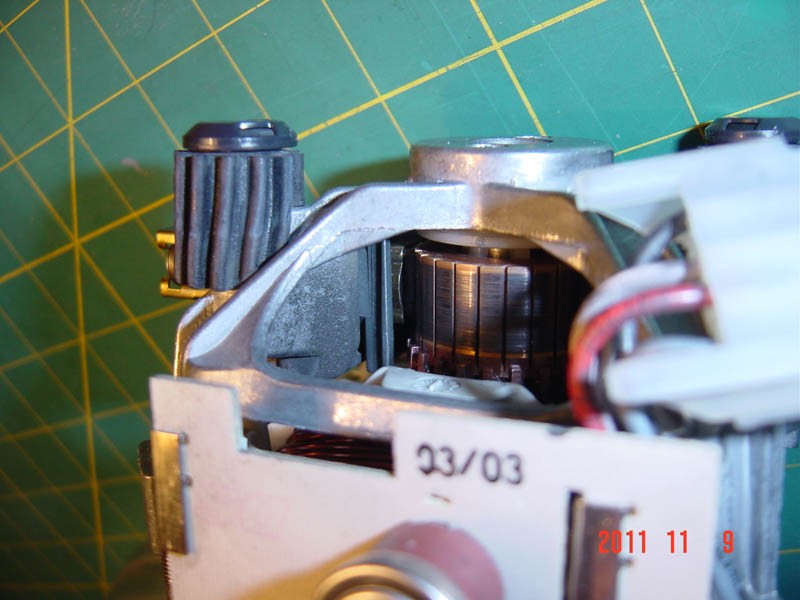
I have a more recent set of images of an old replacement motor I obtained on e-bay (works great and in good condition). [1] [2] [3] [4] [5] [6]
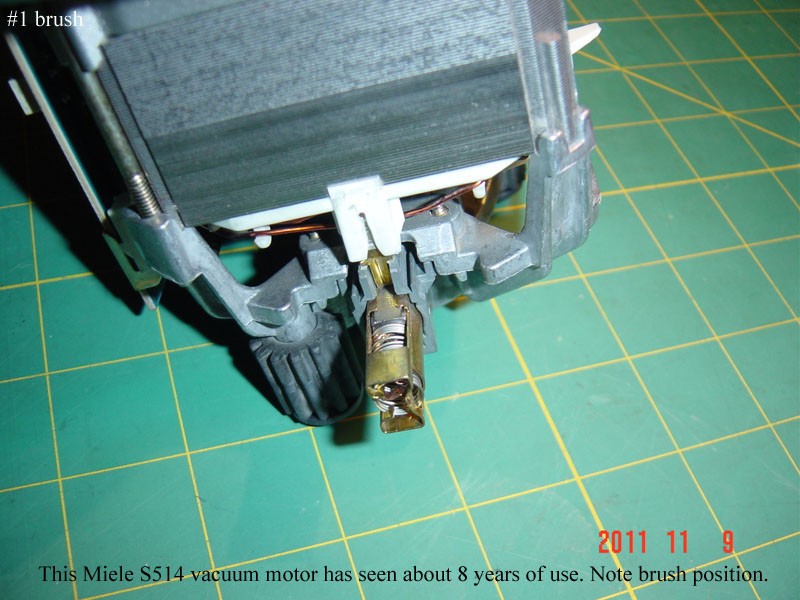
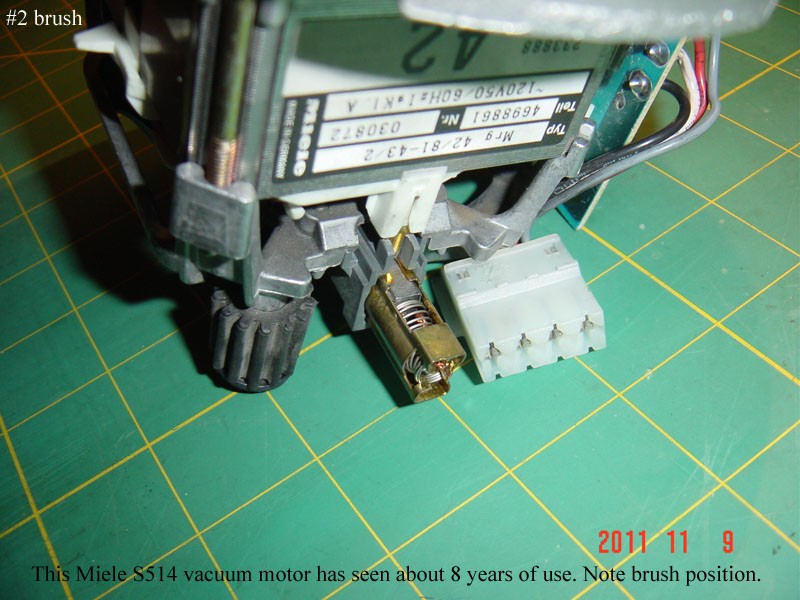
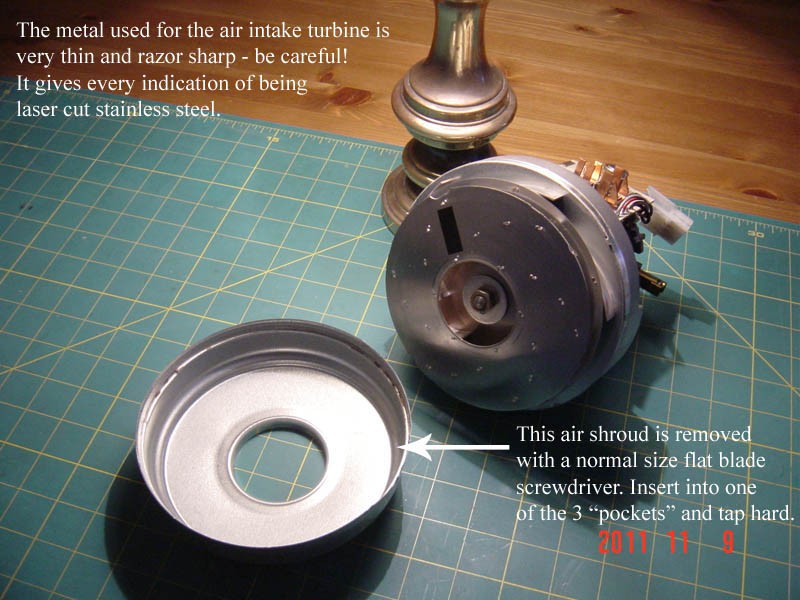
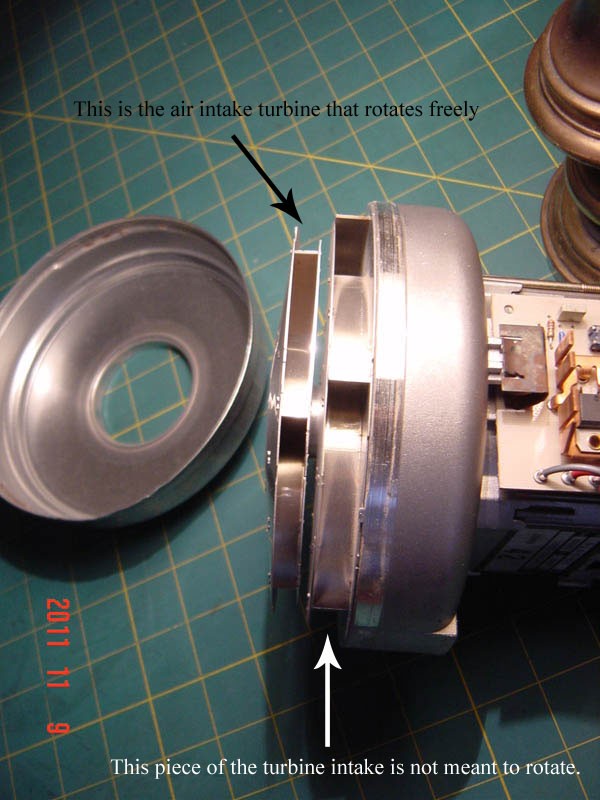
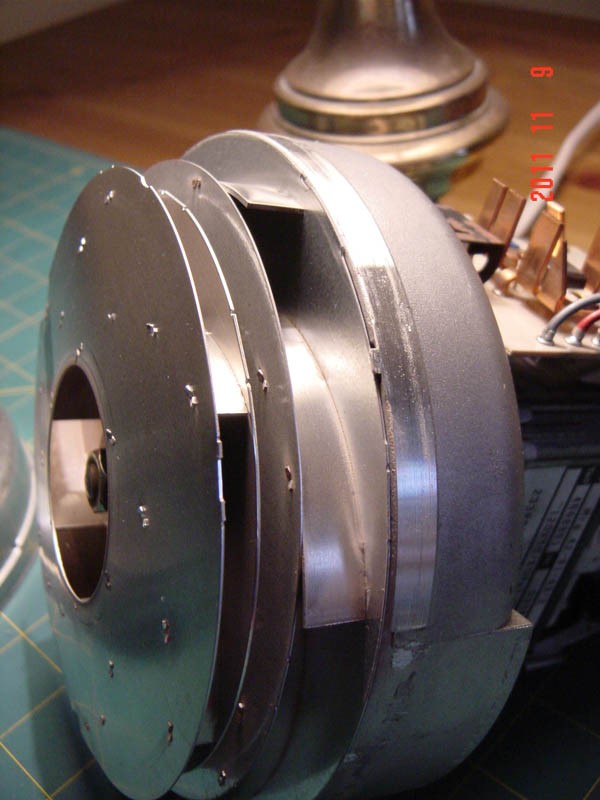
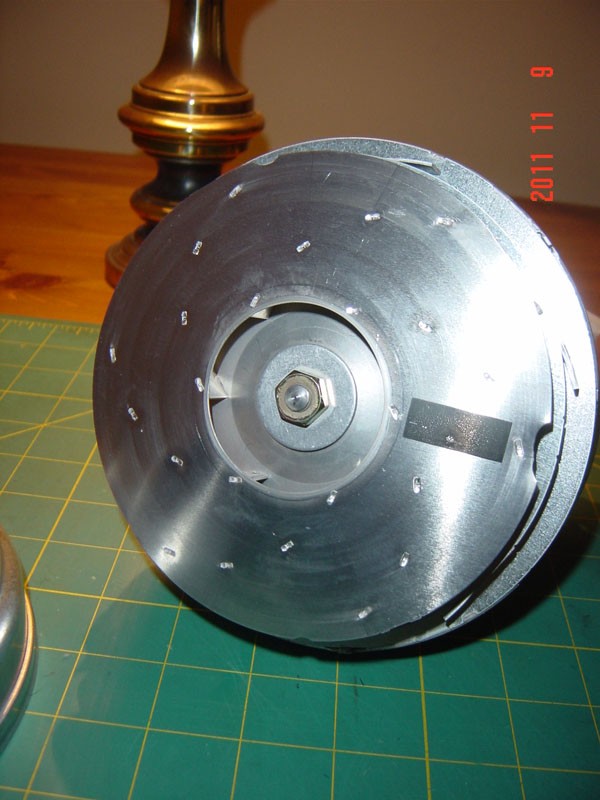
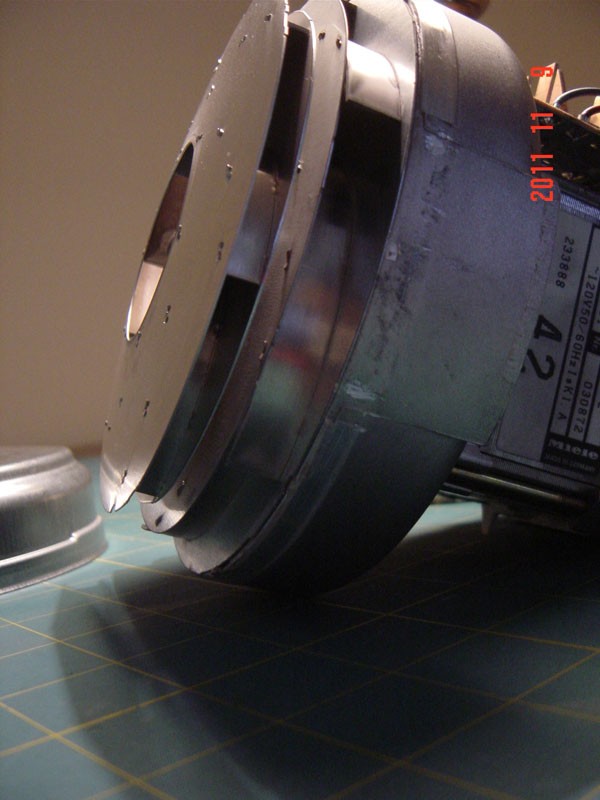
These photographs show close up detailed views of the motors air intake "turbine" with the thin stamped metal shroud removed. [1] [2] [3] [4] [5]
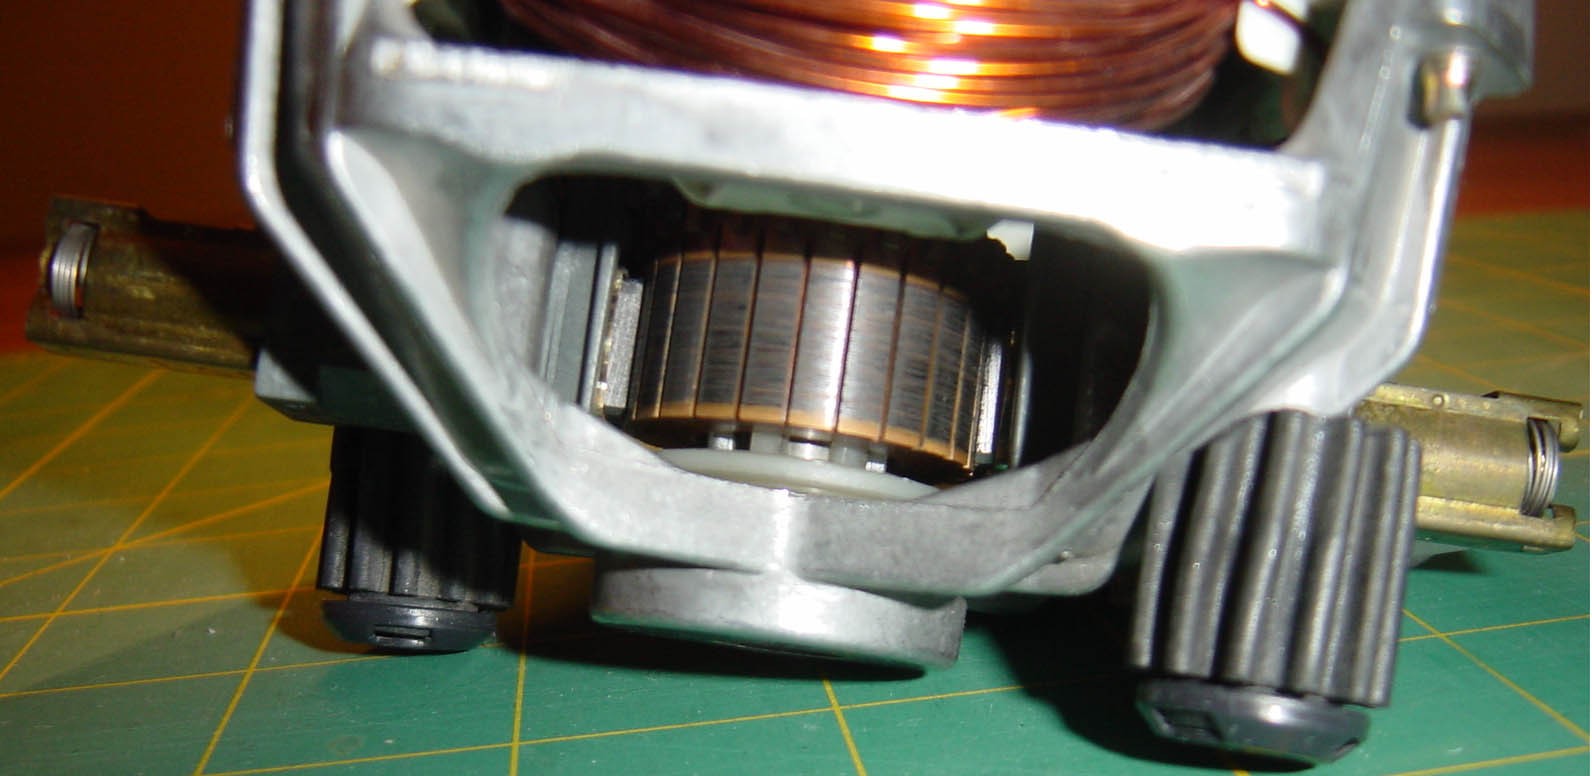
The images also explore the armature assembly, commutator surface and brush assemblies. These images will be able to assist others in determining the condition and level of wear on their Miele vacuum motors. Normal carbon brush position and the amount left in the brass spring loaded holder demonstrate the amount remaining after 9 years of light vacuum operation.
I also wrote a short article discussing possible methods of prolonging the life of the vacuum motor. Some common sense methods people may employ to greatly reduce the stresses on the motor etc.,
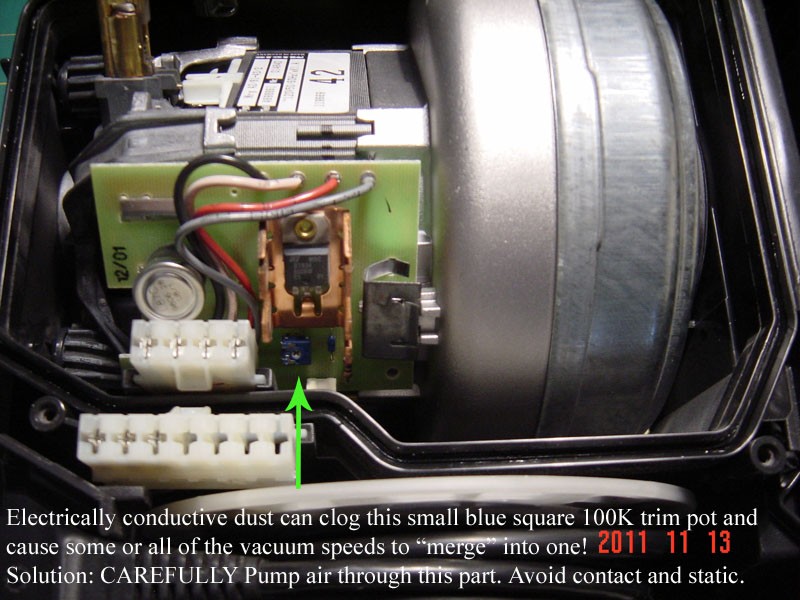
I did have an annoying minor issue with the lowest 3 speeds "merging" into the single 3rd speed setting. In other words, the lowest 2 speeds were the same as the 3rd speed. Then after about a year the 5 lowest speeds merged into the highest speed. Some careful examination and deduction lead me the small on board blue 100K trimmer potentiometer use to adjust the gain to the motor control circuit. I saw that is contained lots of strange gritty reflective dust particles. I flushed them away and the problem was solved. This is another fix that should be able to help people. It must be a fairly common problem.
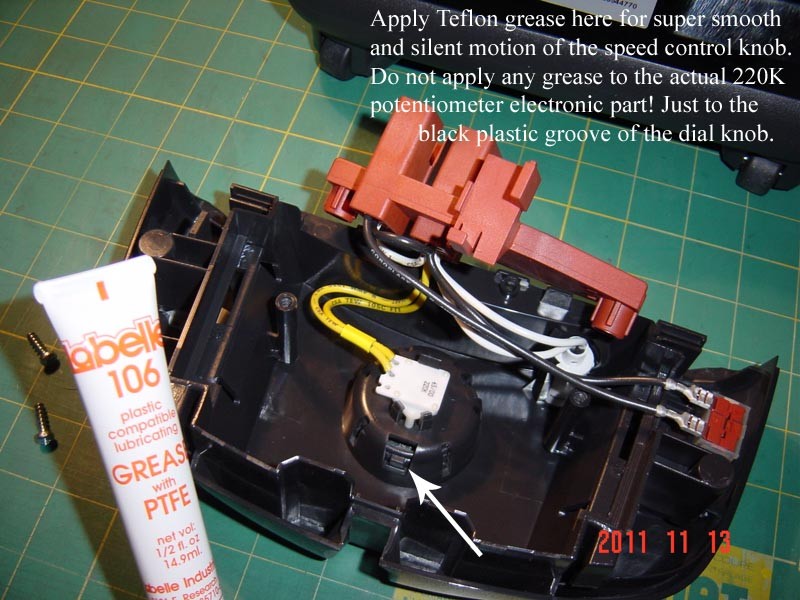
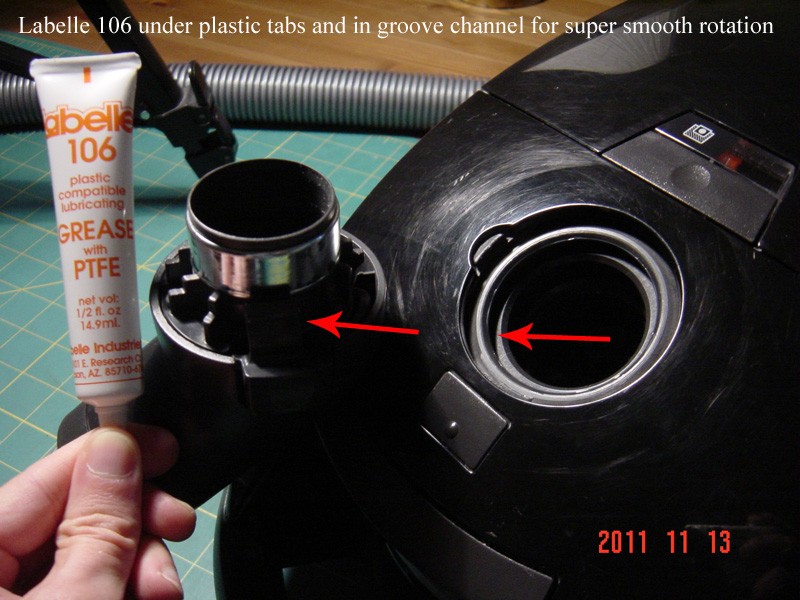
Adding plastic compatible lubricating grease to various squeaky plastic hinges and parts on the vacuum is a great idea too. Better than when it was new! The attachment point for the vacuum hose can benefit immensely from grease.
Yes, little information on the Miele vacuums out there. Well, it's up to use out here in Internet land to solve this deficiency. I have been helped a lot by other people on the Internet with one thing or another. I feel compelled to assist others with obscure items as well now. True, the vacuum shops and repair persons enjoy their monopoly and actively discourage "end users" from performing repairs or diagnostics themselves. (Just like in every other industry and category imaginable.) I'm a Do-It-Yourself person who likes to get in there and tinker with and fix everything myself - and show others how too.
Incidentally, the best way to polish out all those millions of ultra
fine scratches on the smooth shiny ABS plastic of the Miele is..
toothpaste.
It works. Tested it on a small area... will complete the messy job soon.
It works on all smooth hard plastics amazingly well...
Complete restoration!
Thank you for your website on Miele vacuums! It is one of a kind. More
material needs to be made available to further help people! In my
exhaustive Internet searches I came across many messages posted by
desperate Miele vacuum owners who were trying to find information for
problems they were experiencing etc,. I want to help everyone with a
Miele vacuum by providing this information!
Please let me know if you can make use of these images and if I should e-mail them to this same address,
Thank you,
Luke in Vancouver Canada
Can you direct me to the correct repair for this problem?
Thank you for your help.
Sincerely,
Jill
Thank you so much for your help. I took apart the vacuum today and put single side sticky felt with a nylon washer against the inner wall to take away the play of the cord winder. It worked. Thank you so much as I didn't want to pay so much for it to be fixed. I never saw the brushes, but just took the play away.
Thanks again,
Julia
I'm shocked that I was able to do this as I don't usually repair things.
This page was a pleasure to read. Thank you for posting it. It really helped me to dismantle and clean out my dusty old Miele White Star S300.
I want to add one more thing for your amusement: After I read your site, I took the machine apart and got the years of dust out of it. It was pretty late at night and my wife thought I was deranged. Then I couldn't stop talking about how ingeniously simple the machine was. I always wondered why certain people were so fanatical about their particular vacuum. Now I at least understand the Miele obsession.
Again, thanks.
Douglas K.
Mahopac, NY
Susan S.
I am so grateful for your very detailed descriptions & clear photos on fixing the Miele! I have a white star as well, which I bought off of eBay for less than $300 over 10 years ago. I'm glad to say I've only had a problem with the cord a couple times. My puppy chewed through it once, which I had to patch a few times. She only did it once & it was plugged in, but my electrical tape fix wasn't up to par. She's fine. The first couple times the cord would get hot, &/ trip the circuit, the last time I fixed it I soldered the wires and it doesn't get hot anymore.
The only other problem was with the actual prong part of the cord (name?); the head frayed off somehow & I had it replaced by some guy at an electrical store. For some reason he used this big 3 prong thing, but he did a cruddy job actually & it has gotten loose, hot, burnt, sparked. I've used it that way for 3 years anyways, even though I'm relatively handy, but it's time to fix it. So I looked at the photos on your page to see what kind of prong end (2 prongs or 3) but I cannot tell for sure. I think the original cord is a 2 prong, as I don't see a 3rd prong in any of your photos.
Sorry to write so much, but I just really love my vacuum, and am anxious about the accumulation of dog hair on my carpet. If you get this anytime soon & have any advice on whether or not to spend the extra money on a new "proper" oem replacement cord, please do give it to me. For now, I'm going to find something in the tool/paint/misc household material room that I can splice on to use (for now). And I have to go flip the circuit.
Regards
Bridget, Chicago
I have an older Miele that finally got sick. Minnesota is not the state to need repair on them.
Two failed repair shops later and almost two months without "little red" and I found your website and Know I can fix this myself. Similar problem with on/ off switch
Thanks!
Susan G.
Our problem was intermittent power through the cord winder. Result, cleaned up brushes and it's a bit better. The winder spring isn't under much tension when the cord is "in" but it is a bit fussy to get back together. The end of the spring slips into a slot on the reel and must be set just right in order to lock in place. The bigger problem is cleaning up the brushes, which are four copper metal fingers holding silver (color anyway) contacts down on the metal rings fixed inside the reel (connected to wire clips on the outside). There are two fingers for each pole, holding the contacts down with appropriate pressure in each direction as the reel spins in and out. I cleaned up the rings and contacts (and lightly sandpapered them) and gently pulled out a little on the fingers to increase the amount of pressure against the rings for better contact.
Miele makes well designed and built vacuums. However, it is obnoxious that they do not make parts diagrams readily available. Some repairperson could do a great service to scan and post them.
tt
Seattle
Where can I buy a motor to install myself?
I was amused by the vacuum shops' recommendation that our cord and cord winder be replaced. My husband had recently replaced the broken Miele plug with one from an older, but similar voltage/polarity device. It works with no issues, but the Miele guys were disturbed that the new plug was not official 'Miele' and wanted to replace the whole cord winder, with new official Miele cord and plug for "around 109.00."
Thing is, we replaced ours because the wires inside had broken and power was intermittent�and had become much weaker. After we put the new "old' part on, the White Star powered around our house, vacuuming like a new machine again! So if you can direct us to where to buy a replacement motor for our White Star Miele, we will be forever grateful.
Emily V.
Portland, Oregon
Rob
[Ha ha ha sorry Rob, I can't help you with that! -- Jim Sannerud]
it was just a dry joint on the cut out unit. I re soldered it and it all came back to life. this happens when the motor overheats when it is choked in the collecting bag and when using non-standard collecting bag so the thermostat/cut out unit gets hot and the solder melts and gives a bad joint. it is straightforward to re solder back to board. this board is mounted on the back of the motor by one screw and one plug in connector. Mine is a Miele S726 newer than yours but come apart the same way. this cutout/thermostat is a safety device and it reset itself after it gets hot and cut out the motor so normally it should be ok but prolonged use it gets hot and give a bad joint and malfunction.
hope this is useful to you or someone else
( WARNING to test this thermostat you could link it out to test, if it is faulty Please you need to understand a bit of electronics ).
Keith
Congratulations on your excellent site. Browsing the Net there is a common fault but few replies - the vacuum cleaner will not start, or sometimes not switch off.
I have a Miele canister Cat'n'Dog 700 which has this intermittent fault. Its been repaired twice but not permanently. So today following your guide I detached the switch console from the rear of the machine. After experimenting and observing I found the on/off switch sometimes sticks, but more importantly, the switch block moves away from the pedal slightly. Then the switch can't be activated unless it moves back into place - which happens. Thus a puzzling and intermittent problem.
My solution is to tape a small piece of cardboard 6mm (1/4 inch) thick over the bottom of the switch block resulting in it being held in place by pressure from the body of the machine. Its impossible to see if this works - there may be more than 6mm clearance but its effective so far.
I'm happy to share this small idea because it is a simple but irritating problem.
After finding your site (which incidentally came up first in Google!) I then searched for " Miele vacuum won't start" "faulty switch" etc and seemed to get a number of hits. Could still be a rare fault.
My fix isn't quite as definitive as I thought, the darned machine switches on most times but not always. A little thump seems to help but that isn't exactly ideal. I might persevere and see what else can be done. A dab of hot plastic glue on the tip of probe which pushes the electric switch would slightly lengthen it, and give a closer contact.
Anyway the more information we can share on the net the better off everyone is. I was particularly annoyed about the problem because the Miele is the best vacuum cleaner we have ever had. We now have two. Also we have twice paid for it to be repaired without success. To be fair intermittent problems are the worst in anything.
Cheers
Winston F.
Finding the motor online was confusing until I learned that AL adds 11 as first 2 digits to the number on the motor as their catalog number. I found the motor listed as "in stock" at a online website, but for 3 weeks their communication was non existent once I got an auto reply to my initial order, and I canceled 3 weeks later when I found out from AL that Grainger was a distributor. Grainger did say 2 weeks lead time for the motor, but it arrived in about 7 days. Perfect replacement except I had to butt splice old connector wire since I didn't feel like searching electrical departments for right size connectors once I had the motor and my wife had been tearing her hair out in frustration with nothing but an old vacuum for 4+ weeks.
Your tip on not removing the bumper saved me time.
Thanks again,
Paul J.
Baldwin, MD
Sarah T
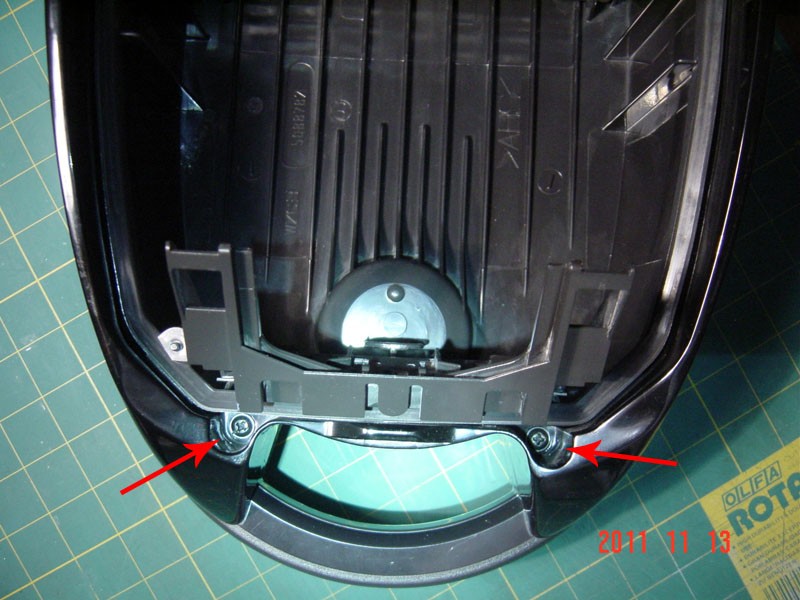
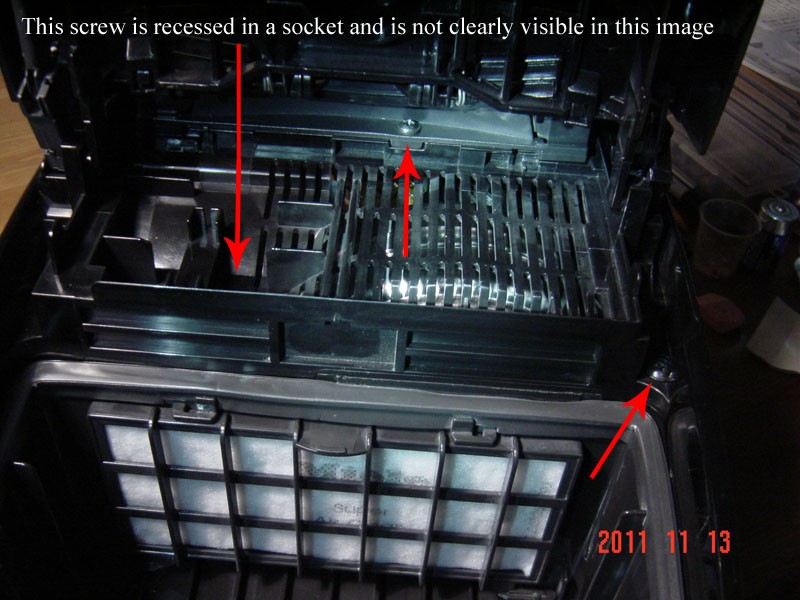
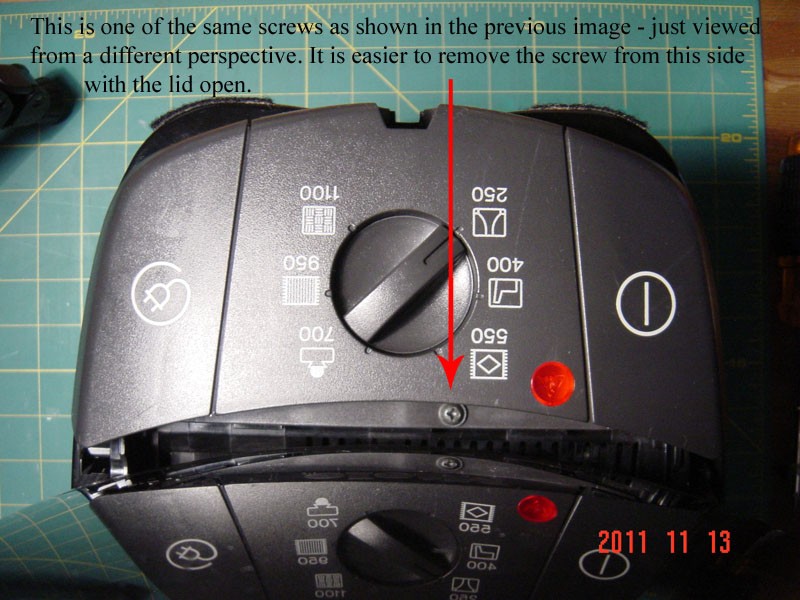
I have a Flamenco II which I bought in 2002. It quit running and here's how I learned to disassemble it.
1. First, make sure the machine is unplugged.
2. Gently pry the two black plastic lid hinges until the lid pops
free -- be careful not to lose the small spring which seats on one of
the hinges.
3. Remove the two black screws at the front corners with a Phillips
head.
4. Remove the two small silver screws that secure the switch and
recoil housing -- keep the two small springs with them. This will
expose the switch which can be lifted off its housing.
5. To expose the motor housing and recoil wheel, remove the deeply
recessed black screw that is between the two silver screw holes.
Motor housing can then be lifted off.
Your page seems to be about the only such guidance on the entire internet.
Having been disappointed by what I would term Miele�s �promise much, but don�t deliver much� customer care and �valet service� for minor cleaner repairs I thought I�d have a go at taking my 9 or 10 year old S556 Revolution 500 apart.
Seems to follow similar principles to yours but when I get to the bit about �Here it is, belly up. Nothing is holding it together at this point, so just lift the entire base (the big black part) off and set it aside. It is not necessary to remove the rubber bumper that goes all the way around the outside of the base� I find that with mine there IS something holding it together and I cannot fathom what. Guess its some internal spring clips or something within the design of the plastic moulding, for which certain pressure points must be known about to pop it open.
Just wondered if others had contacted you and you might either know an answer or be able to point me in the right direction? I think the models are known by different names over here in the UK to what you have.
Andrew T.
Best,
Thomas
power cord was dead, your post helped with the disassembly; I enjoy keeping high quality German products going forever, seems to me the way of the future. Bought it in �99, figure it�s got another 10 years in it at least.
Thanks again.
Joe N
Thank you,
Lydia C.
Have you ever changed the carbon brushes ? I used to do this with my scalectic cars, easy as long as you respect residual current. I have my S571 vac motor out but can't figure how to open the case to change the brushes
Hope you can help
Cheers,
Carl
PS Found the answer on a related website that has credited you with inspiration http://www.asciimation.co.nz/bb/2009/12/29/tearing-apart-my-miele-s5210-vacuum-cleaner
thanks anyway and I love your work (but no donation as yet)
I can only wish I had found your site 2 years ago when a friend had the same cord problem with her Miele S548 vacuum. I wish I had taken pics then and had the for-site to upload them to held others. That said, do you have any idea where I might find the small circuit board that mounts to the motor of the S548. The power rectifier is fried but the motor appears good. Thank you in advance for any direction you can point me in. If I am successful in the second repair I will give you the pics to post.
Irv S
Hi Jim
497-2426-5-ND TRIAC 600V 25A TO-220AB
497-2426-5-ND TRIAC 600V 25A TO-220AB
I did a little research about the chip and found they use it on most of their vacuums. If this chip fails there is no current to the motor whatsoever, I believe it's part of the speed control circuitry. It looks like a typical three leg voltage rectifier chip, the center leg is cut and not used.
The chip is made by ST and is a MRC BTB24 600BW. It can be ordered through Digi Key Corp. online, www.DigiKey.com their part number is: 497-2426-5-ND their description is TRIAC 600V 25A TO-220AB current unit cost $1.99 handling and shipping by first-class mail is about $4 so for under $10 I ordered two and saved my friend several hundred dollars.
If you feel this information might help others, feel free to post and edit as you like.
Keep up the good work,
doc
Anyway, before I take it apart I was wondering if you think I would need any parts first. My cord is completely out of the vacuum. If I press the re-wind button nothing happens. If I press the button the cord might go in an inch or less. If I do need parts could you tell me where to get them as our local place has closed down?
Also, what do you think of the replacement bags, the envirocare bags?
I purchased the machine in 1995. It�s a S248I.
Thanks for any advice, appreciate.
Jim
First, some descriptions: The assembly consists of a take-up reel that contains the majority of the spring and two shafts - one for the cord reel and the other for a small spoked wheel. The spoked wheel simply serves to support the cord reel as it turns. The cord reel has some internal spring clips that make electrical contact to some rings on the assembly at the base of the cord reel shaft. This is the part that was making intermittent contact once the tabs broke. The end of the spring from the take-up reel slips into a groove in the cord reel and it is very easy for the spring end to come out of the groove when putting it back together.
So here are my instructions, assuming you have the cord reel and the spoked wheel off of the assembly: Take up the entire spring onto the take-up reel. Now unwind about 6" of it (anymore and it gets difficult to handle). Keeping a grip on the take-up reel so no more spring comes out, slip the spring end onto the groove on the cord reel . No doubt at this point the spring is twisted up - that's OK. Ultimately what has to happen next is this: the cord reel has to slide back onto the center shaft of the assembly in such a way that the spring is not twisted, and the spoked wheel has to slide onto its shaft. In doing this, you'll need to make sure that the end of the spring stays in the groove on the cord reel (this may take some awkward positioning and some trail and error so don't be discouraged). Don't get distracted by the odd bend in the spring near the end, that is supposed to be there. Just make sure the spring isn't twisted, as that will prevent it from winding onto the cord reel properly. Once this is done, you're almost there.
This is the part that took so much trial and error. At this point, I pulled the cord out about 6 feet and tried to retract it. It retracted about a foot or 2, but then the spring got dislodged from the cord reel and I was back to the beginning again. At first I keep thinking I must have let the end in the groove get out while I was sliding the cord reel on the assembly. I kept being more and more careful but nothing changed, time and time again. Here's the deal - the part of the cord reel where the groove is located is where the spring winds around the cord reel when you pull the cord out. If you look at the shape of the plastic piece with the shaft that the cord reel slides onto, there is some small amount of clearance (about 1/4") around the area where the spring winds around. This is designed to allow enough space for spring when you pull the cord all the way out. However, when there is only a little bit of cord on the reel, there is another problem. Once the tension is taken off of the cord (during retract), the spring has plenty of room to move and nothing really forcing it back onto the take-up reel, and this is what I kept experiencing. OK, lots of exposition, HERE IS THE SOLUTION! Once the cord reel is on the shaft, pull the cord out about 6'-8'. As before, some of the spring will wind onto the reel. Now, keeping the reel where it is, pull the cord back through and manually wind it back onto the reel. It's THAT SIMPLE! What you are doing here is filling the clearance in enough to minimize the expansion of the spring when the tension is released and this will keep the end of the spring in the groove.
So there's the part I wanted to contribute, certainly doable but you may need some patience. I hope my descriptions are adequate. Just keep in mind the money you are saving yourself.
For those that are interested, or may be looking to do something similar, I had one other problem to resolve. With the tabs broken off the reel, I had to find a way for it to make good electrical contact with the base of the assembly. Luckily, the shaft that the cord reel slides onto is several inches longer than the cord reel is, which gave me room for my solution - slide a c-clip onto the shaft to retain the reel the same way the tabs did. I used my Dremel tool to cut a slot around the shaft so the c-clip of the right size would fit. I also put a plain washer in between the cord reel surface and the c-clip to ensure the reel didn't get torn up over time.
If you're wondering, it's been several months since this repair and the Miele is as good as new, not a single problem.
thank you so much!
sue
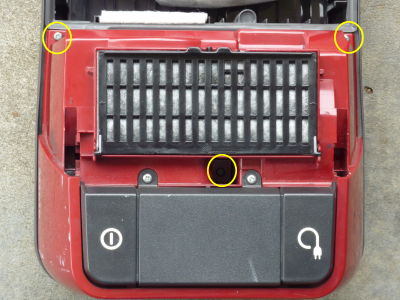
Your Miele page got me started but my Flamenco turns out to be a rather different beast. Attached are some photos that show how to open the Flamenco and possibly similar models. Additionally, I show how I repaired the friction roller on the cord reel - a fix that probably applies to many models. You are welcome to post the photos and instructions on your site.
The top of the Flamenco must be removed to expose the third of the three case screws you will have to remove. To remove the top, open the vacuum as if to replace the filter bag. The whole lid assembly attaches via hinges that are simply pressed down into the main case. Gently pry vertically upward on each side to remove the lid (see topremoval.jpg).
Next unscrew the three case screws (circled in casescrews.jpg) and you can open the vacuum.
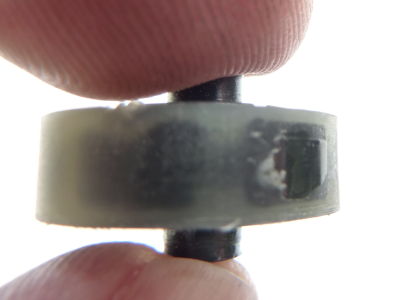
I discovered that there is a small friction wheel that fits between a wedge and the outer edge of the cord reel. This prevents the cord reel from rewinding until the button has been pressed. This wheel is hard plastic with a rubbery coating. The coating had rubbed off in one spot so whenever that slick spot was next to the reel, the cord reel would slip and the cord would not stay extended (see slickwheel.jpg).
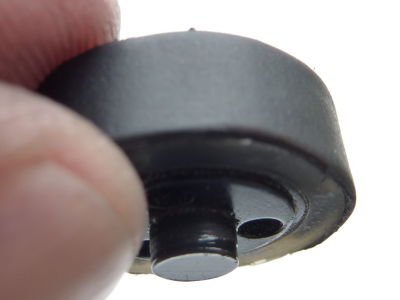
I carefully pried the wheel loose from its plastic holder, got some heat-shrink tubing slightly larger than the wheel from my toolbox, and shrunk a small piece of it around the wheel. I then then trimmed the excess heat-shrink at the edges of the wheel (fixedwheel.jpg). I used plain heat-shrink and it has worked fine so-far but if the tubing ever slides off I will redo the repair using adhesive-lined heat-shrink (available at marine-supply stores if your hardware store doesn't have it). After applying and trimming the heat-shrink, snap the wheel back into its holder (replacedwheel.jpg).
Finally, reassemble the vacuum by reversing the above steps. Sliding the lid-hinge tabs back into place may require firm but careful pressure but is not difficult. I'm pleased to say that following this repair, the cord-reel has been working like new.
Cheers,
Steve C.
We have a Miele S538 Monte Verde and it started to have intermittent power problems when extending the cord after about 6 years. In our case it turned out to be the contacts in the recoil assembly.
I removed the recoil assembly from the case (it just lifts out) removed the cord drum from the assembly, sprung out the copper contact arms slightly and also made a plastic washer (14 mm hole, 20 mm diameter, 3mm thick) that goes on the outside of the recoil shaft and provides more preloading on the contacts when the assembly is installed.
Unlike your version our model has only one screw holding the control panel. I couldn't figure out how to get it off because the two molded plastic clips at the rear are tucked up underneath. One website said to just lift the control panel from the front until you hear a crunch and it will come off. That seems to be what you do but be prepared to catch it when it comes off.
Thanks again for your help.
Regards
Larry
Thanks for sharing your experiences with Miele vacuum cleaner repair and providing an opportunity for others to share, as well.
I just recently experienced an intermittent electrical connection and seemed more frequent when cord was fully unwound. I found I was pressing the cord wind button more than the power button to get the vacuum to work :o) Anyway, here are the steps I used to resolve my connection problem.
Model: Red Star 312i
Root cause: - electrical connectors (in white cord wheel) no longer had sufficient tension against connectors (in black component). Probably just from component loosening up as it ages.
Resolution: - bend electrical connectors outward (in white cord wheel) so they have sufficient tension
Procedure:
1) disassemble vacuum (I did it before I saw your page, but found your page in the middle of my efforts and used your tip for removing the lid.) so that cord winder component is accessible.
2) remove single screw that secures cord winder component
3) unplug plastic connector (release the small clip on the side of connecter)
4) slowly remove cord winder component from vacuum housing
5) ensure cord is fully wound (this leaves spring wheel fully retracted and, therefore, without tension against the white cord wheel
6) disconnect the spring from the white cord wheel (line up the white cord wheel so that the spring attachment location shows through opening in the black component and remove spring with needle-nose
pliers)
7) remove white cord wheel from black component (pull white wheel up from black component with it horizontal. Careful, there is a little white guide wheel that may fall out of the black component if you do not have black component horizontal.)
8) carefully bend copper connectors outward approximately 1/8th inch
9) also check all 4 metal clips (attaching black and white wires to electrical connectors) to ensure they have tight fit
10) that's it.. follow instructions in reverse to once again enjoy the consistent purr of your
Miele friend ;o)
Here's a tip on fixing the problem where the machine won't turn on because of a fault in the cord winder.
I assume that the cord winder maintains electrical contact when rotating, similar to an electric motor, by means of a commutator and carbon brushes. In my machine one of the brushes wasn't making contact with the commutator anymore. The white plastic wheel that spools up the electric cord rotates around a black plastic axle and, in my unit, also has some lateral movement along the length of the axle. I found that if I pushed the wheel toward the outside of vacuum that the out-of-contact brush now had contact with the commutator. When I let go, it returned to its out-of-contact position. But how to keep it moved so there is good contact?
I took 2 small tie wraps (those plastic strips with the grooves that securely tie wires up--http://www.tiewraps.com/tiewrappage.html) and tied them around the end of the axle closest to the motor. The wheel now rests against the tie wraps and is kept far enough toward the outside of the vacuum that the brushes stay in contact with the commutator.
Problem solved.
... jeff
I just replaced the cord winder on my Bahama Blue Miele using your instructions. A few changes and updates:
This is a newer unit than yours, and it seems Miele has now shifted from Phillips head screws to Torx. To do the basic disassembly as you have described, you need a #T20 Torx driver. If you get into some of the smaller parts, like the switches, you need a #T10 Torx. I strongly recommend that anyone starting out on such a repair on a machine that uses Torx screws, just go out and get these two drivers (not just the Torx bits). They are inexpensive and will save you lots of trouble.
The filter is not screwed in, but just snaps out now.
I determined, with a continuity tester, that I needed to replace my cord. Of course I would have liked to replace just the cord, like Georgia B. However, I followed her instructions ( I thought) and zip- tied the two halves of the white plastic cord reel together. But I got the dreaded spring explosion anyway. This happened when separating the white reel from the black winder body. The spring is captured within the black body piece next to the white reel. Perhaps I should have zipped the reel to the black side piece, then tried to remove the cord. But in any event, I felt that $115 for the winder assembly was worth it in order to complete the job without endless hassle. Once I had the part, ordered from Vacuums 24x7, putting it back together was relatively easy. I do note that the reel assembly is marked with something like, "Complete assembly only" implying that it is replaced whole, not disassembled. I can see why.
Note on ordering the part: It came in a reasonable amount of time and everything, but I couldn't get a status on the shipment at all. The tracking function at the site never worked, and I even emailed them. I got a shipping confirmation on the same day that it arrived at my doorstep. So there it is. Thanks again, and if I need to do anything else on the machine in the future, I'll be confident.
Steve A.
My Miele Solaris Electro Plus would not power up. I took it apart and discovered power wasn�t getting from the electrical plug to the two prongs on the side of the cable reel. I could wiggle the cable reel around a little and would get power intermittently. Basically, the problem was that the cable reel assembly had gotten to where it would allow too much side-to-side movement, causing the contacts to lose contact.
The fix: I simply took up some of the slack by putting washers on one side of the black plastic shaft which runs through the center of the reel. I cut the bottom out of two plastic cups (the kind you get with a large drink at fast food places). This gave me two flat, plastic pieces which I could make into washers. I then drilled a hole through the center of the two �washers.� As the 3/8� hole wasn�t large enough to fit over the shaft, I simply took my Dremel tool out, put on the small cylindrical sandpaper attachment, and used that to enlarge the holes to enable them to fit over the shaft.
I then reassembled everything, complete with handcrafted washers. My Miele now works like new and I saved the price of a new cable reel, approximately $100.
Caution: Don�t let the reel assembly come apart or you�ll have a heck of a mess trying to get the spring rewound properly so the cable reel will work. Mine came apart and I didn�t take the time to rewind it. No problem. I just simply coil the cord up when I�m finished using it. Not a big deal.
William H.
Leesburg, GA.
The model I have 248i comes apart differently, if you want to add this to your page it would be nice since I did not find anything else re: 248i
1. remove two screws under main cover
2. remove accessory door by pulling gently at 90 degrees to main body
3. remove felt strip under hinge of accessory door
4. remove the two screws you see that were hidden by the felt strip
Thanks again
Kirk
thanks for your page on stripping down the Miele vacuum cleaner. I buggered mine vacuuming up sanding dust after filling and sanding a car so I had to strip it down to clean the motor brushes. Even though mine is a different model (a S5210) I figured it would be similar and your page encouraged me to write up my own tear down.
That is available here: http://www.asciimation.co.nz/bb/2009/12/29/tearing-apart-my-miele-s5210-vacuum-cleaner
They are beautifully made machines and I am pleased to say after stripping mine down, cleaning and reassembling it is all working properly again.
Thanks!
Simon
Jerome
I saw that many people said the spring would pop out so I studied the winder and if you continue to let it rewind after the unit is out it will come to the end of the spring and the spring will stay in the little self-contained reel attached to the case. You can then take the white reel with the cord in it out and you will see copper springs with contacts on them, clean and sand these contacts and the metal plates they ride on and, with your finger rebend upwards to get good contact and put everything back together. maybe a little elec grade grease on each.
Don't forget to slip the spring back in the slot in the white spool and rewind a few turns before mounting back in the unit. I have the s314 I but I think all the units are similar.
This is easy to do and best of all it will fix the problem for free!!!
R. Anderson
Thanks very much for taking the time to post these pictures and guide. I used them to repair a similar model. On mine, the cord winder was only providing power intermittently depending on how far out the cord was pulled. It turned out to be too much grease had worked its way onto the metal tabs and circles that make the turnable electrical contact between the white spool and the black plastic housing with the "axle".
One item to add about dealing with the spring. If you let the cord wind up one extra turn or two, as if it would be going further into the machine, the spring loses all its tension. From there, you can look and see where the spring attaches to the hub of the white spool and turn the spool a little further and disconnect it easily, again with no tension. From there, you can just lift the spool off and the spring remains on the smaller spring spool. In my case, I just had to clean up the excess grease with a Q-tip, and I was back in business.
When putting it back together, I reconnected the spring to the white spool, and gave it one turn to add some tension to the spring before putting it back in the vacuum. For folks repairing or replacing their cord, I thus recommend disarming the spring by fully winding the cord onto the spool, and then turning it a an extra time or two. After that, you can just lift spool out and unwind the cord by hand.
Thanks again for this great site!
cheers,
Tim
| Home |